

2
Copyright © 2022 by KNIME Press
All rights reserved. This publication is protected by copyright, and permission must be obtained from the publisher prior to any prohibited reproduction, storage in a retrieval system, or
transmission in any form or by any means, electronic, mechanical, photocopying, recording or likewise.
This book has been updated for KNIME 4.6.
For information regarding permissions and sales, write to:
KNIME Press
Talacker 50
8001 Zurich
Switzerland
3
Table of Contents
General Usage ............................................................................................................................................................................................................................................. 5
Spreadsheets Workflows and Nodes ..................................................................................................................................................................................................... 6
Folders Workspace .................................................................................................................................................................................................................................... 7
The KNIME Workbench ................................................................................................................................................................................................................................................ 8
Building a KNIME Workflow ......................................................................................................................................................................................................................................... 9
Display Data Table ...................................................................................................................................................................................................................................................... 10
Input/Output .............................................................................................................................................................................................................................................. 11
Opening an Excel File Excel Reader Node .................................................................................................................................................................................................. 12
Opening a CSV or txt File CSV Reader Node ...................................................................................................................................................................................... 13
Importing Content from Multiple Files of the same Type to a Single Table ........................................................................................................................................................... 14
Importing Content from Multiple Sheets into a Single Table ................................................................................................................................................................................... 15
Saving an Excel File Excel Writer Node ...................................................................................................................................................................................................... 16
Adding a Sheet to an Excel File Excel Writer Node ...................................................................................................................................................................................... 17
Updating Cells in an Existing Excel Sheet Excel Cell Updater Node ........................................................................................................................................................... 18
Data Types in Excel Data Types in KNIME ................................................................................................................................................................................................. 19
Connect to a Database Database Connector Nodes ......................................................................................................................................................................... 20
Tips on Reading Data with KNIME Analytics Platform ............................................................................................................................................................................................. 21
Appending / Joining Data .......................................................................................................................................................................................................................... 22
Appending Data Concatenate Node ......................................................................................................................................................................................................... 23
VLOOKUP Filter and Joiner Node ............................................................................................................................................................................................................ 24
Filtering and Transformations ................................................................................................................................................................................................................... 25
Filtering / Removing Rows with a Specific Value Row Filter ......................................................................................................................................................................... 26
4
Filtering / Removing Rows with Different Values Rule-based Row Filter ..................................................................................................................................................... 27
Removing Duplicates Duplicate Row Filter ......................................................................................................................................................................................... 28
Sorting Rows by Multiple Key Columns Sorter Node ................................................................................................................................................................................... 29
Removing Columns Column Filter Node .................................................................................................................................................................................................... 30
Reordering and Renaming Columns Column Resorter and Column Rename Node................................................................................................................................... 31
Changing Data Types String to Number and Number to String ................................................................................................................................................................ 32
Tip on Data Manipulation with KNIME Analytics Platform ...................................................................................................................................................................................... 33
Data Aggregation ...................................................................................................................................................................................................................................... 34
Pivot Tables Pivoting Node ...................................................................................................................................................................................................................... 35
Pivot Table without Columns GroupBy Node .............................................................................................................................................................................................. 36
Unpivot Unpivoting Node ......................................................................................................................................................................................................................... 37
Math Functions and Text Functions ........................................................................................................................................................................................................... 38
Math Functions Math Formula Node ....................................................................................................................................................................................................... 39
Math Functions Math Formula Node ....................................................................................................................................................................................................... 40
Concatenation and Find& Replace String Manipulation Node ........................................................................................................................................................... 41
Formatting Excel Tables ............................................................................................................................................................................................................................ 42
Creating an XLS Control Table with Tag Values ....................................................................................................................................................................................................... 45
Adding Formatting Actions based on Tag Values .................................................................................................................................................................................................... 49

5
General Usage
6
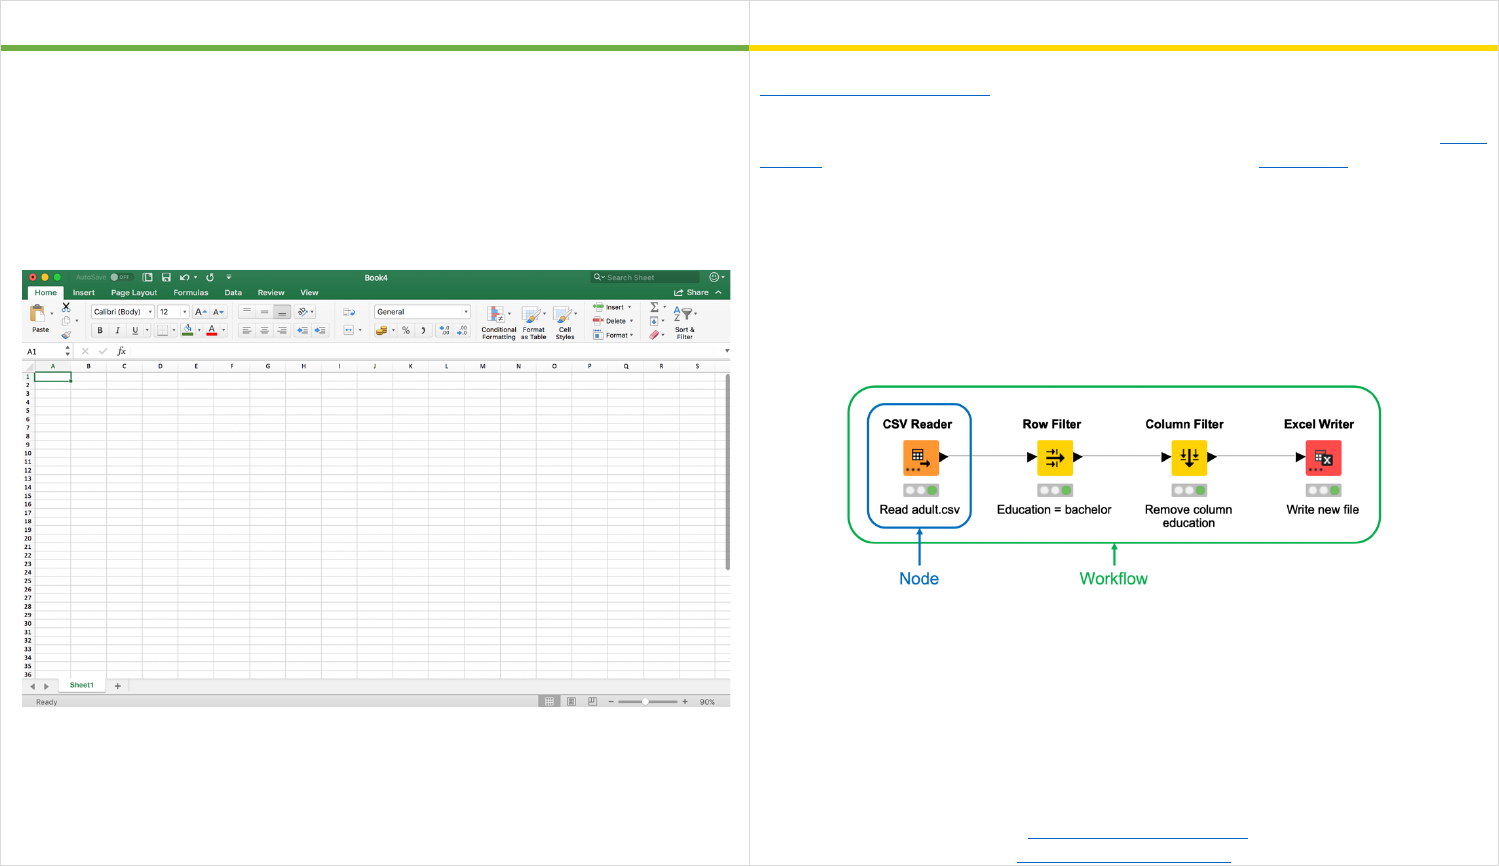
Spreadsheets Workflows and Nodes
Excel
KNIME Analytics Platform
Microsoft Excel is a spreadsheet program, which features calculation, graphing
tools, pivot tables, and a macro programming language (Visual Basic for
Applications, VBA for short).
By using cell mathematics, macros, and VBAs you can edit a sheet. This can be
really easy cell mathematics, like summarizing the values from cells A1 and B1 (=
SUM(A1, B1)), but can be also really complex, embedded logic.
KNIME Analytics Platform implements visual programming. This means that each
data analysis step is represented by means of an icon block, called a node, in a
graphical editor. Each node can perform one specific task. For example the Excel
Reader node can read one sheet of an Excel file or the Row Filter node allows to
filter rows based on a filter criterion.
A sequence of connected nodes is called a workflow and is the corresponding
concept of an Excel sheet with many functions and/or VBAs.
Data is organized through data tables, where each data cell is identified by a column
header and a Row ID. To visualize the content of a data table, see page 11.
Note. Nodes have four possible states displayed by a little traffic light under the
node itself:
- Not configured -> red light
- Configured -> yellow light
- Successfully executed -> green light
- Executed with error -> red light with cross
For more details about KNIME Analytics Platform, check:
- S. Hayasaka, R. Silipo, “KNIME Beginner’s Luck”, KNIME Press, 2021
- R. Silipo, V. Palacios, “KNIME Advanced Luck”, KNIME Press, 2021
7
Folders Workspace
Excel
KNIME Analytics Platform
Excel files are normally saved in different folders. A single Excel file can contain
multiple sheets.
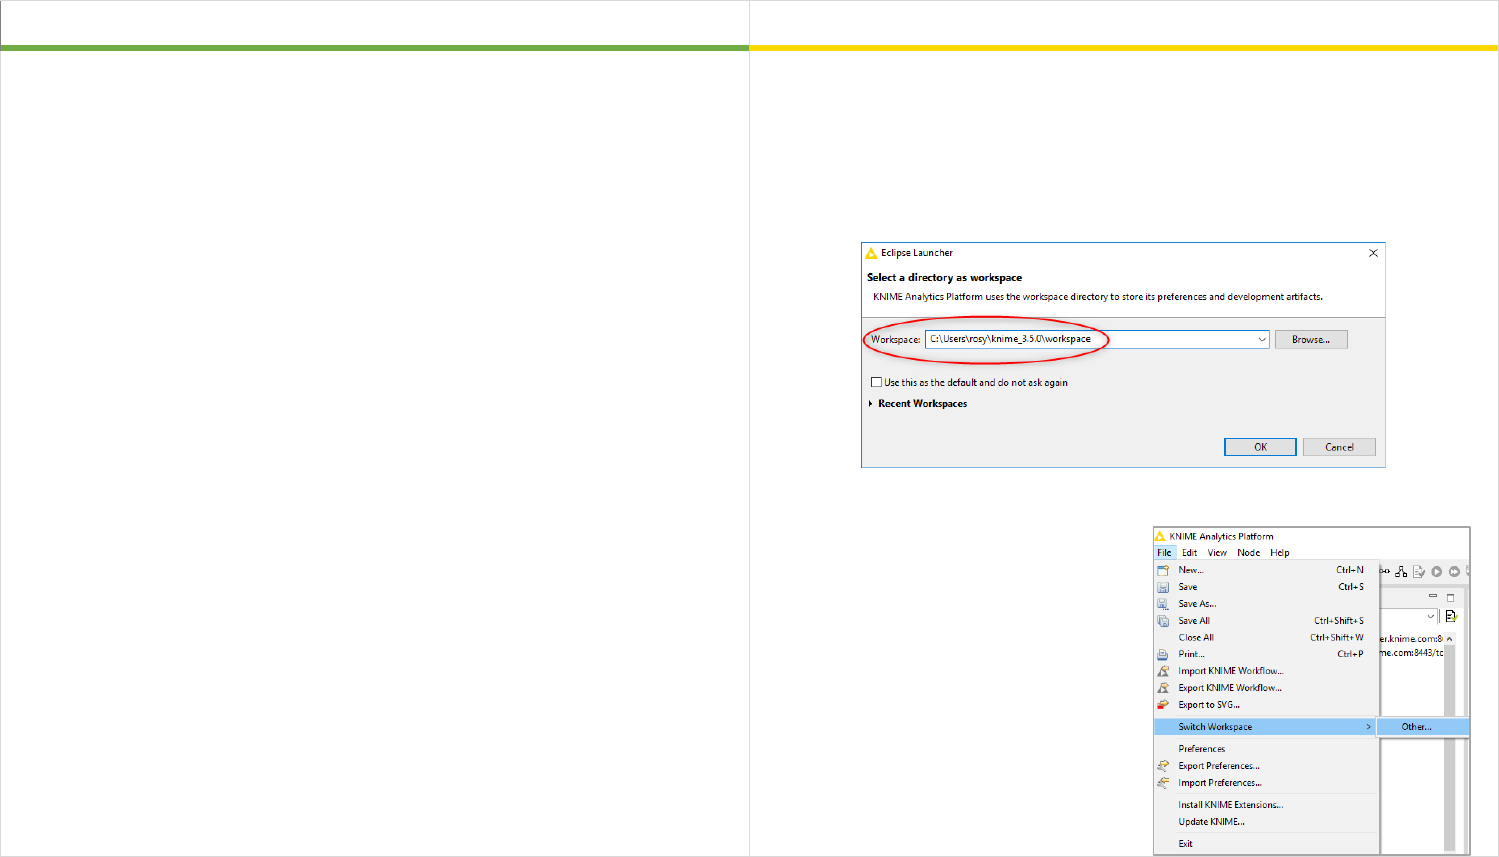
The workspace defines the folder where all workflows, data and intermediate data
are saved. One workflow corresponds to an Excel sheet with all formulas,
visualizations and VBAs. All the projects and datasets saved in a workspace are
available in the KNIME Explorer, located in the top left corner of the KNIME
workbench. The path to the workspace is selected at the very beginning, after
starting KNIME Analytics Platform.
You can still change the workspace after
KNIME Analytics Platform has been
launched, by going to “File” in the top menu
and selecting “Switch Workspace”. You
can have multiple workspaces, e.g. for
different projects or customers.
8
The KNIME Workbench
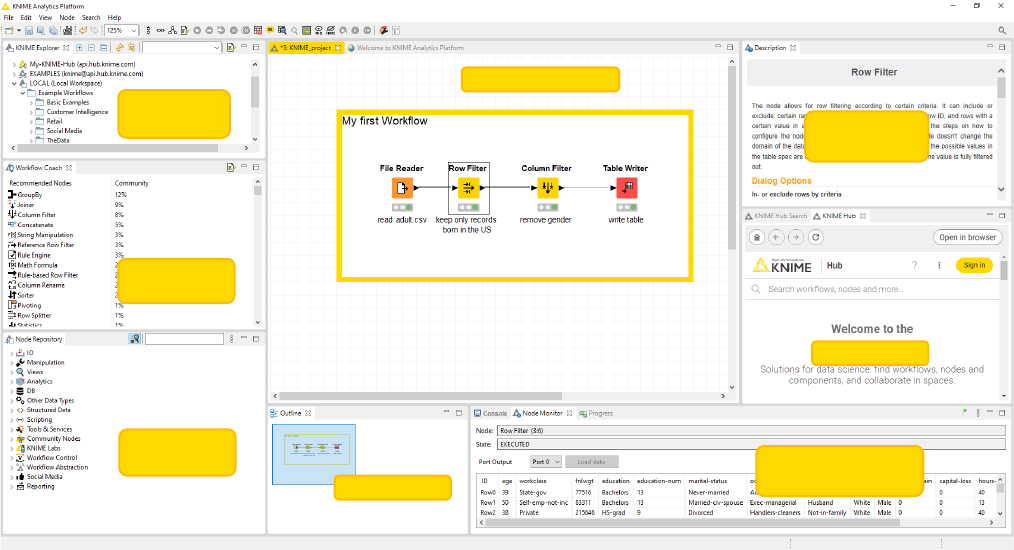
After downloading and installing KNIME Analytics Platform you can start it from the desktop or from the installation folder. The KNIME workbench, which you can see
below, opens including the following panels:
“KNIME Explorer” showing the list of currently available workflows and KNIME servers for the selected workspace and the My-KNIME-Hub mountpoint.
“Workflow Coach” recommending the next node based on the KNIME user statistics and the node currently selected in the “Workflow Editor”.
“Node Repository” containing all currently installed nodes. A “Search” box is available at top of this panel to search for nodes.
“Workflow Editor” in the center allowing for the creation and editing of workflows.
“Node Description” showing a text describing the node task and configuration settings, for the selected node either in the “Workflow Editor” or in the “Node Repository”
panel.
“Node Monitor” showing a preview of the output table of the node selected in the “Workflow Editor”
“KNIME Hub” allowing use of the KNIME Hub to search for nodes, workflows, components, and extensions.
“Outline” offering an overview of the workflow
“Console” showing execution messages, e.g. error and warning messages.
KNIME
Explorer
Workflow
Coach
Node
Repository
Workflow Editor
Outline
Console / Node
Monitor
Node
Description
KNIME Hub
9
Building a KNIME Workflow
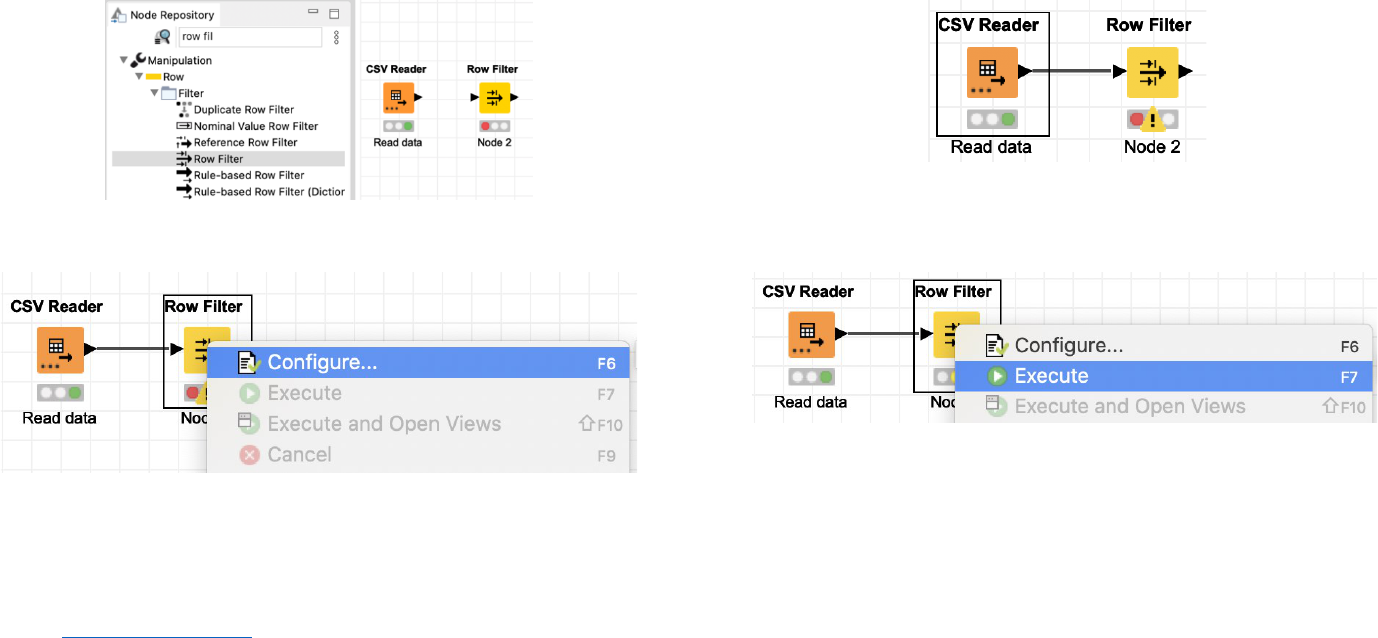
KNIME workflows are created by dragging&dropping nodes from the “Node Repository” or “Workflow Coach” panel to the “Workflow Editor”. Use the search box on the
top of the Node Repository or browse through the nodes, sorted by different categories to find the correct node for your next step.
Nodes are connected to each other through their input and output ports. Just click the output port of the first node and release at the input port of the second node.
Nodes that have just been created show a red light status: not yet configured. To configure a node, right-click the node and select the option “Configure” or alternatively
double-click the node. The node “Configuration” window opens. Configure the node and close the configuration window. If the configuration is successful, the node status
changes to a yellow traffic light.
The node is now configured, but not yet executed. To execute the node, right-click the node and select the “Execute” option. If the execution is successful, the node
changes its status to a green light.
Step 1: Search and create a node via drag& drop
Step 2: Connect the nodes
Step 3: Configure the node
Step 4: Execute the node
Note 1: To create a new, empty workflow right click in the KNIME Explorer panel, select “Create New KNIME Workflow…” and define the name and destination of the new
workflow in the new window.
Note 2: Click the magnifier next to the search box in the node repository to change the mode of the search box to a fuzzy search. This makes finding the correct node
easier in the beginning.
Note 3: The “Getting Started Guide” guides you step by step through building your first example workflow.
10
Display Data Table
Excel
KNIME Analytics Platform
In Excel what you see is what you get. This means that the data table you see is
the final data table.
The output data tables produced after node
execution are always available. To see them:
- Right-click the node in the workflow
- Select the last option in the context
menu
Note: Some nodes, like plotting and modeling nodes, also have a more complex
“View” function. The option leading to this “View” is usually displayed in the middle
of the context menu.
Column header
Data Type

11
Input/Output
12
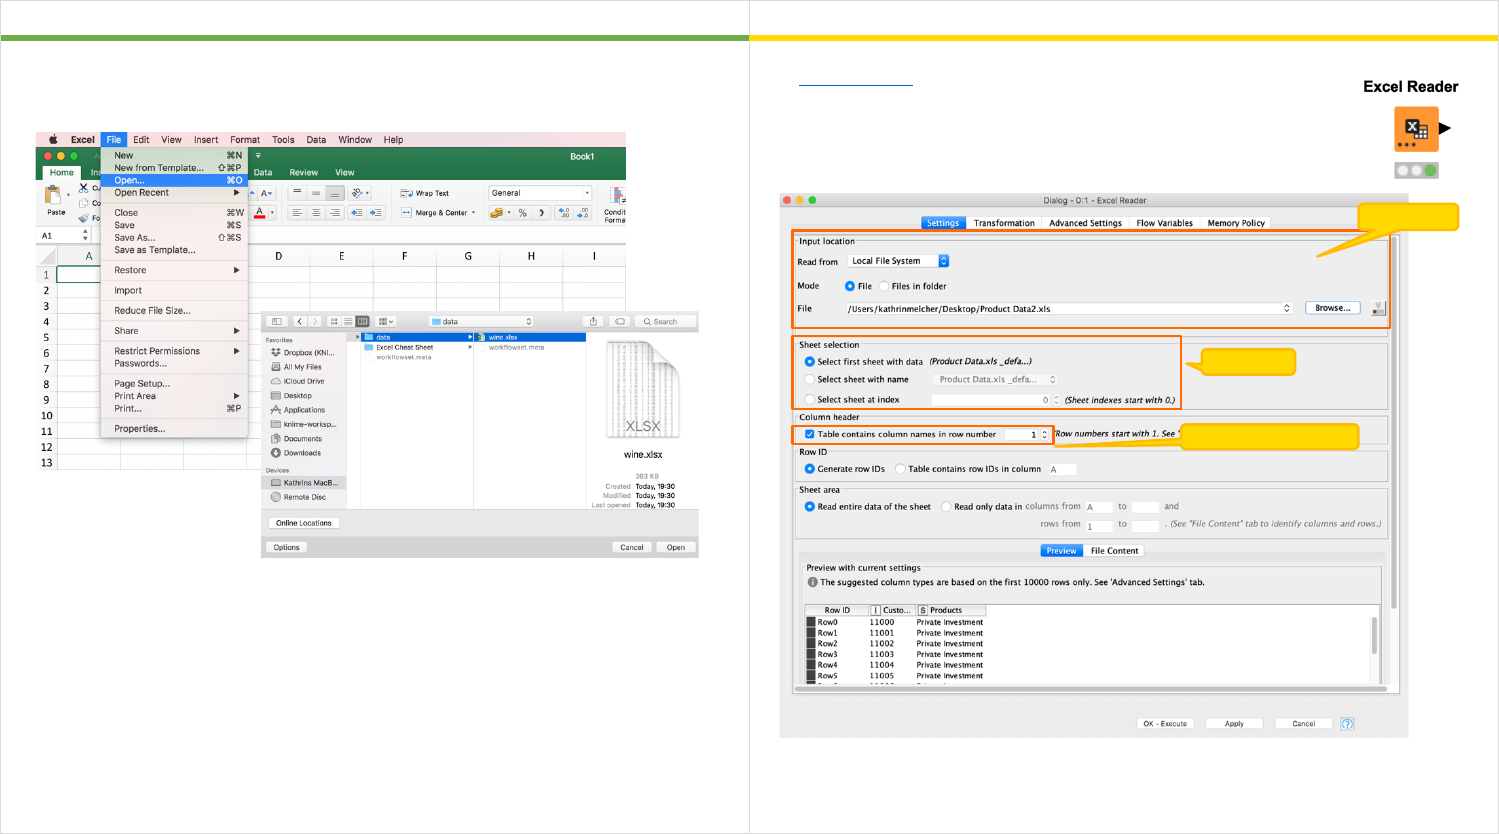
Opening an Excel File Excel Reader Node
Excel
KNIME Analytics Platform
To open an Excel file you can either double click the file or open Excel, go to “File”
in the top menu, select “Open…” and then browse to the file you want to open.
The Excel Reader node reads a single sheet of an Excel file.
Similar to Excel you first have to define the file path. Next you can
select the sheet. The additional setting options enable you to
define whether the table has column headers and / or row IDs
and to specify which part of the sheet you want to read.
Note: Page 15 shows how to read and concatenate multiple Excel files which
have the same column headers.
File path
Sheet
Name
Column headers
13
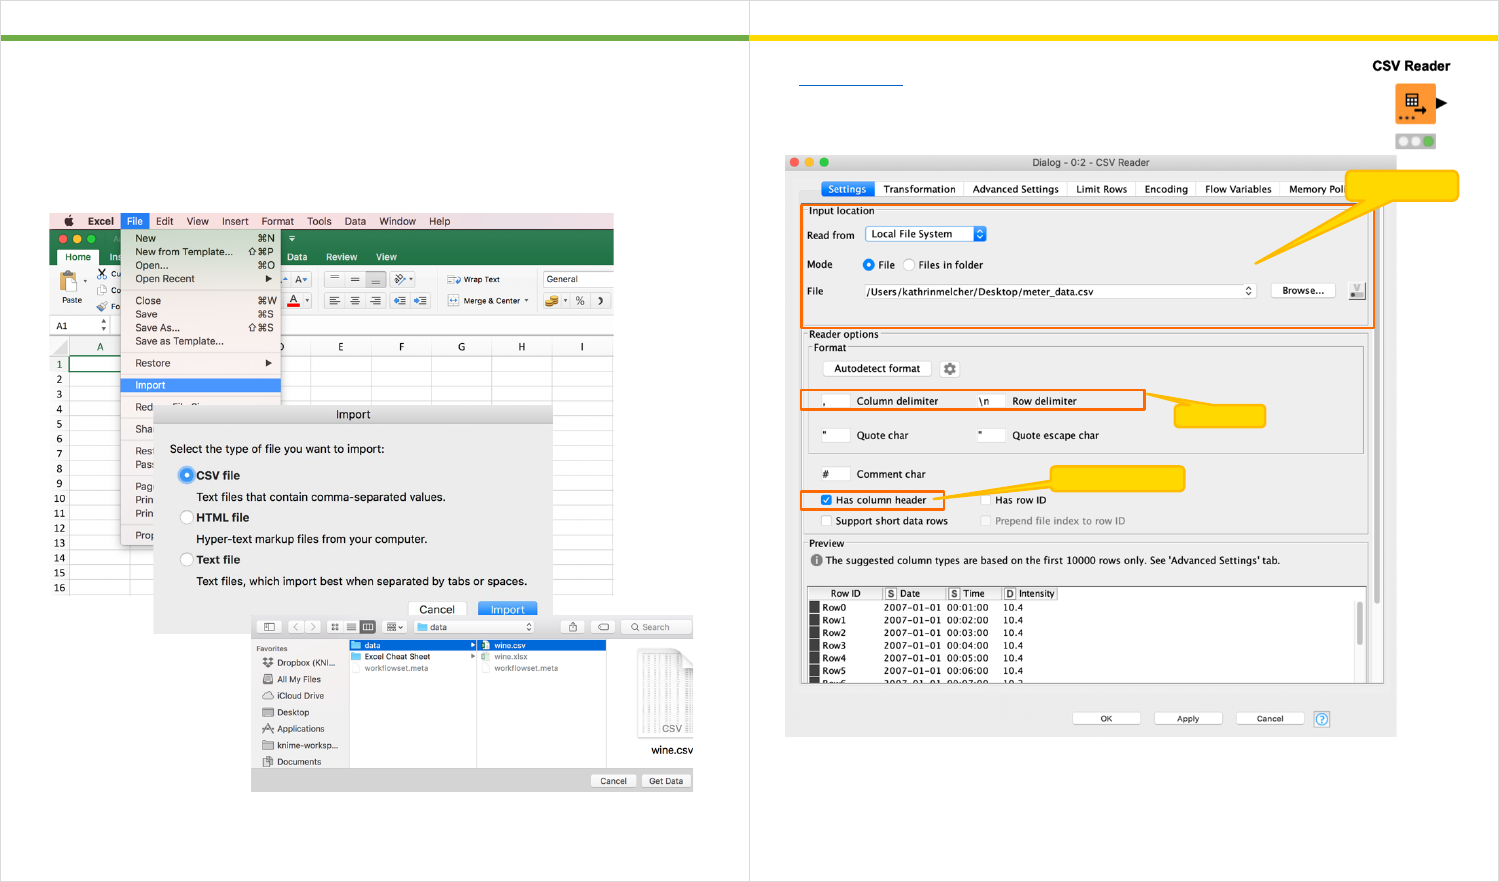
Opening a CSV or txt File CSV Reader Node
Excel
KNIME Analytics Platform
To open a CSV file click “File” in the top menu and select “Import”. Select CSV file
and then choose the file you want to open.
Fill in all necessary options, such as the separating character, to correctly read the
file.
The CSV Reader node reads various text based files, e.g. CSV
files. In the configuration window you can set all the necessary
options, such as separating character, to correctly read the file.
Note 1: Click the “Autodetect format” button if the node doesn’t create the preview.
Note 2: Check out the additional tabs to limit the number of rows or to change the
encoding.
File path
Column header
Headerssd
Delimiter
14
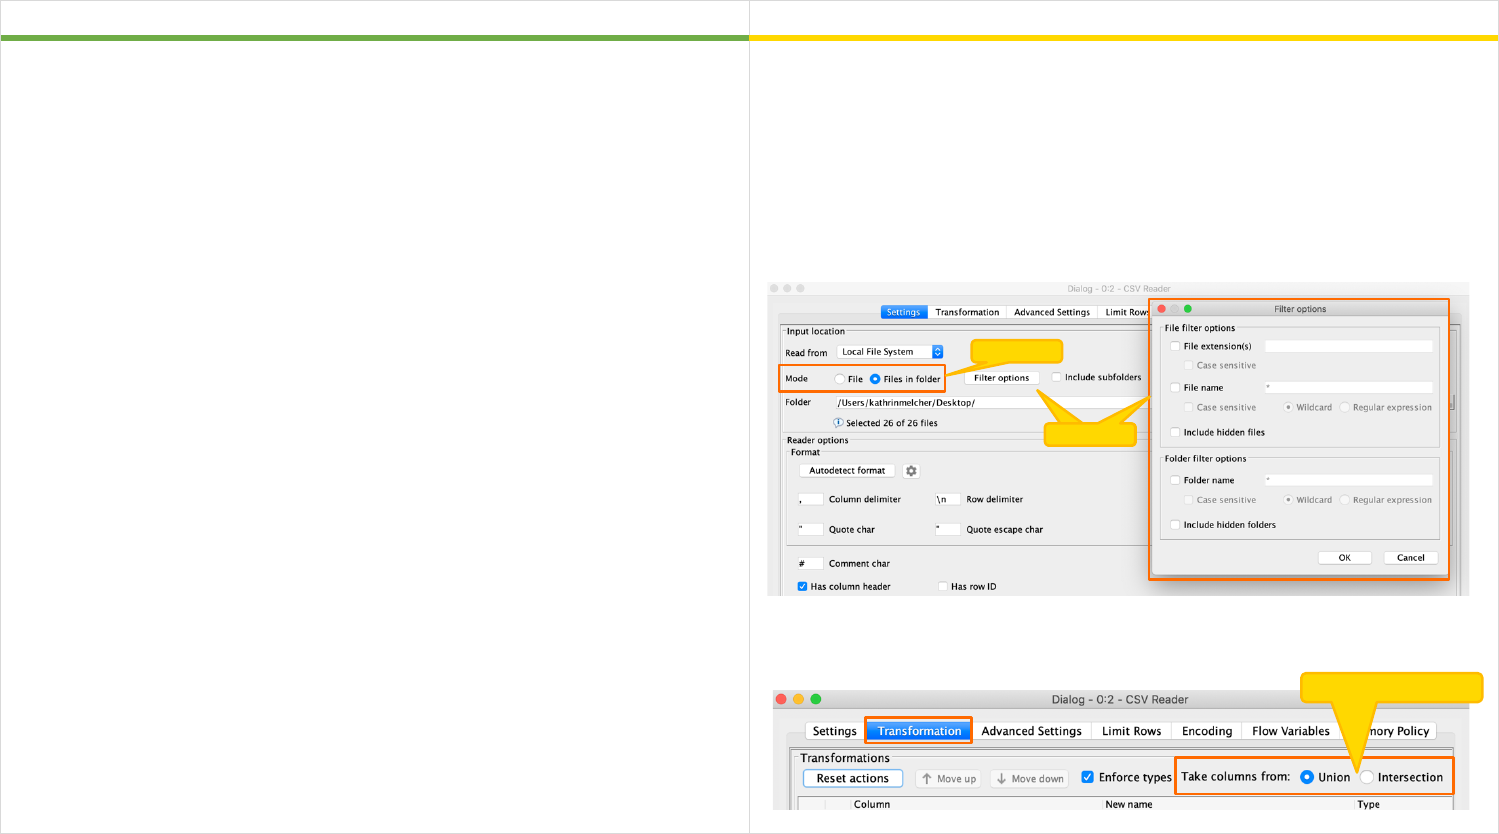
Importing Content from Multiple Files of the same Type to a Single Table
Excel
KNIME Analytics Platform
If you have a folder containing multiple files of the same type (e.g. CSV), you can
open them all at the same time in different Excel instances. Follow the instruction
from the previous page and select all the files you want to open.
To move data tables together into one single sheet, you have to proceed manually
using copy and paste.
Note: Before copying and pasting, ensure that all files have the same column
order.
Many reader nodes in KNIME Analytics Platform support reading multiple files in a
folder and combining them into one table. For example the CSV Reader can read
multiple text-based files.
To read multiple files select the “Mode” “Files in folder” and specify the folder
using the “Browse” button. A little note tells you how many files are currently
selected. In case you don’t want to read all the files in a folder, click the button
“Filter options” to specify which files should be included according to their file
extension and/or name. Lastly you can also include files from subfolders by
activating the checkbox “Include subfolders”.
Note: In the Transformation tab you can define whether you want to use the union
or the intersection of the columns from the different tables.
Mode
Filter
Filter
Union or intersection
15
Importing Content from Multiple Sheets into a Single Table
Excel
KNIME Analytics Platform
To move data from multiple Excel sheets into one Excel sheet you proceed
manually, using copy and paste.
Note: Before copying and pasting, ensure that all files have the same column
order.
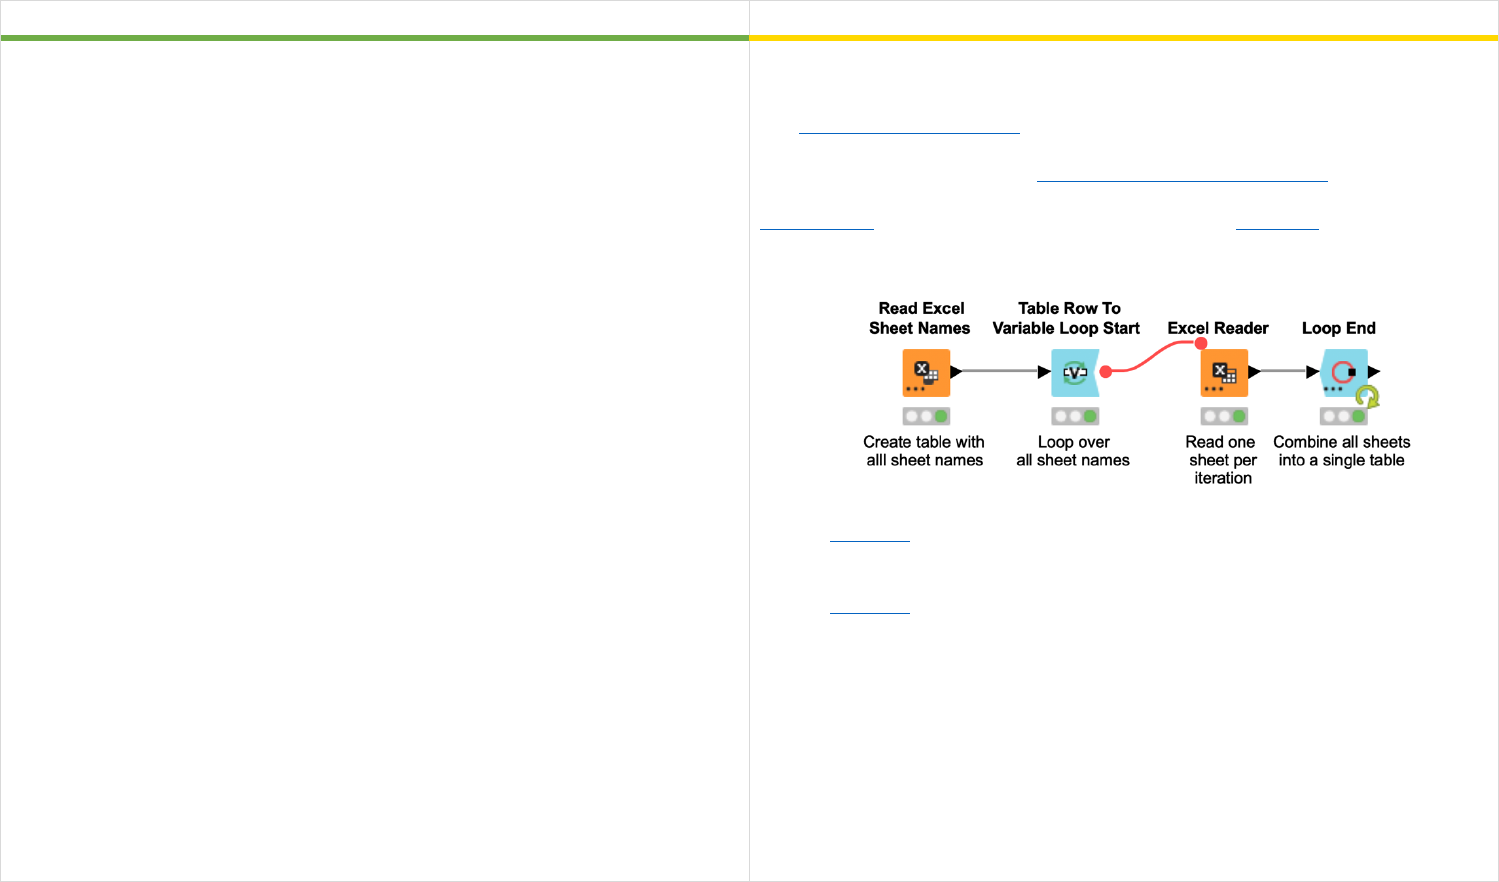
With a simple loop you can read all sheets of an Excel file automatically.
The Read Excel Sheet Names node creates a list of all sheet names. The loop (the
part in between the blue nodes) reads one sheet of the Excel file at each iteration.
Therefore, at each iteration the Table Row to Variable Loop Start node creates a
flow variable with the sheet name as its value. This flow variable is used in the
Excel Reader node to control the sheet selection. The Loop End concatenates the
content from the different tables.
Note 1: Lesson 3 of the free KNIME Self-Paced Course L2-DW KNIME Analytics
Platform for Data Wrangles course introduces flow variables.
Note 2: Lesson 4 of the free KNIME Self-Paced Course L2-DW KNIME Analytics
Platform for Data Wrangles introduces loops in KNIME.
16
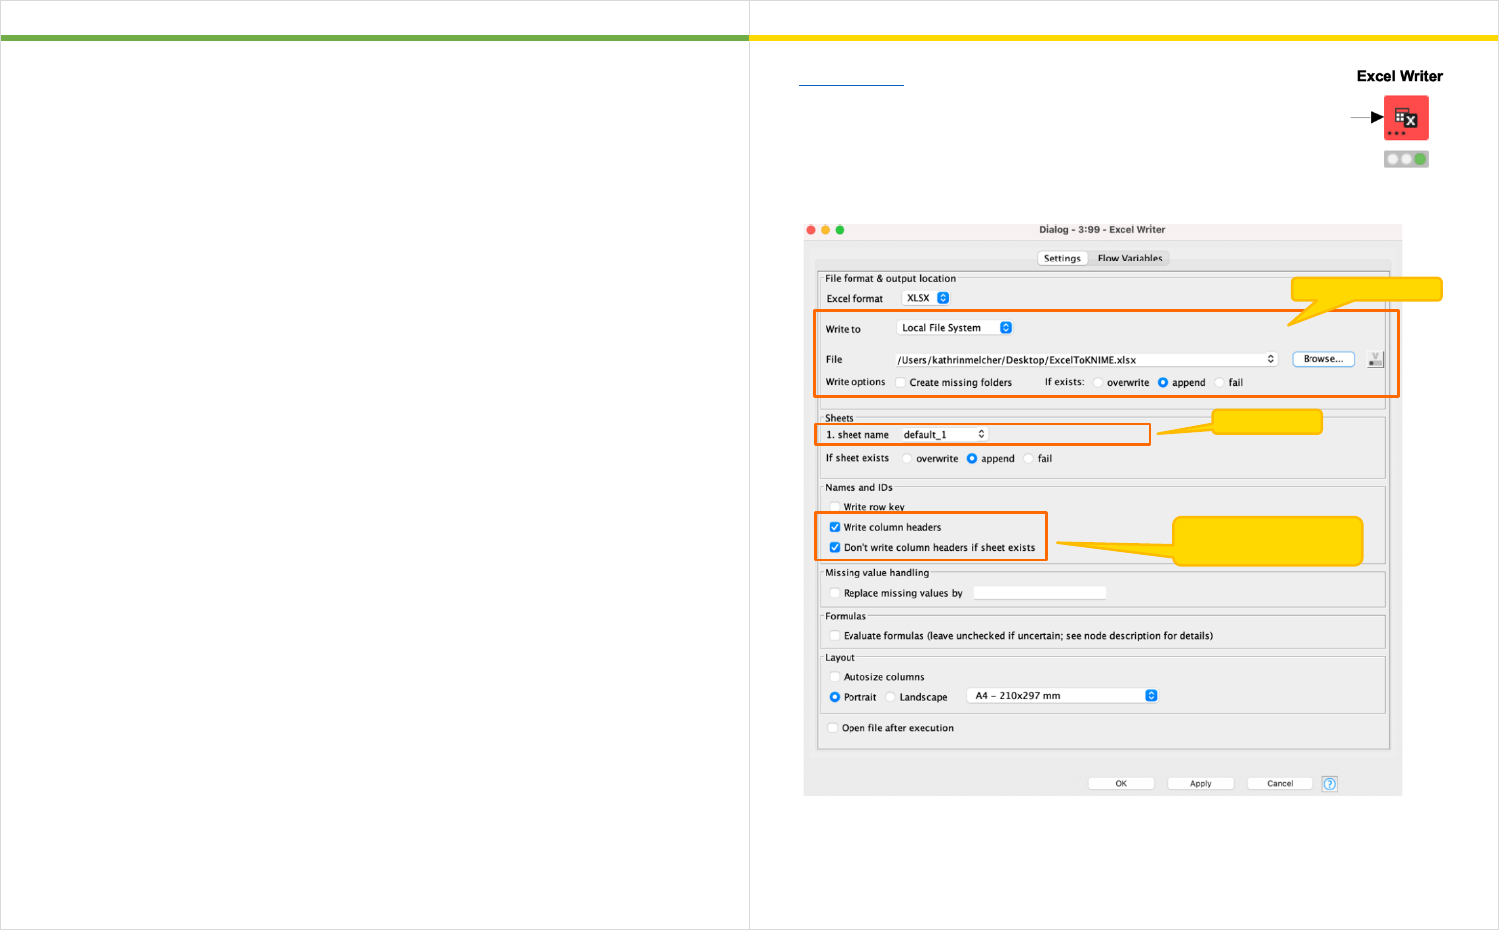
Saving an Excel File Excel Writer Node
Excel
KNIME Analytics Platform
To save the sheet of an Excel file you have different options:
• Click File->Save As… and define the output location
• Or press Shift+Ctrl+s and define the output location
The Excel Writer node writes or append the input data table into
a sheet in an Excel file, in either xls or xlsx format.
In the configuration window you can set the output location and
sheet name. The additional setting options enable you to
overwrite an existing file and to define whether you want to write
the column headers / row ids into the first row / column of your Excel sheet.
Note 1: To write multiple tables into different sheets you can add dynamic input
ports and define a sheet name for each input table.
Note 2: Select “append” for the settings “Write options” and “If sheet exists” to
append the input data after the last row of an existing sheet.
Output location
Sheet name
Column headers
and row key
17
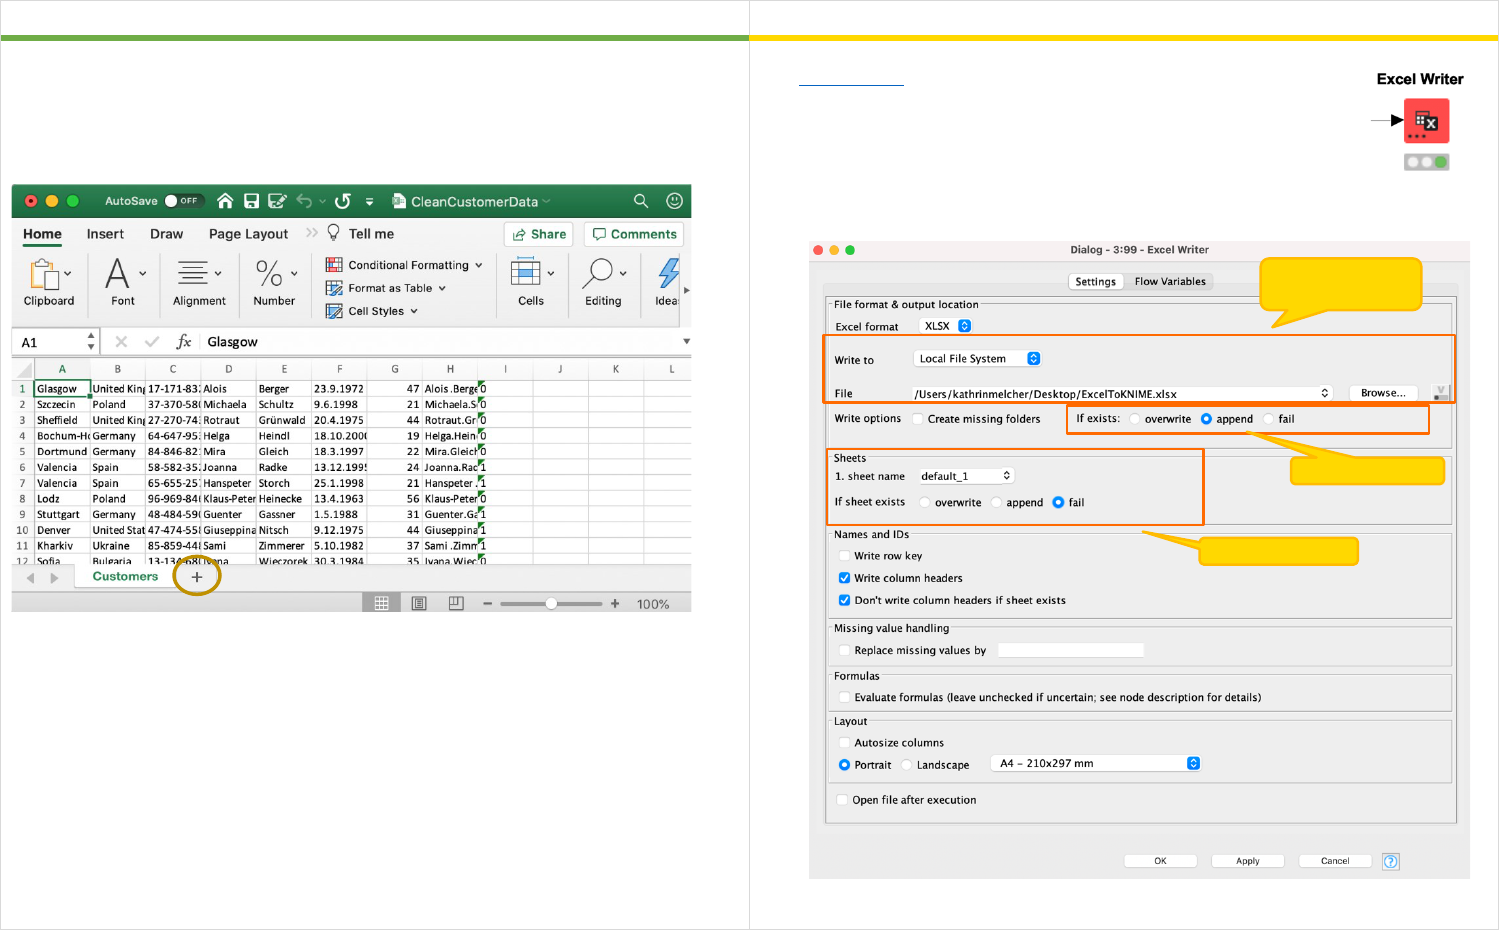
Adding a Sheet to an Excel File Excel Writer Node
Excel
KNIME Analytics Platform
To add a new sheet to an existing Excel file you have to click the plus below the
table, next to the already existing sheets.
To add a table from another Excel file you can copy & paste the table manually.
The Excel Writer node can also add sheets to an existing Excel
File. In the configuration window you can set the location of the
existing Excel file and select “append” for the setting option “If
exists”. In the “Sheets” part you can define the new sheet name
and whether the node should overwrite or fail in case a sheet with
the defined sheet name exists already.
Sheet settings
Location of the
existing File
Append option
18
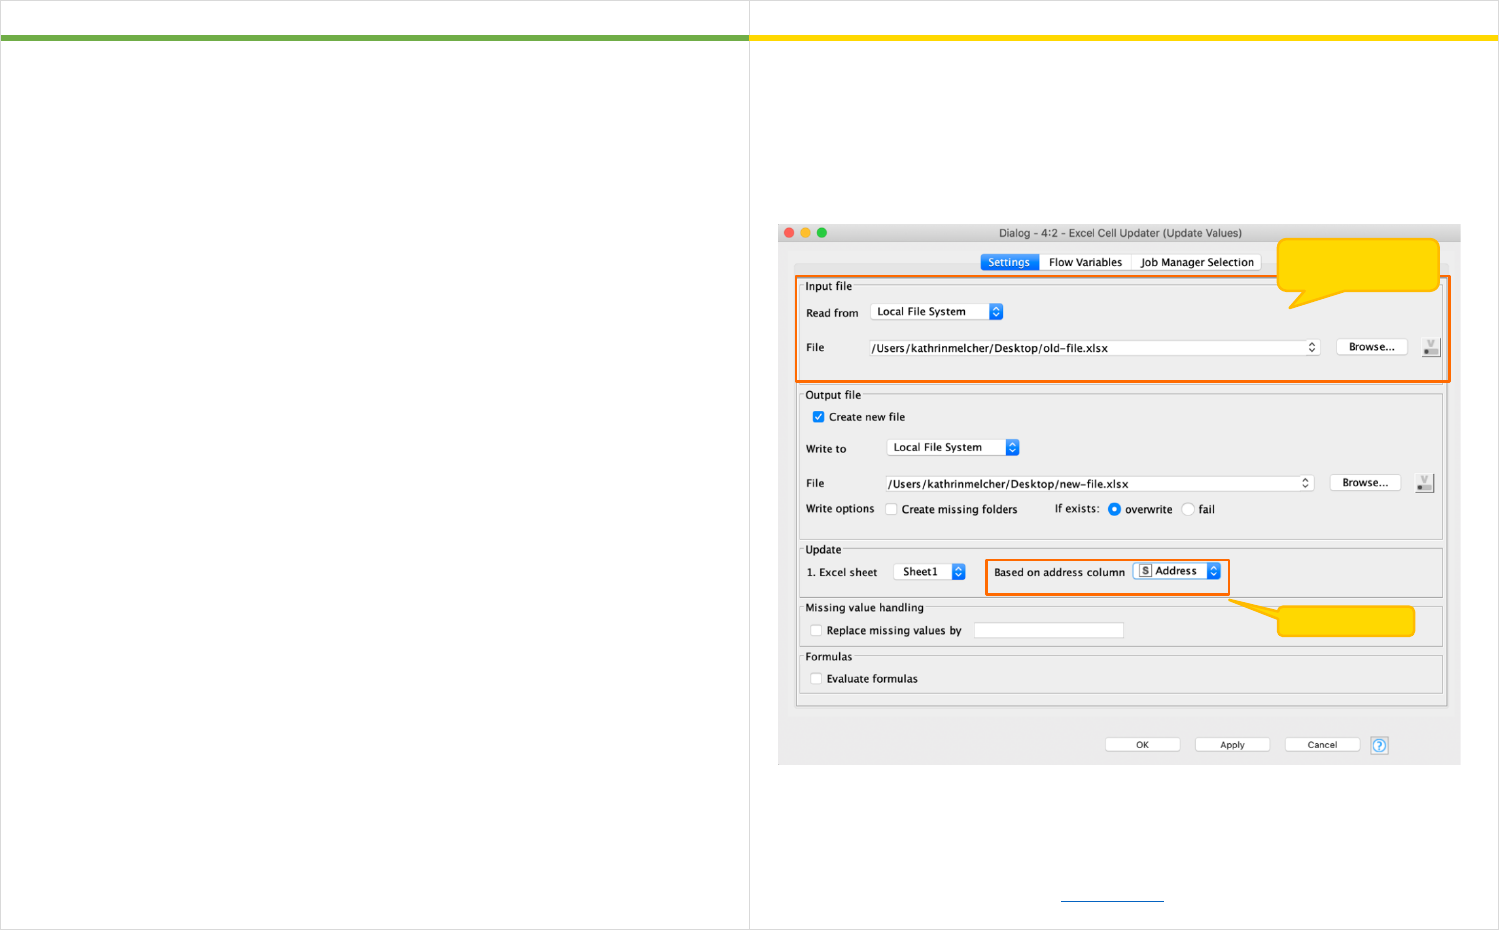
Updating Cells in an Existing Excel Sheet Excel Cell Updater Node
Excel
KNIME Analytics Platform
To edit the content of an existing Excel Sheet, you can open it and edit different
cells manually.
The Excel Cell Updater node updates the cells in an existing Excel sheet, based on
an input data table.
The input table needs a column with the cell address that should be updated e.g.,
B2 or 2:2. In addition the table needs one column for each datatype with the new
cell content. Each row is only allowed to have one value.
Note 1: Activate the checkbox “Evaluate formulas” to evaluate all formulas using
the new cell content.
Note 2: Activate the checkbox “Create new file” to keep the original file.
Note 3: Example Workflow on the KNIME Hub.
Location of the
existing File
Address column
19
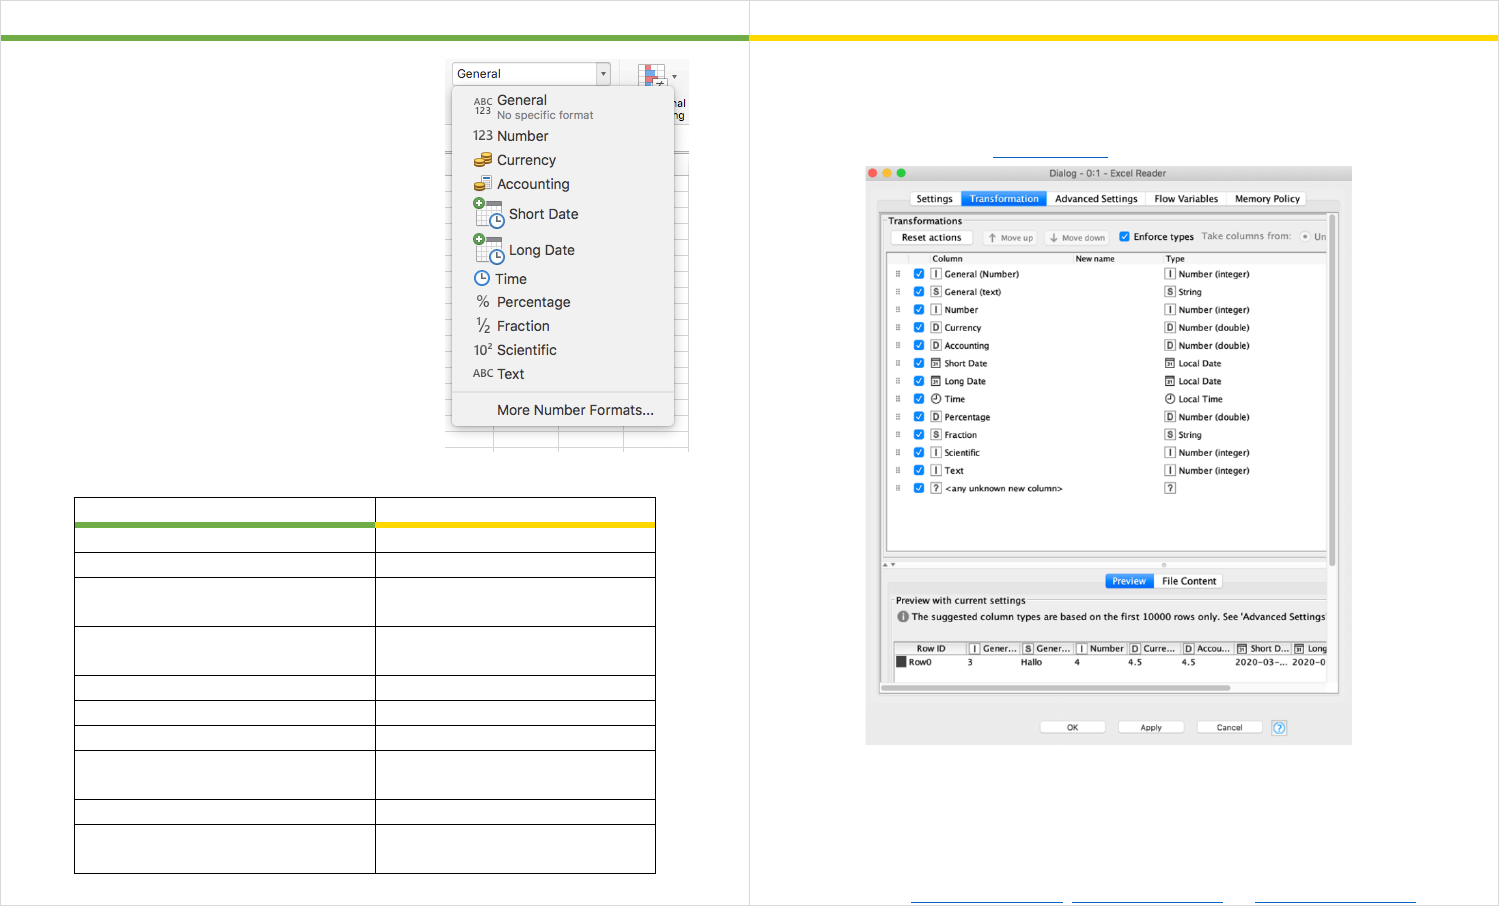
Data Types in Excel Data Types in KNIME
Excel
KNIME Analytics Platform
The screenshot on the right shows you the
different available datatypes in Excel.
They can be mapped to the following data
types in KNIME Analytics Platform
Excel
KNIME Analytics Platform
General
Number or String
Number
Number
Currency
(e.g. 50,25 €)
Number (Integer or double)
(e.g. 50,25)
Accounting
(e.g. 50,25 €)
Number (Integer or double)
(e.g. 50,25)
Short Date
Local Date
Long Date
Local Date
Time
Local Time
Percentage
(e.g. 50%)
Number (double)
(e.g. 0,5)
Fraction
Number (double)
Scientific
(e.g. 5,00E+02)
Integer
(e.g. 500)
KNIME Analytics Platform supports reading all data types from Excel, and even
more. When reading a file, KNIME Analytics Platform tries to autodetect the
correct data type. If you want to change this during reading you can use the
Transformation tab of the Excel Reader node.
Note 1: The Transformation tab is also available in other reader nodes.
Note 2: In the Transformation tab you can also rename, remove, and change the
order of columns.
Note 3: To change the data type later in the workflow you can use one of the
following nodes: String to Number, Number to String, or Table Manipulator.
20
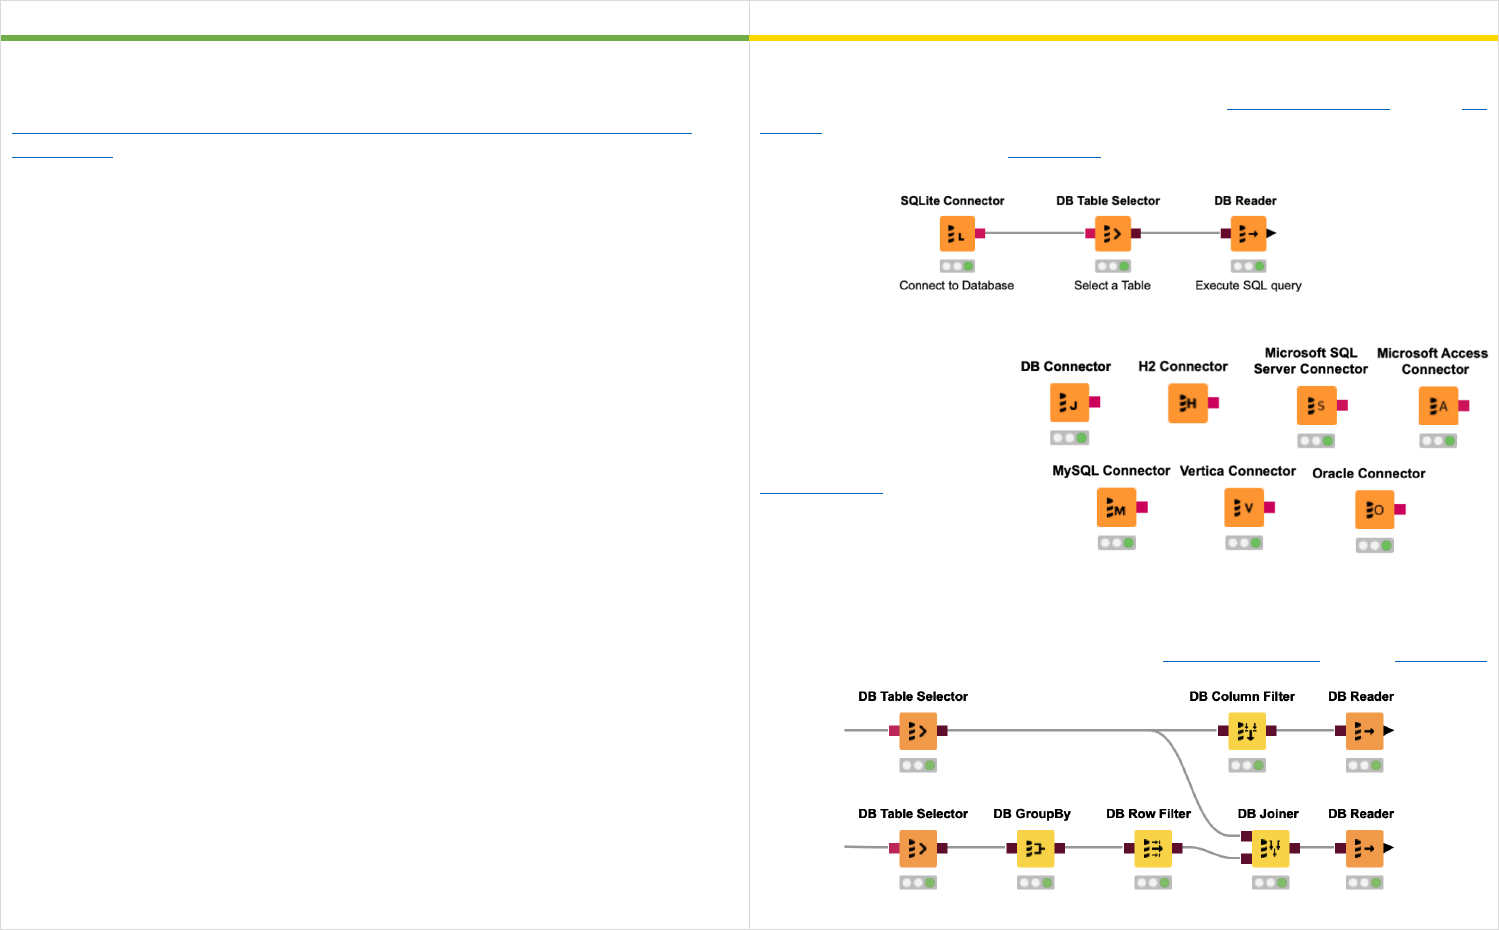
Connect to a Database Database Connector Nodes
Excel
KNIME Analytics Platform
You can connect to a database in Excel. A description about how to do this is
available via the following link:
http://www.erpsoftwareblog.com/2017/01/microsoft-excel-connections-sql-
databases/
Reading data from a database follows three steps: connect, select, and extract. The
workflow is built step by step with a Connector, a DB Table Selector, and a DB
Reader node. Database nodes simply build the SQL query, they do not execute it.
Only the final node, e.g. the DB Reader node, executes the SQL query and extracts
the data.
A number of database
connector nodes are
available to connect to the
most commonly used
databases. However, the
DB Connector node allows
you to connect to all JDBC
compliant databases.
There are more database nodes to help build a SQL query for in database
processing. You can use them in between the DB Table Selector and the DB Reader
node.
21
Tips on Reading Data with KNIME Analytics Platform
All reader nodes require a path to the input file location. Let’s collect some Tips&Tricks
for this:
Tip&Trick 1: Use drag&drop from the KNIME Explorer:
Data files saved in the workspace folder are available in the KNIME Explorer panel (top
left panel). To read in one of these files, you just drag&drop the file from the KNIME
Explorer panel to the workflow editor. KNIME automatically creates the correct reader
node and sets the path of the input location.
Tip&Trick 2: Different options to define a file path:
In KNIME we have different options to provide a file path. This becomes important when
you start sharing your workflows or exporting them to other KNIME Analytics Platform
installations or KNIME Servers. There are four default file systems available in KNIME
Analytics Platform.
• Local File System: Allows you to select a file/folder from your local system.
• Mountpoint: You can connect to a KNIME Server or the KNIME Hub via
additional mountpoints in the KNIME Explorer. To read data from either LOCAL
or another mountpoint select “Mountpoint“. When selected, a new drop-down
menu appears so that you can choose the mountpoint. Unconnected
mountpoints are grayed out but can still be selected (note that browsing is
disabled in this case). Go to the KNIME Explorer and connect to the mountpoint
to enable browsing.
• Relative to: Allows you to choose whether to resolve the path relative to the
current mountpoint, current workflow, or the current workflow's data area. When
selected a new drop-down menu appears to choose which of the three options
to use.
• Custom/KNIME URL: Allows to specify a URL (e.g. file://, http:// or knime://
protocol). Browsing is disabled for this option.
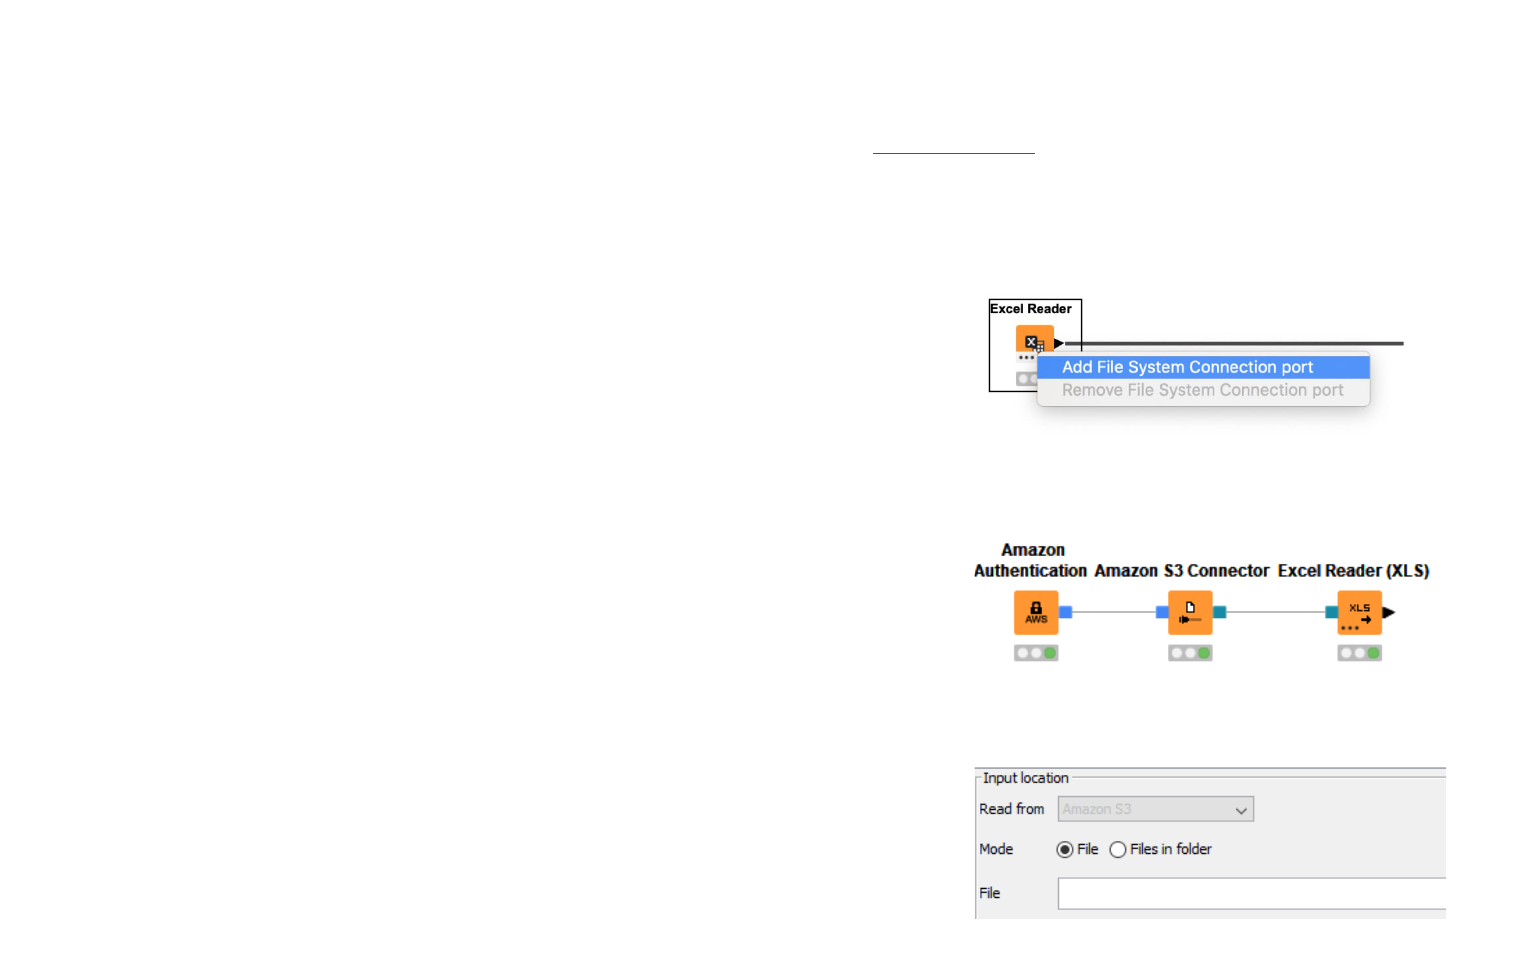
Tip&Trick 3: Reading from another file system:
KNIME Analytics Platform allows you to connect and read from many
different sources / file system, e.g. Amazon S3, Microsoft SharePoint
Online, Databricks to name just a few. Three steps are necessary (the
file handling guide gives you further information).
c
Step 1: Click “...” in the bottom left corner of the reader node icon to
add a File System Connection port
Step 2: Connect to the desired file system via the dedicated
connector node and connect it with the reader node
Step 3: Select the file/folder in the connected file system

22
Appending / Joining Data

23
Appending Data Concatenate Node
Excel
KNIME Analytics Platform
To append data to a table select manually the area you want to append and copy
and paste the content below the first table.
Note 1: Before copying and pasting ensure that all tables have the same column
structure.
The Concatenate node writes two or
more tables below each other.
Note 1: The order of the column
doesn’t have to be the same.
Note 2: You can decide whether you want the intersection or the union of the
columns.
Note 3: The Concatenate node has the option to add more input ports, to
concatenate more than two tables. To add an additional input port, click on the
three dots on the lower left of the node and select “Add input port”.
24
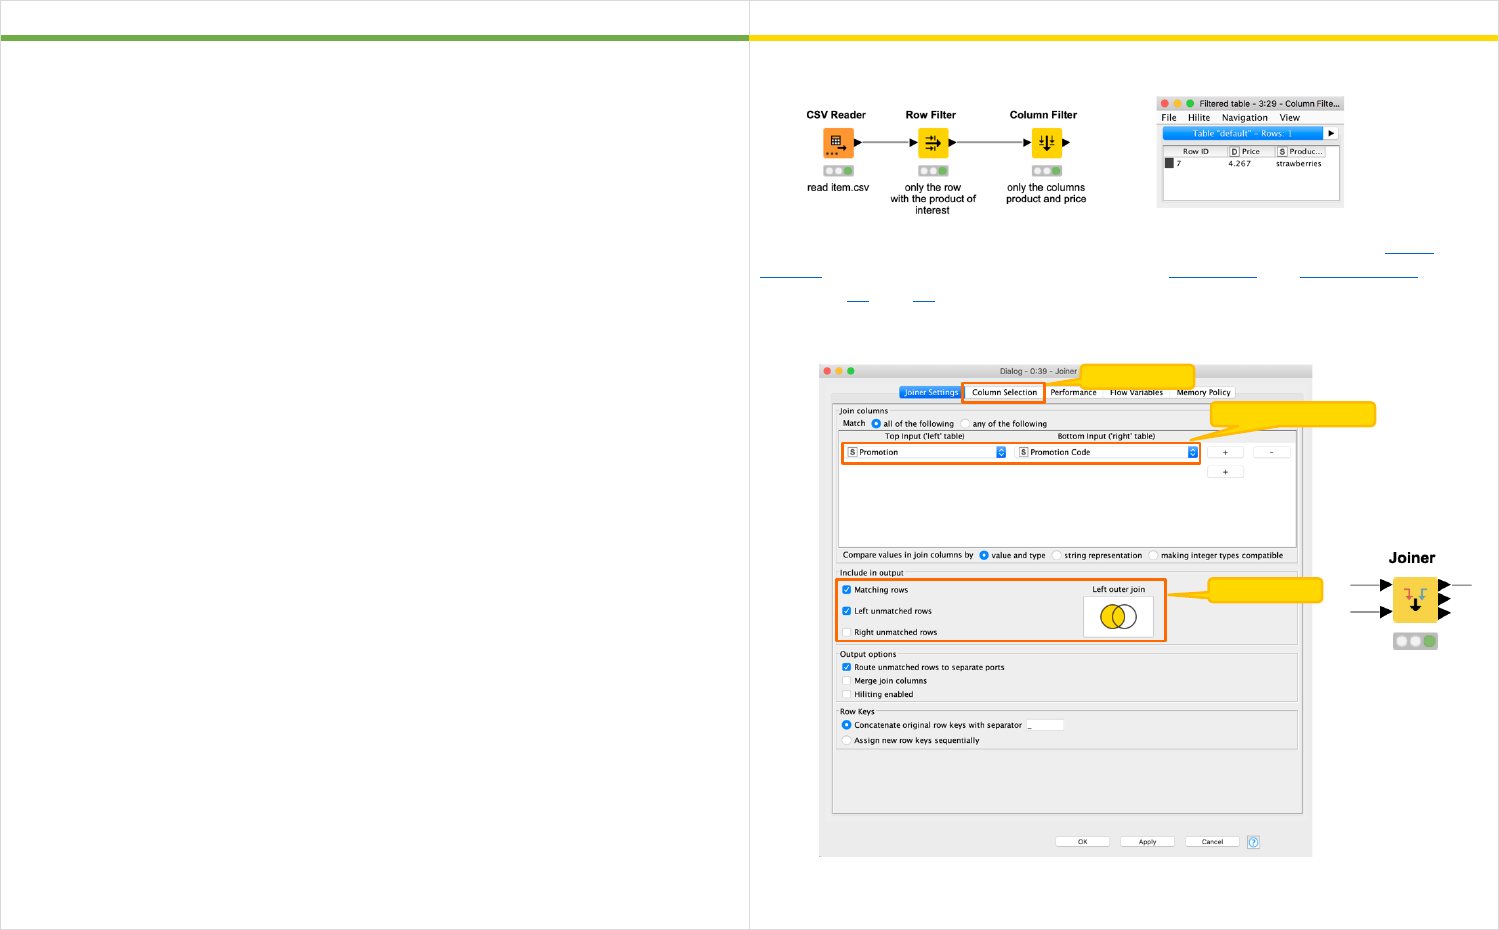
VLOOKUP Filter and Joiner Node
Excel
KNIME Analytics Platform
The VLOOKUP function is used for different tasks. The most common uses are:
1. Look up a certain value, e.g. the price of a certain product.
2. Join columns based on a primary key (look up value), e.g. join product
information based on the product ID.
An alternative function for the second task is INDEX MATCH.
1. To look up a certain value, e.g. the price of a certain product
Note 1: Your full original table is still available at the output port of the Table
Reader node. See more information about the Row Filter and Column Filter nodes
on pages 26 and 30.
2. Join columns based on a joining column, e.g. join product information based on
product ID.
Note 1: The “Joining Column” is the look up value column.
Note 2: For task 2. you can also use the Cell Replacer node
Filter
Columns
Join column(s)
Columnsdsdffd
Join mode

25
Filtering and Transformations
26
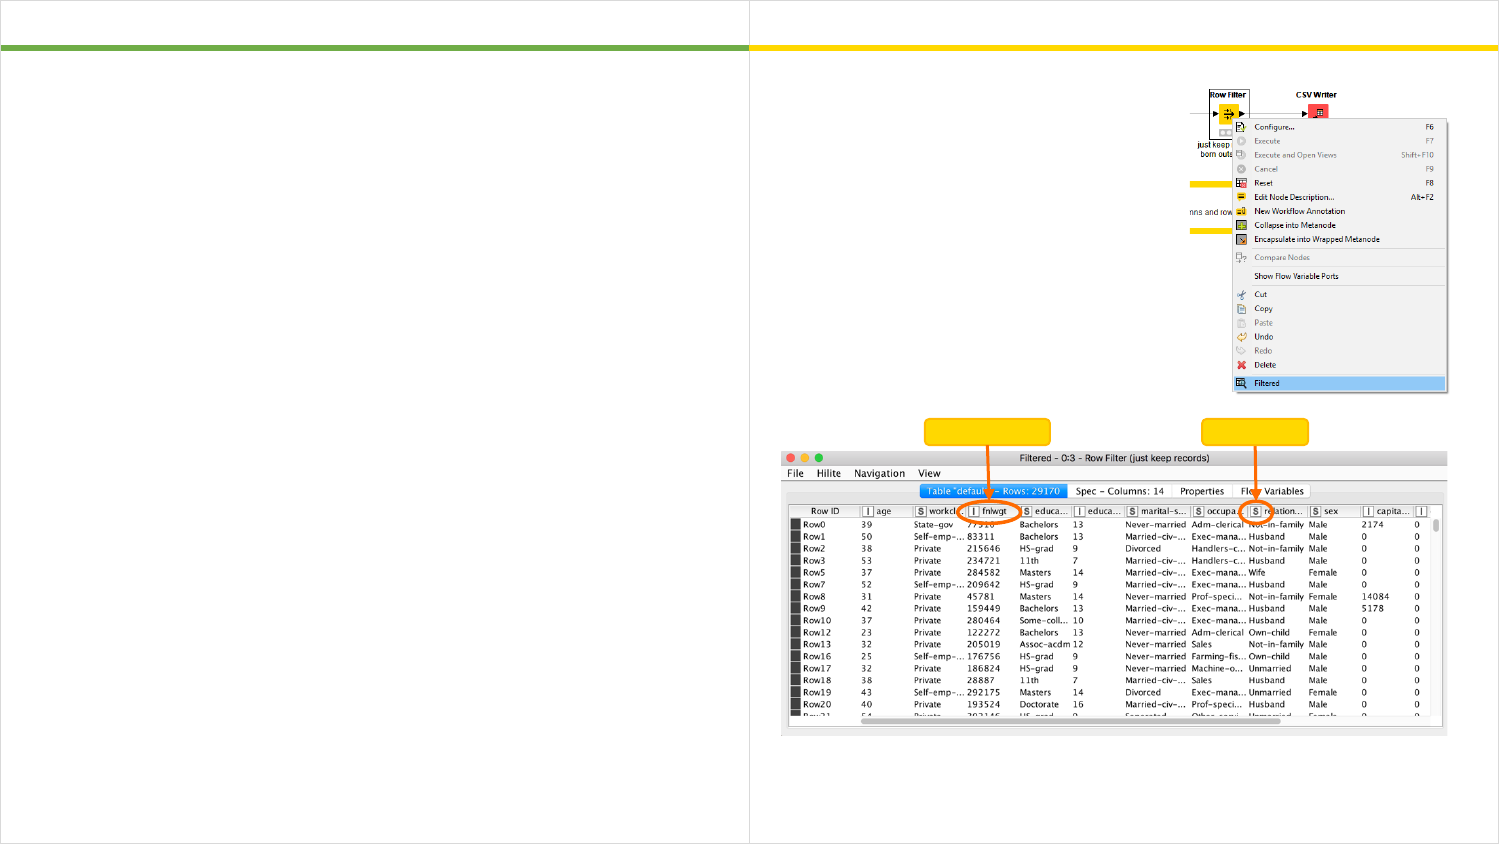
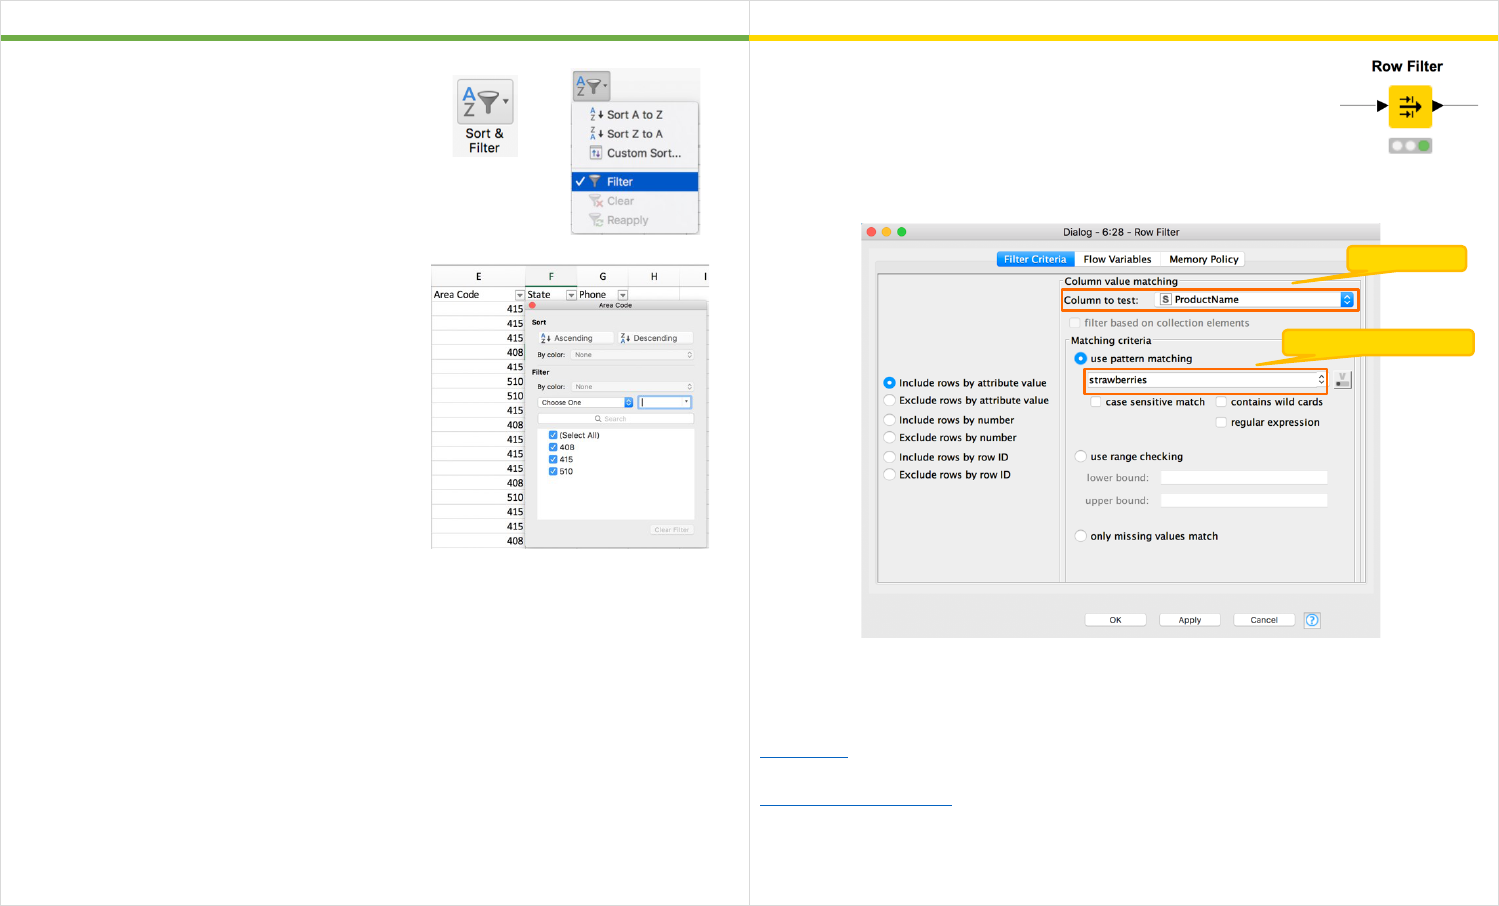
Filtering / Removing Rows with a Specific Value Row Filter
Excel
KNIME Analytics Platform
To filter data select a random cell in the data
table, go to the Home tab, click the “Sort&
Filter” button and select “Filter”.
Select the value you are interested in from
the drop down menu.
To remove rows, select the rows you want to delete, right click and select “Delete
Rows”.
In KNIME Analytics Platform there is no difference between
filtering and removing rows, as the original table is not deleted
and is still available at the output port of the previous node.
The Row Filter node filters the table based on a filter criteria,
e.g. by including / excluding all rows with a certain value in the filter column.
Note 1: On the left you can choose whether you want to include or exclude the
rows with the matching value
Note 2: If you only interested in the rows with one specific value you can use the
Row Filter node.
Note 3: If you want to include rows based on different values you can use the
Rule-based Row Filter. (See next page).
Note 4: Further filter options are available, e.g. on a numerical range, filter rows by
row number or row ID, or missing values only.
Filter column
Value to in- or exclude
27
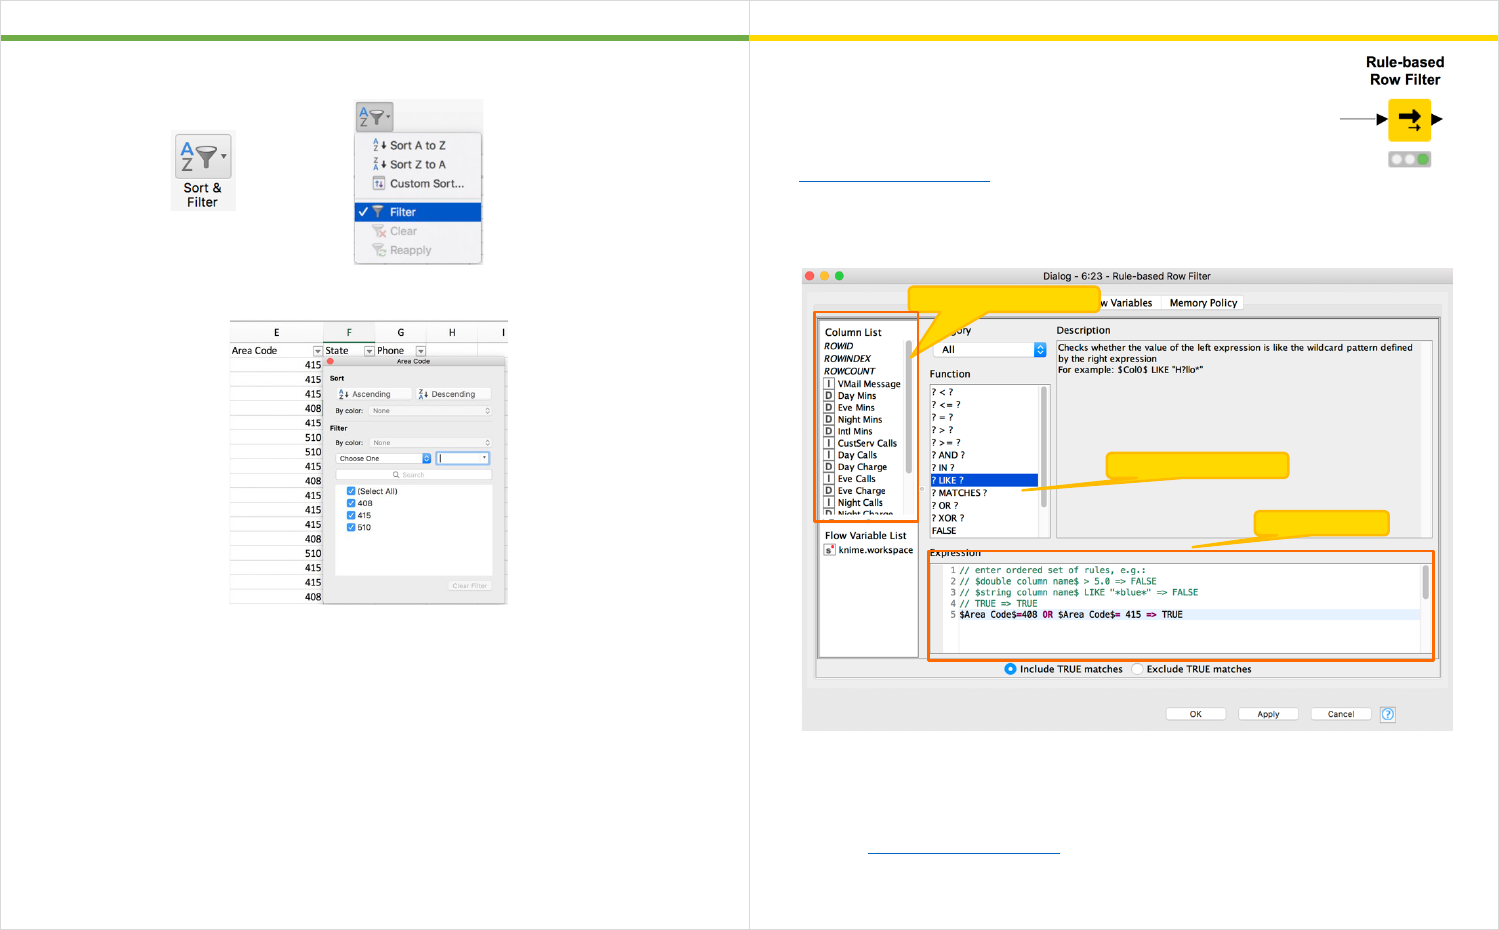
Filtering / Removing Rows with Different Values Rule-based Row Filter
Excel
KNIME Analytics Platform
To filter data select a random cell in the data tables, click on “Sort& Filter” and
select “Filter”.
Select the values you are interested in from the drop down menu.
To remove rows you have to select the rows you want to delete, right click and
choose “Delete Rows”.
In KNIME Analytics Platform there is no difference between
filtering and removing rows, as the original table is not deleted
and is still available at the output port of the previous node.
The Rule-based Row Filter node filters rows in or out according
to a set of rules. To include / exclude rows with two different values you can use
the following expression
$Column_Name$ = “Value 1” OR $Column_Name$ = “Value 2”=> TRUE
Note 1: At the bottom of the configuration window you can choose whether you
want to include or exclude TRUE matches.
Note 2: Columns are given by their name surrounded by $. Add them to the
expression frame by double clicking a column name in the Column List.
Note 3: The Rule-based Row Filter node has a number of different functions for
many advanced filter options.
Note 4: Different rows in the expression frame work like an OR conjunction.
List of functions
Column List
Expression
28
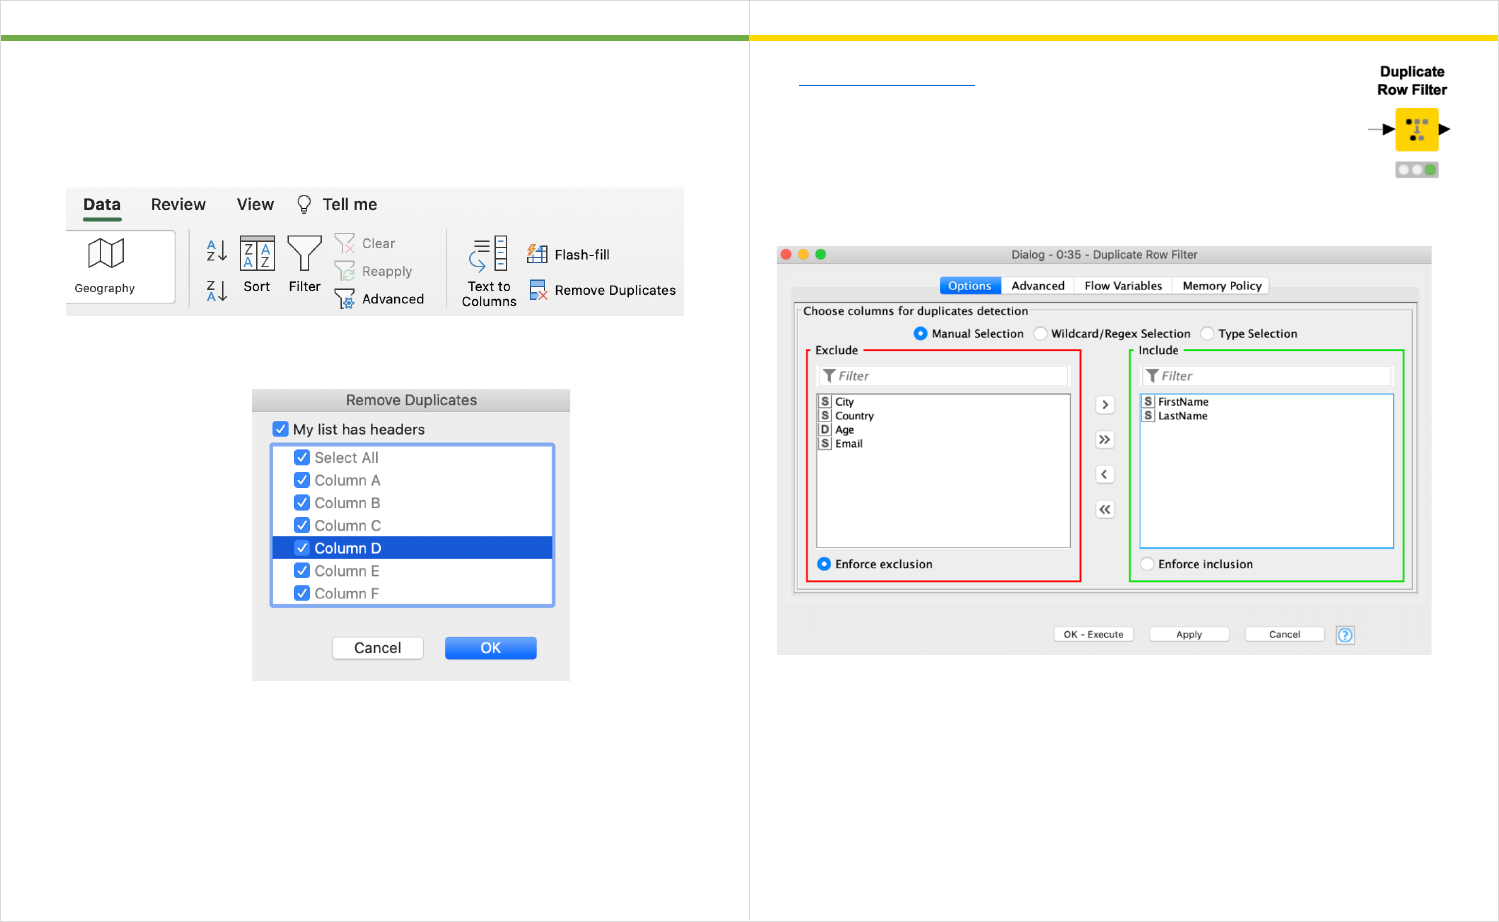
Removing Duplicates Duplicate Row Filter
Excel
KNIME Analytics Platform
To remove duplicates
• Select the range of cells that might have duplicates that you want to
remove.
• Go to the Data tab and select “Remove Duplicates”
• Select the columns for duplicate detection and click “OK”
The Duplicate Row Filter node detects and treats duplicates. The
default treatment removes duplicate rows like in Excel. The
columns in the “Include” frame correspond to the selected
columns for duplicate detection in Excel. This means rows that
have the same values in these columns are detected as
duplicates.
Note 1: In the “Advanced” tab you can change the treatment for duplicates, for
example to keep duplicate rows and to add a column showing which of the rows
are unique, chosen, or duplicates.
29
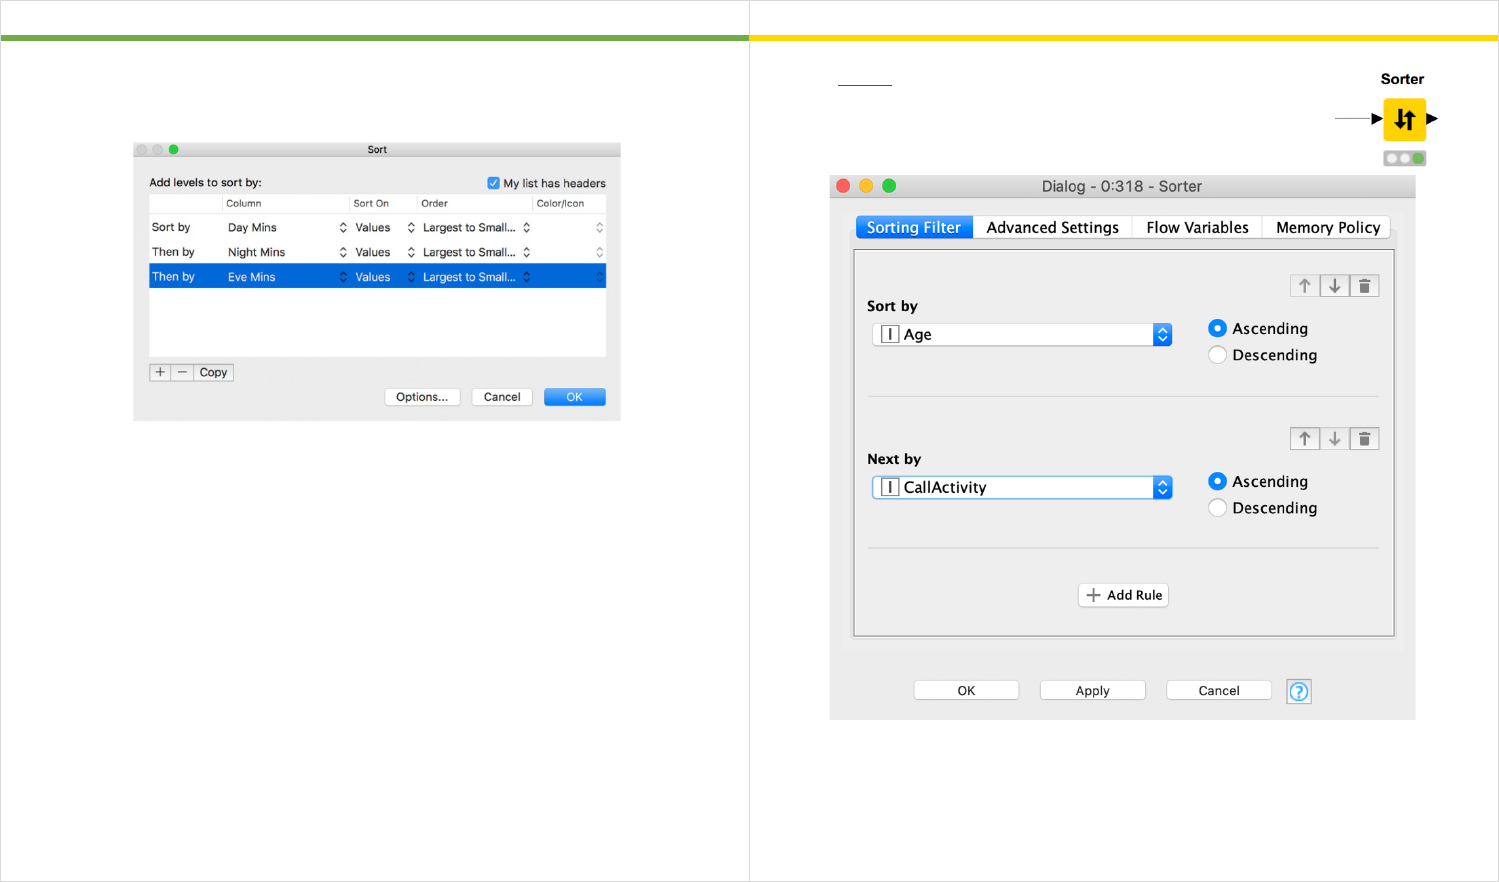
Sorting Rows by Multiple Key Columns Sorter Node
Excel
KNIME Analytics Platform
To sort rows by multiple columns, select the columns by which you want to sort.
Then click on Sort&Filter and select “Custom Sort”.
With the Sorter node you can sort by one or more columns in
either ascending or descending order.
Note 1: You can add as many key-columns as you want by clicking the “Add Rule”
button.
Note 2: You can temporarily sort the output table of a node. Click on the column
header based on which you want to sort and select whether you want to sort
ascending or descending.
30
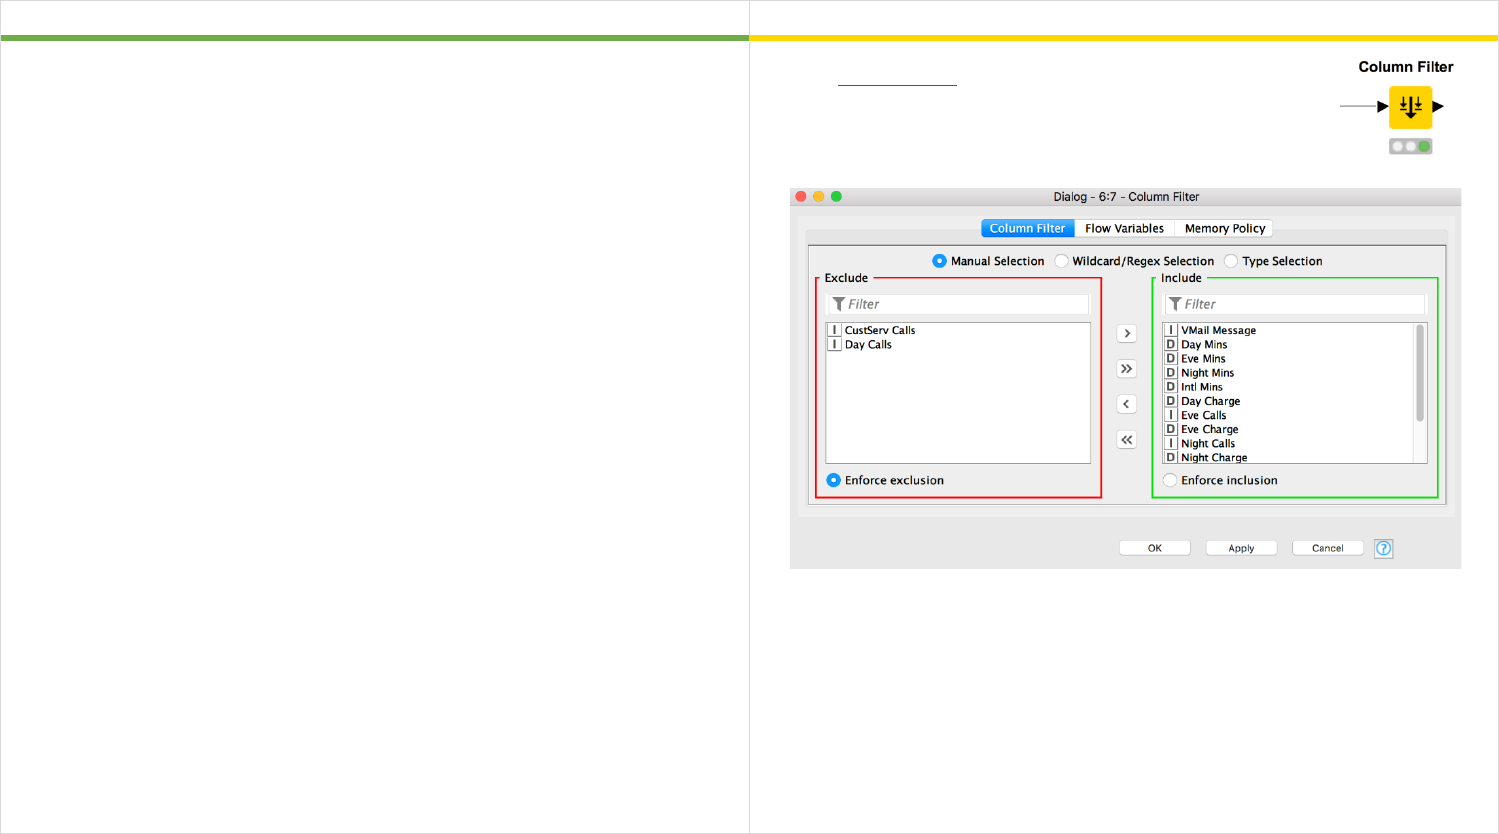
Removing Columns Column Filter Node
Excel
KNIME Analytics Platform
To remove columns just select and delete the superfluous columns.
Remember: If you remove a column used in a calculation field this will break your
formula.
With the Column Filter node you can delete superfluous
columns. Remember that the full data table will be still
available at the output port of the previous node and for
calculations you run upstream.
Note 1: You can use the arrow buttons in the middle to move columns from the
Include to the Exclude frame and vice versa.
Note 2: You can use the Wildcard/Regex Selection to automatically remove
columns by a name patter.
Note 3: You can use the Type Selection to automatically remove columns by data
type.
31
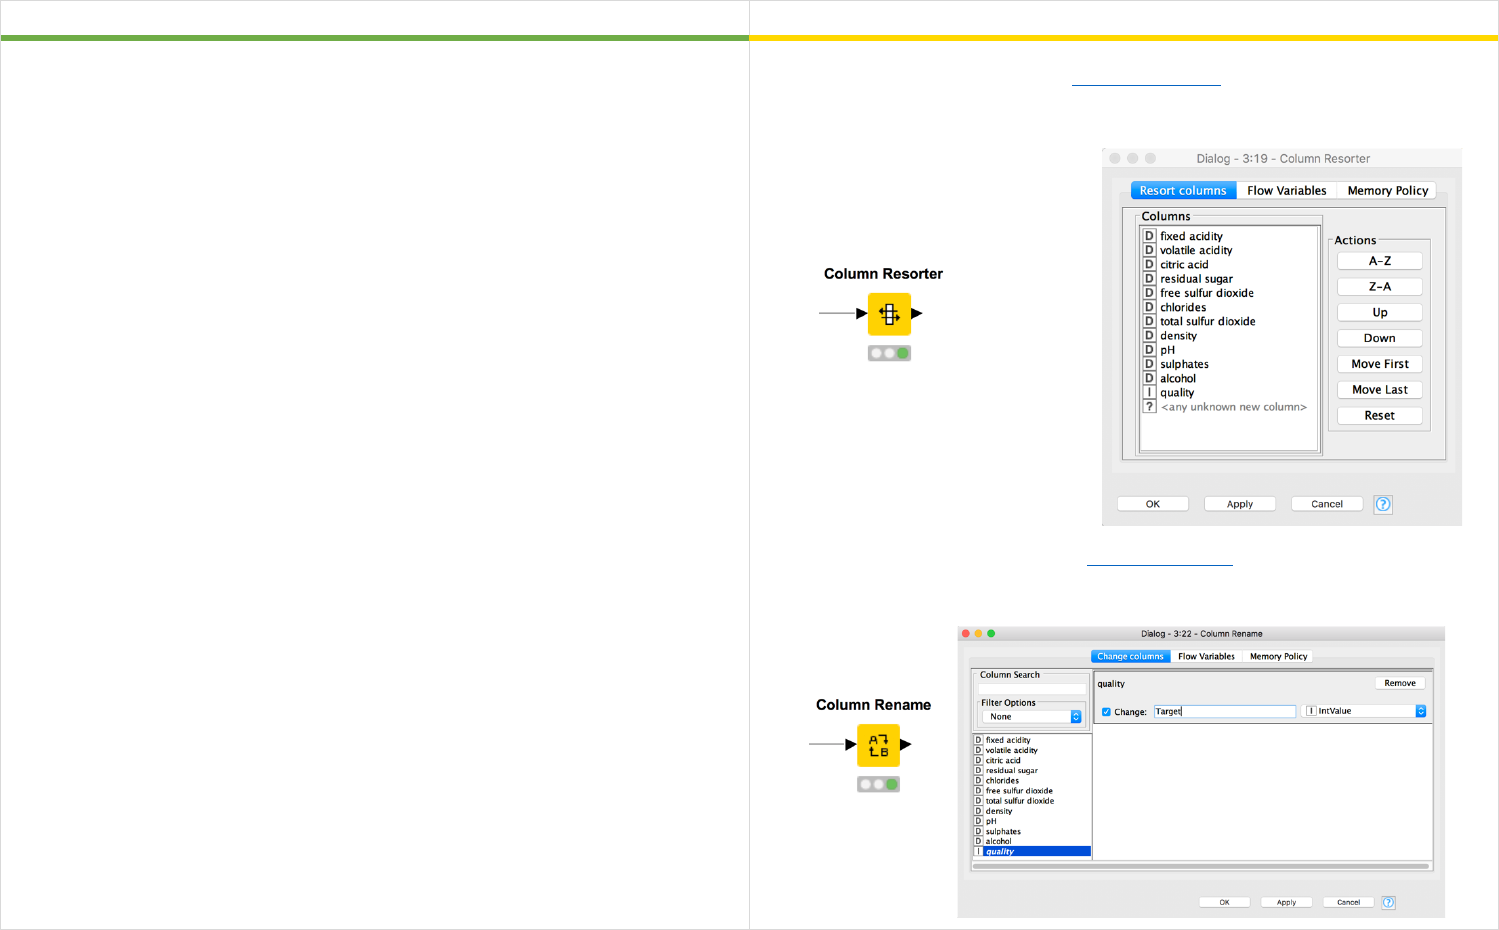
Reordering and Renaming Columns Column Resorter and Column Rename Node
Excel
KNIME Analytics Platform
To reorder columns:
• Select the column header of the column you want to move
• Press ctrl + shift + down arrow
• Click and hold the green outline of the column you want to move
• Drag your column to the desired position
To rename a column just click on the column cell and change the cell value.
To resort columns you can use the Column Resorter node. Define the desired
order of the columns by selecting the one you want to move and using the
“Actions” buttons on the right.
To rename columns you can use the Column Rename node. Double click the
column you want to rename, activate the checkbox “Change” and define the
column header in the textbox.
32
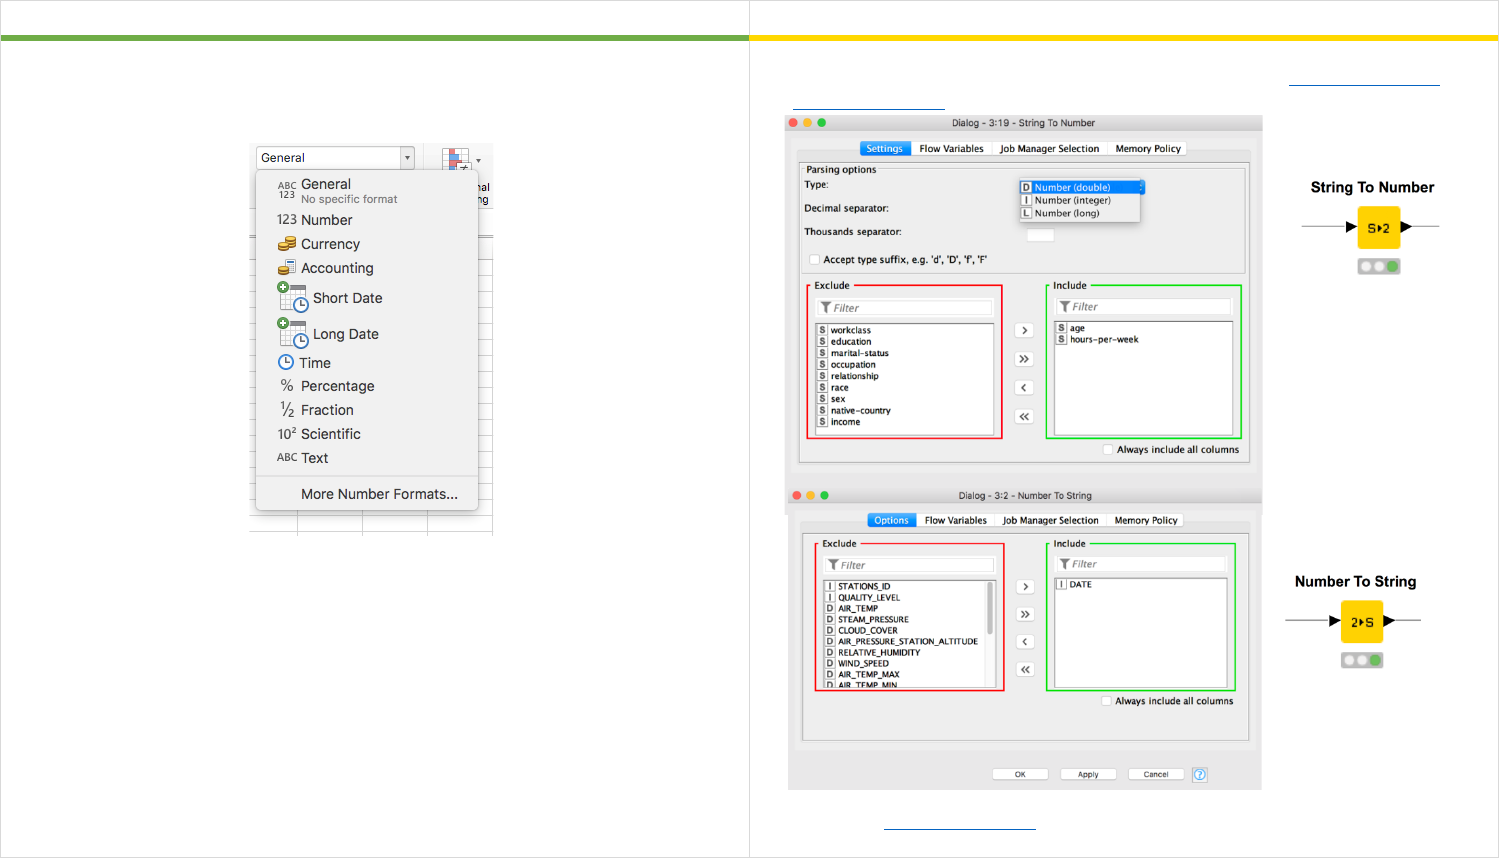
Changing Data Types String to Number and Number to String
Excel
KNIME Analytics Platform
To change the data type of a column or a cell, select it and go to the home tab.
Then use the drop down menu in the middle.
To change the data type of a column you can use either the String to Number or
the Number to String nodes.
Note 1: In the String to Number node you can choose between different numerical
types, e.g Double, Integer, and Long.

33
Tip on Data Manipulation with KNIME Analytics Platform
Resort columns
Remove columns
Change column name
Change data type
The Table Manipulator node allows you to
perform a lot of the described transformations in
one node. You can use it to:
• Concatenate multiple tables (after adding
dynamic input ports by clicking on … on
the lower left of the node)
• Filter, resort, and rename columns
• Change the data type of column

34
Data Aggregation
35
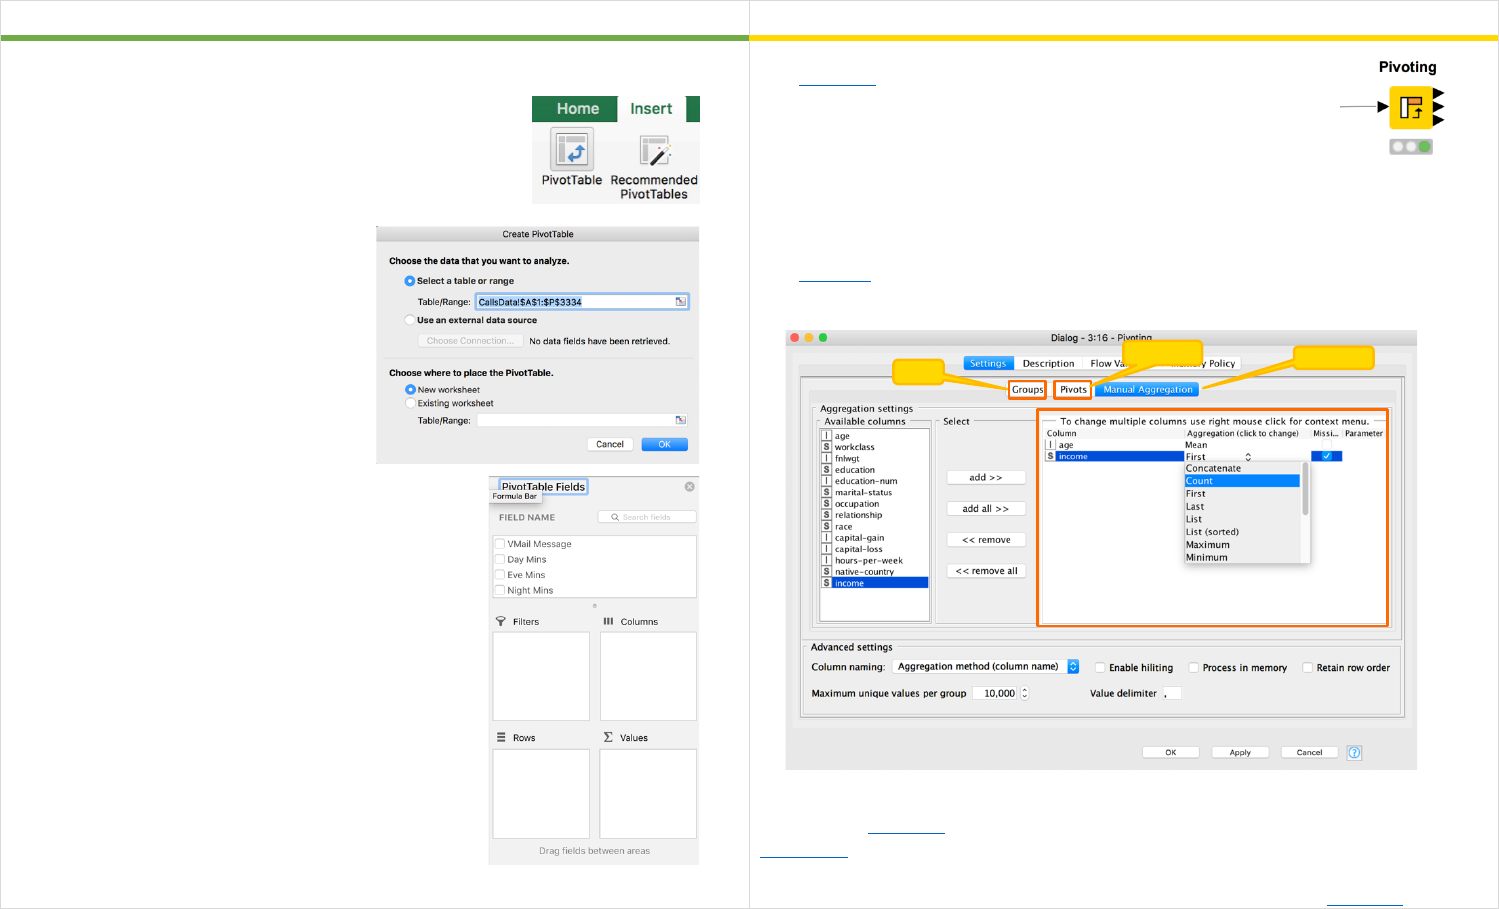
Pivot Tables Pivoting Node
Excel
KNIME Analytics Platform
To create a pivot table in Excel
• Click on any single cell inside the data set
• Go to the Insert tab and click Pivot Table
• Select table / range and output
location
• Choose pivot table fields by dragging them
into “Columns”, “Rows” and “Values”.
The Pivoting node is configured via three tabs:
• “Groups” defines the group columns, aka columns in
the “Rows”-frame in Excel (final row IDs)
• “Pivots” defines the pivoting columns, aka columns in
the “Columns”-frame in Excel (final column headers)
• “Manual Aggregation” corresponds to the “Value” setting option. Select
one or more columns for aggregation from the available columns list and
select an aggregation method for each selected column.
The Pivoting node produces three output tables: the pivot table and the total
values for columns and rows.
Note 1: The Pivoting node doesn’t have “Filter” options, but you can simply use a
Row Filter node beforehand.
Note 2: In KNIME you have to choose at least one column for the Groups and
Pivots. In case you want to choose only “Rows” you can use the GroupBy node.
Row
s
Column
s
Values
36
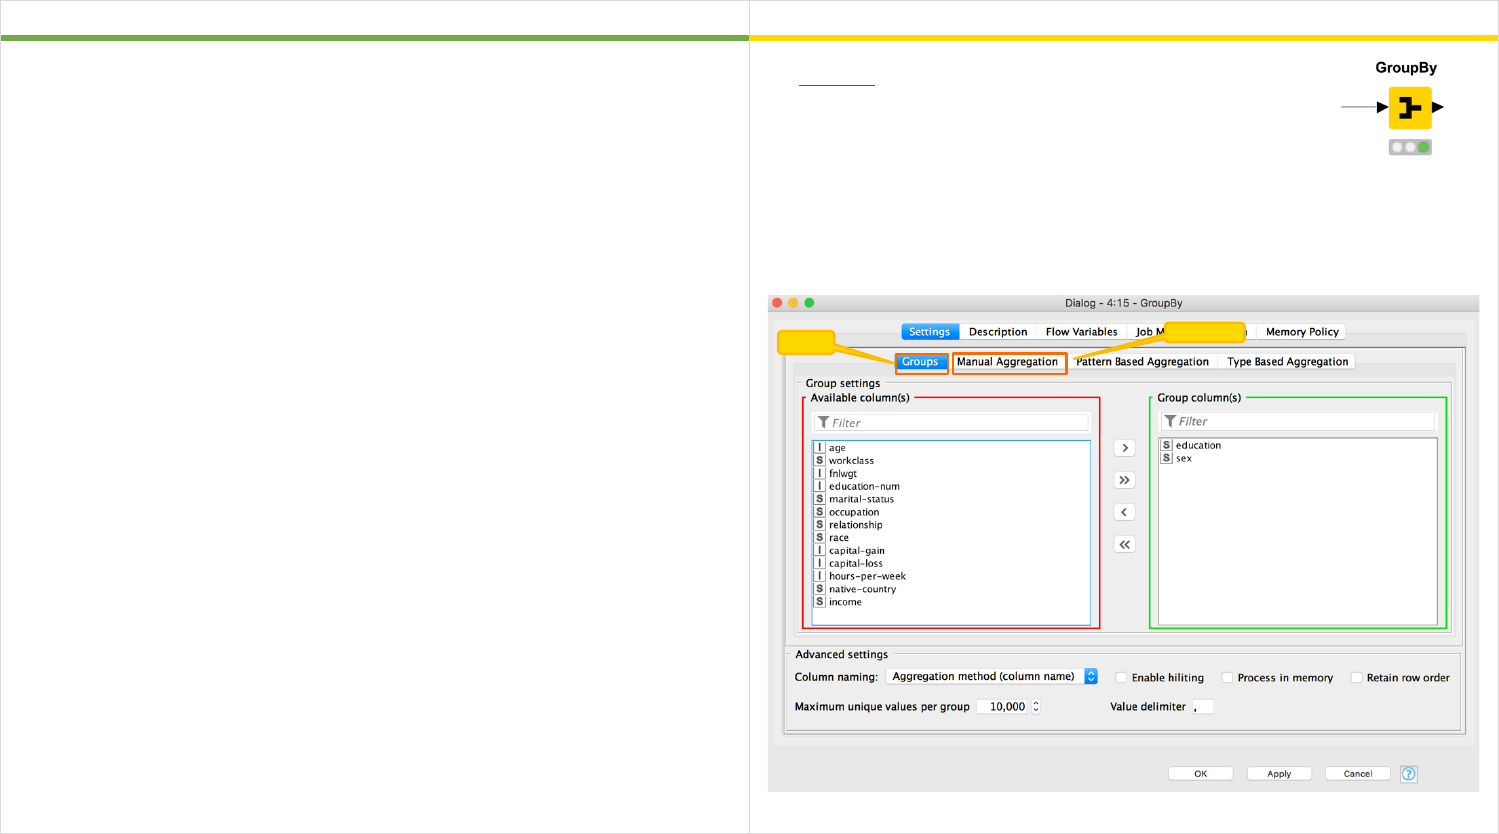
Pivot Table without Columns GroupBy Node
Excel
KNIME Analytics Platform
Create a pivot table as described on the previous page and drag only columns into
the “Rows” and “Values” frames.
The GroupBy node is configured via two tabs:
• “Groups” defines the group columns, aka columns in
the “Rows” frame in Excel (final row IDs)
• “Manual Aggregation” corresponds to the “Value”
setting option. Select one or more columns for
aggregation from the available columns list and select an aggregation
method for each selected column.
The “Value” setting option corresponds to the “Manual Aggregation” tab.
Rows
Values
37
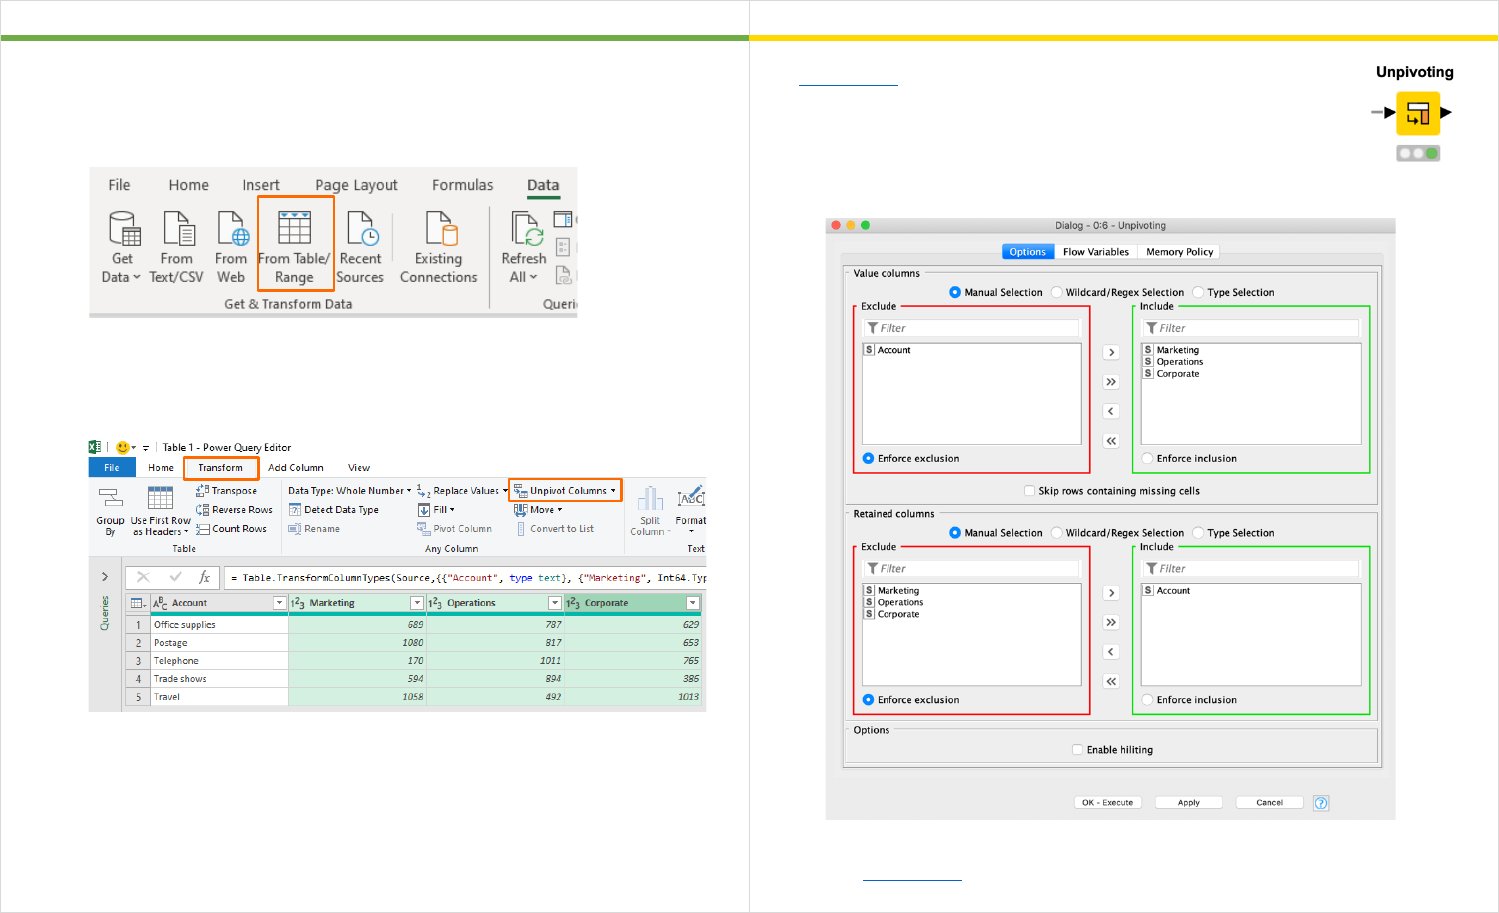
Unpivot Unpivoting Node
Excel
KNIME Analytics Platform
To create an unpivot table in Excel
• Store the dataset in a table.
• Select any cell in the table.
• Click the “Data” tab and select “From Table/Range”.
• This opens the “Power Query Editor”. Select the columns to unpivot by
holding down the shift key.
• Click the “Transform” tab of the Power Query Editor and select “Unpivot
Columns”.
• Click the “Home” tab of the “Power Query Editor”, and select “Close &
Load” to save the data unpivoted back in the Excel workbook.
Note 1: The unpivot command is available without any additional downloads in
Excel 2016 for Windows. If you are using a different version, you may need to first
download the free Power Query add-in from the Microsoft site. Authoring in the
Power Query Editor is not supported for Mac yet.
The Unpivoting node is configured via one tab:
• In the upper section, “Value columns” defines the
column(s) to unpivot, aka column selection in Excel.
• In the lower section, “Retained columns” defines the
column(s) that remains unchanged, aka unselected
columns in Excel.
Note 1: the Unpivoting node requires selecting at least one column in the “Value
columns” section.

38
Math Functions and Text Functions
39
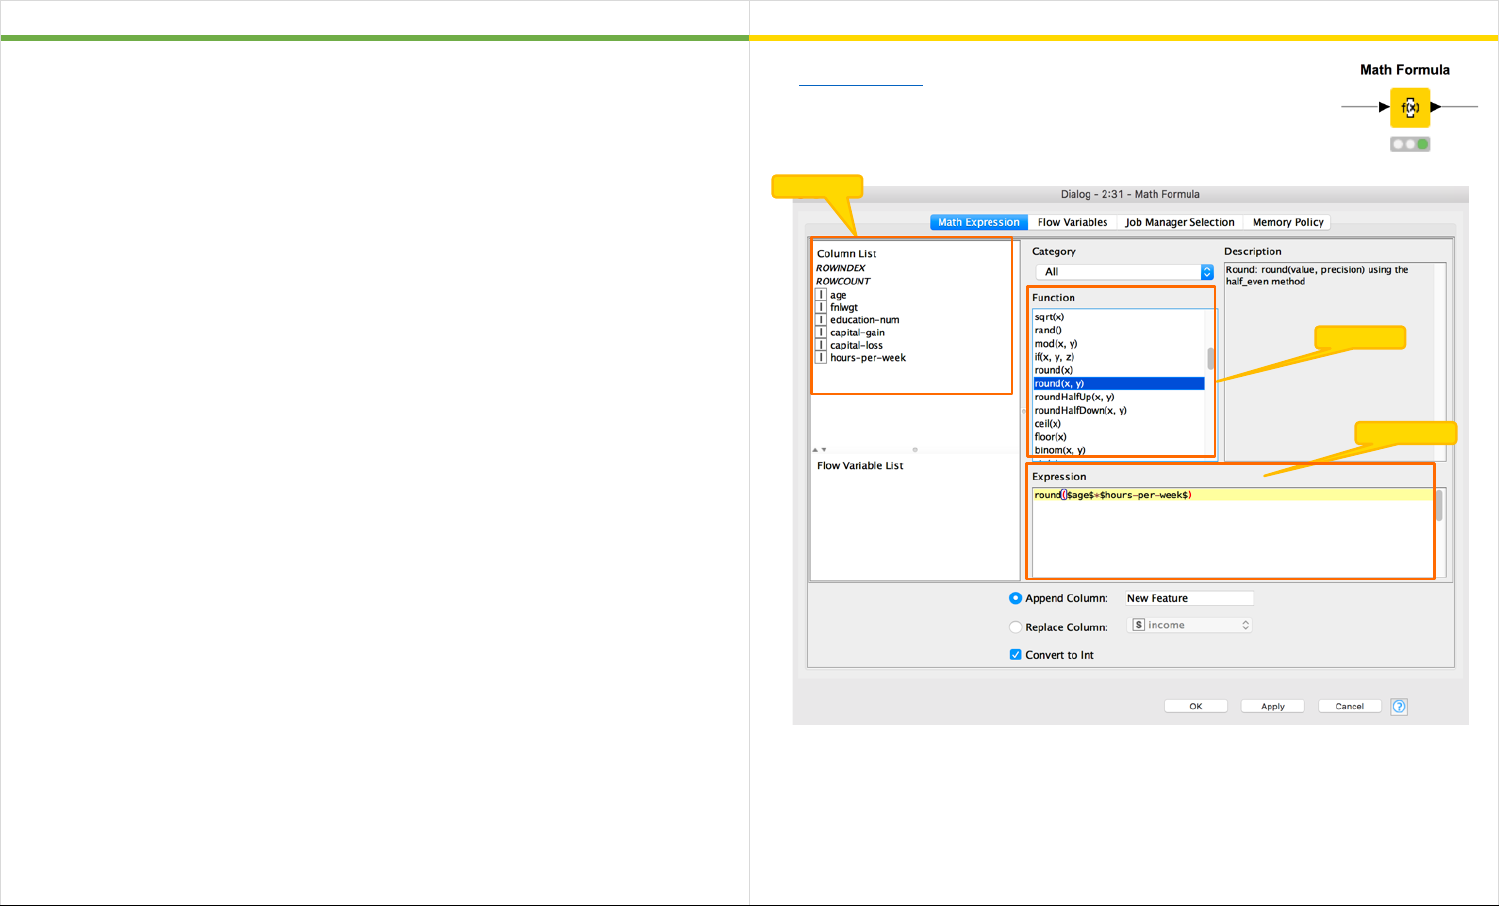
Math Functions Math Formula Node
Excel
KNIME Analytics Platform
Here is a list of frequently used math formulas in Excel. You will find a translation
into the KNIME formulas on the next page:
• SUM
• AVERAGE
• MEDIAN
• SUMPRODUCT
• ABS
• SUMIF
• Round functions
o ROUND
o ROUNDUP
o ROUNDDOWN
If you’re often used math formula is missing sent a message to
kathrin.melcher@knime.com.
The Math Formula node evaluates a mathematical expression
based on the values in a row. It has a long list of functions. The
table on the next page provides a translation of the most used
Excel functions.
Note 1: You can decide whether you want to append a new column or replace one
of the columns, by using the checkboxes underneath the Expression frame.
Note 2: By activating the checkbox “Convert to Int” you can ensure that your
output appended / replaced column is of type Integer.
Note 3: To perform the same mathematical expression on multiple columns you
can use the Math Formula (Multi Column) node.
Columns
Functions
Expression
n
40
Math Functions Math Formula Node
Excel
KNIME Analytics Platform
SUM(number1;number2;…)
COL_SUM(Col) = Sum of the values in the selected column.
Col1 + Col2. = Sum of the values in Col1 and the values in Col2 for
each row.
AVERAGE(number1;number2;…)
COL_MEAN(col_name) = Average of the values in the selected column.
average(Col1, Col2,…) = Average of the values of the selected columns for
each row.
MEDIAN(number1;number2;…)
COL_MEDIAN(Col_name) = Median of the values in the selected column.
Median(Col1, Col2,…) = Median of the values of the selected columns for
each row.
SUMPRODUCT(number1;number2;…)
Sequence of two “Math Formula” nodes:
First one: Multiply the two columns using the expression Col1*Col2 and
Append a new column.
Second one: Use COL_SUM on the new column.
ABS(number1)
abs(Col) = The absolute value for all values in the selected column
SUMIF(range; criteria)
Sequence of two “Math Formula” nodes:
First one: Append new column with if(criteria, column to sum ,0)
Second one: Use COL_SUM on the new column
Round functions:
ROUND(number1, num_digits)
ROUNDUP(number1, num_digits)
ROUNDDOWN(number1, num_digits)
round(Col, NumberOf Digits) = Number of digits is optional.
ceil(Col*10^(num_digits))/10^num_digits
floor(Col*10^(num_digits))/10^num_digits
41
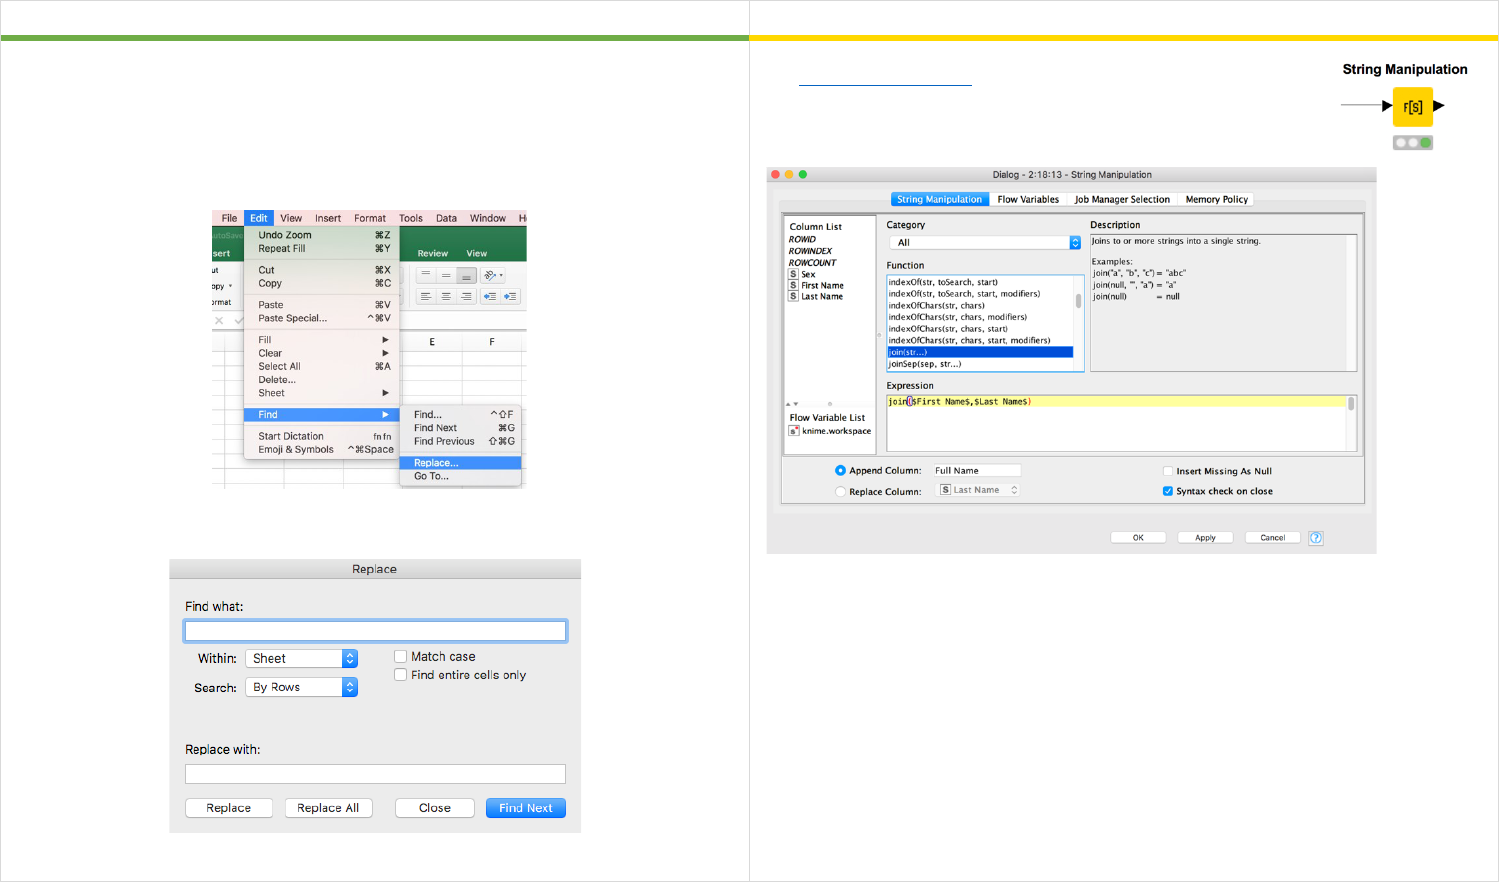
Concatenation and Find& Replace String Manipulation Node
Excel
KNIME Analytics Platform
1. The function CONCATENCATE( text1, text2,..) combines different texts into one
cell.
2. To find and replace a certain value you have to go to “Edit -> Find -> Replace…”
to open the dialog below.
In the dialog that opens, you can define the value you want to replace and the
value you want to replace it with.
The String Manipulation node manipulates columns of type
String based on the defined expression. A lot of different
functions are available.
1. CONCATENATE (text1, text2,..) from Excel
join(col1, col2 ,…) or join(col1, “your own string”,…)
Note 1: You can either join the values of different columns row wise, or add also
another String value to a column.
2. Find&Replace
Replace(string, search, replace)
Note 1: “string” corresponds to the column where you want replace something.
Note 2: To perform the same manipulation on multiple string columns you can
use the String Manipulation (Multi Column) node

42
Formatting Excel Tables
43
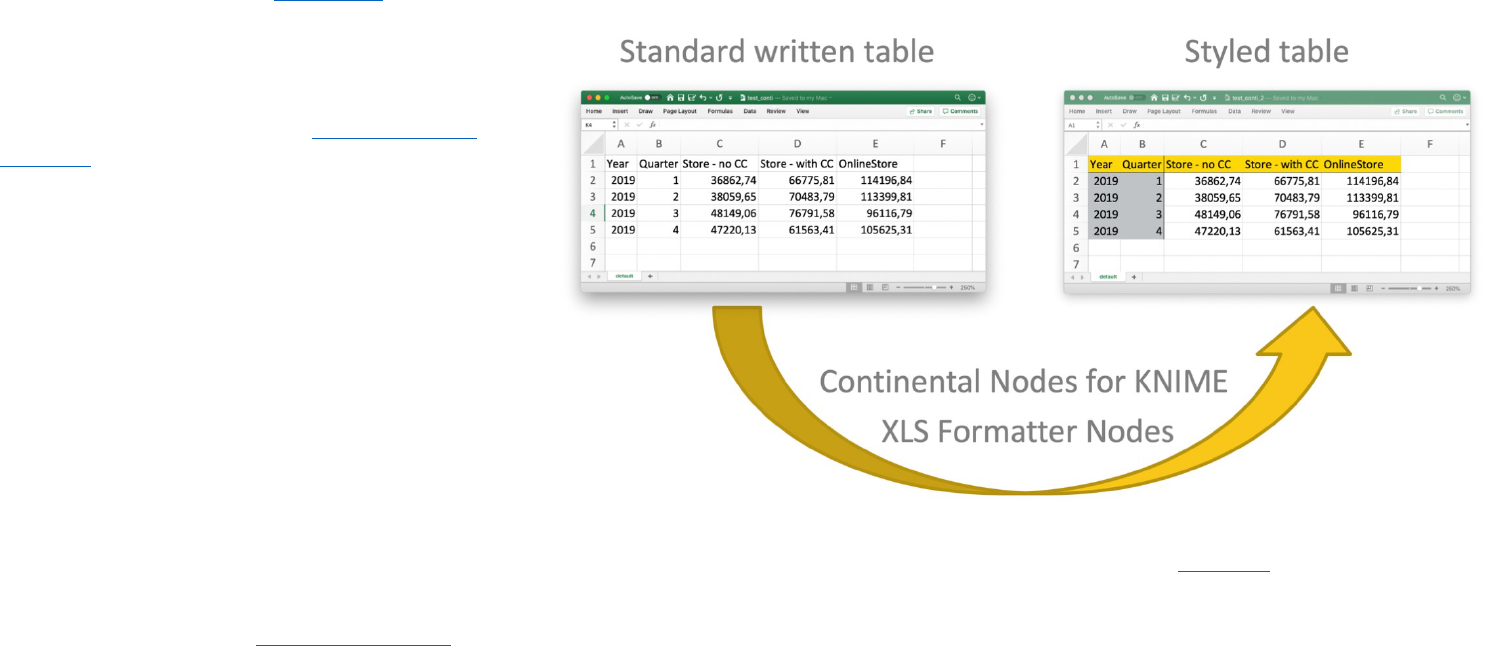
In chapter 1 we introduced the Excel Writer, which you
can use to write your result table into an Excel Sheet.
By default, this is a simple table without any
formatting like colors, border cells, etc. In this chapter,
we want to show you how to use the XLS Formatting
nodes of the community extension Continental Nodes
for KNIME. These nodes enable you to add formatting
instructions and advanced settings to already existing
XLS files, so that you can create Excel reports that
have the look and feel you used to.
Figure 1 On the left you can see an Excel table created by an Excel Writer node without
formatting, and on the right a styled table after formatting information
have been added with the XLS Formatter nodes, e.g. yellow background for the headers.
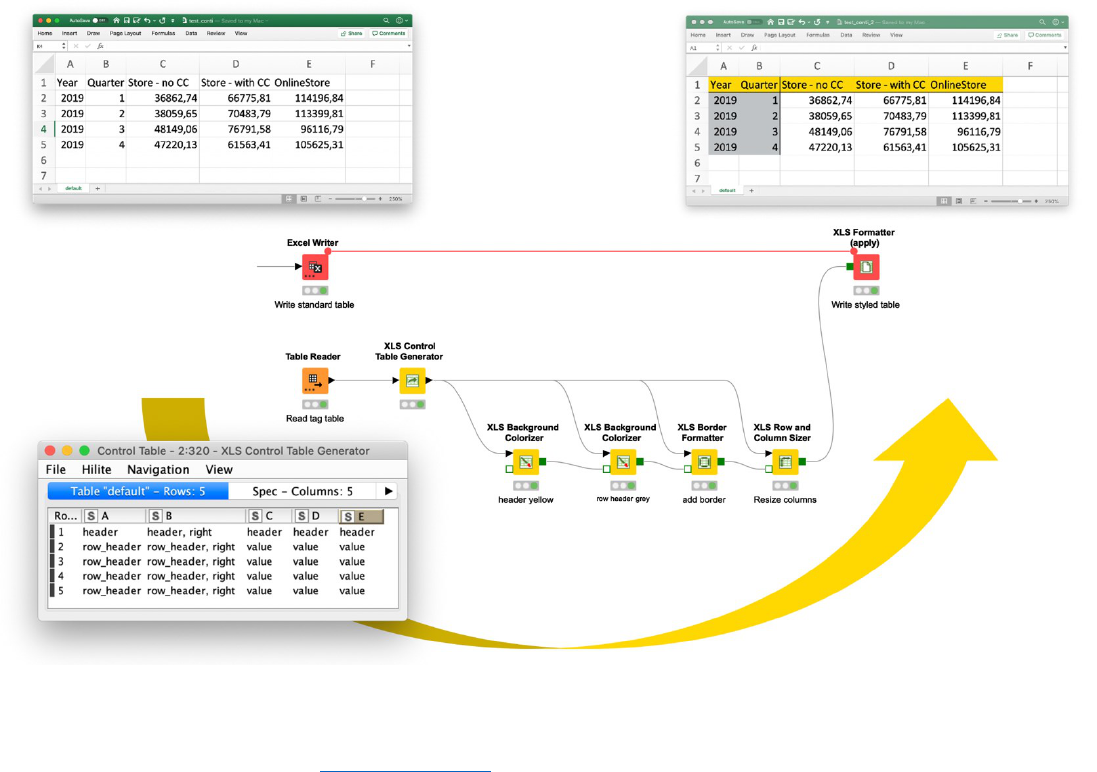
The key to your formatted Excel sheet is an additional
XLS Control Table of the same size as the original file
with one or more comma separated tag values, e.g.
header, border, etc. Different XLS Formatter nodes
assign different formatting instructions to the cells
based on these tags, e.g. you can change the
background color for all cells that are tagged “header”.
Your formatting can then be applied to an already
existing Excel sheet with the XLS Formatter (apply)
node.
Hint: Use a flow variable connection to make sure that
the Excel files are already written.
44
To summarize, this means we have to perform the following steps:
1. Write the table to an Excel Sheet
2. Create an XLS Control Table with tag values
3. Add formatting instructions based on tag values
4. Apply the formatting instructions to the existing Excel Sheet
Figure 2 Bottom left you can see a control table with tag values, which is the key for your styled table. Based on
the tag values the yellow XLS formatting nodes collect formatting instructions, which are them applied by the
XLS Formatter (apply) node, producing the styled table (top right).

45
This chapter is divided into two sections. The first section of this chapter
shows two ways of creating an XLS Control Table with tags. The second
section introduces some of the nodes that are available to add formatting
instructions.
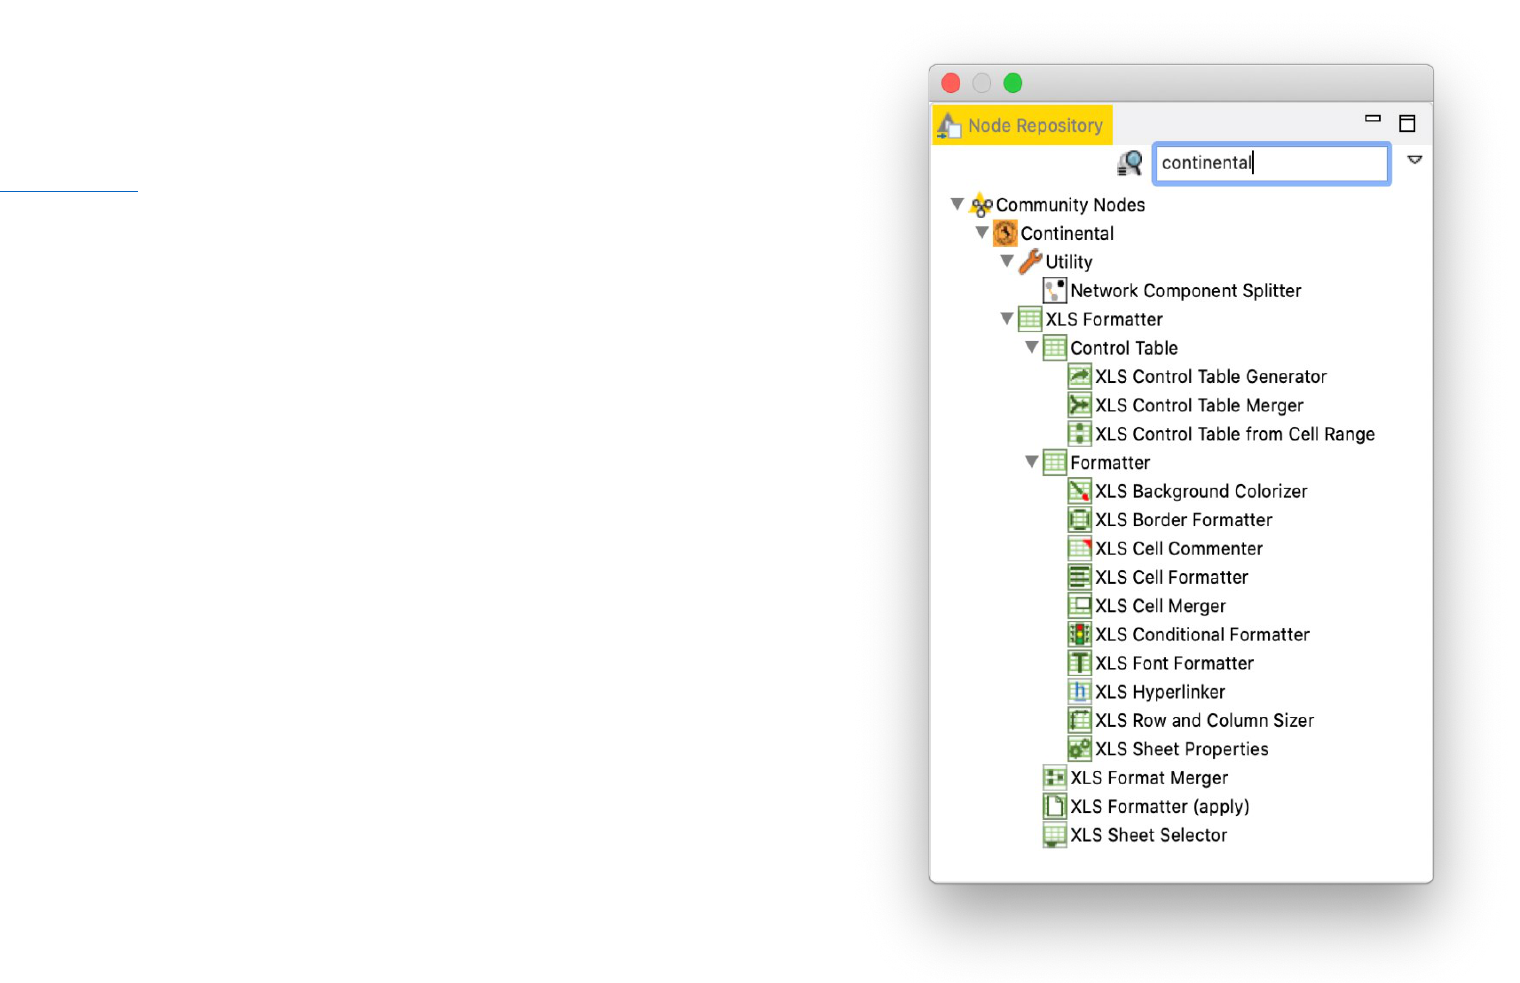
Hint: You can’t find the nodes in your node repository? The Continental
Nodes for KNIME are a community extension that you can install by
dragging the extension from the KNIME Hub to KNIME Analytics Platform
or by installing the extension as described in this video.
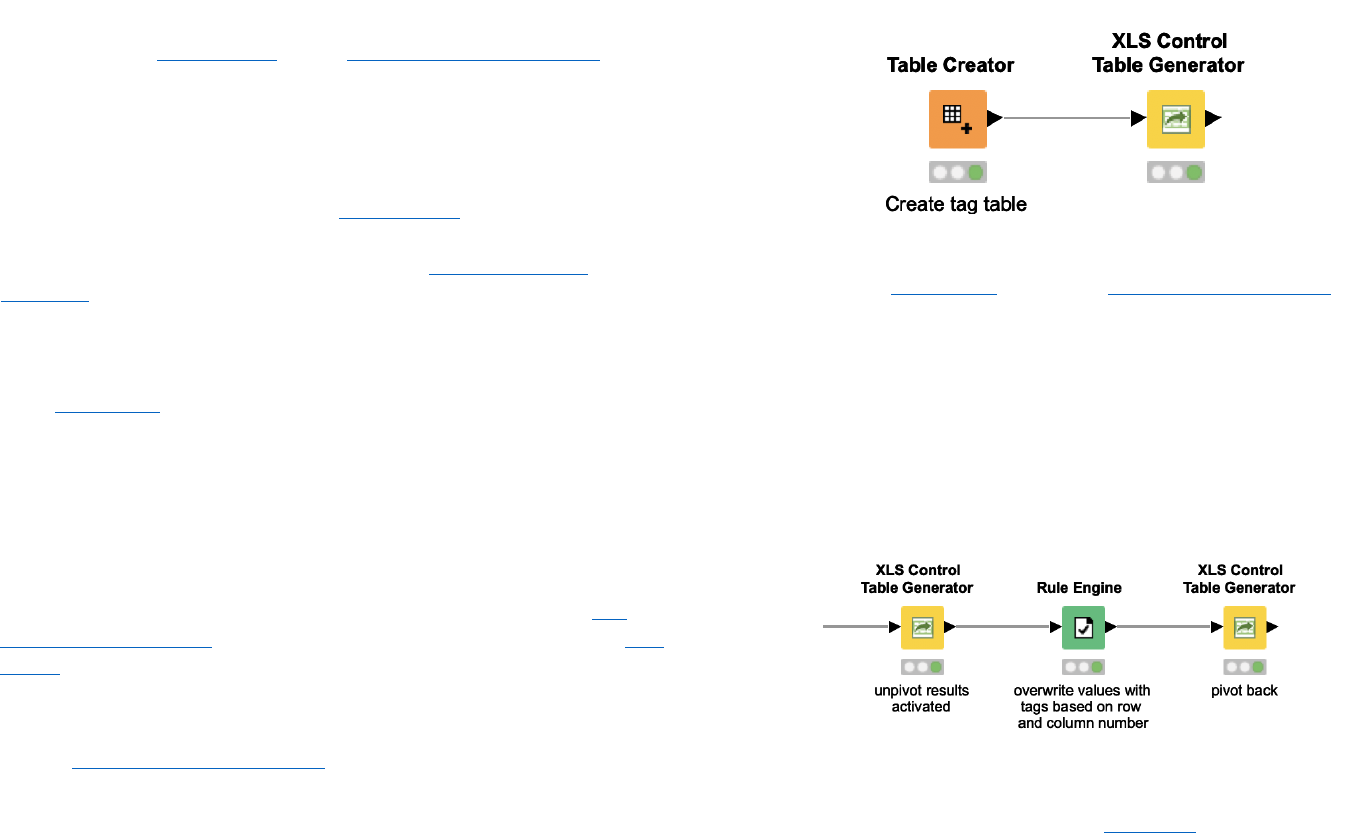
Creating an XLS Control Table with Tag Values
As the saying goes, many roads lead to Rome. This section introduces
two different roads or approaches for creating an XLS Control Table.
(The second approach happens to be my personal favorite!) The “key
node” in both examples is the XLS Control Table Generator node.
Figure 3 The configuration dialog for the XLS Control Table Generator node
46
Figure 5 Here you can see another option to create a control
table using a combination of two XLS Control Table Generator
nodes and a Rule Engine node. The Rule Engine node is used to
define tag values based on the row and column number.
Approach 1: Table Creator + XLS Control Table Generator
The first approach to create an XLS Control Table with tags involves a
combination of a Table Creator and an XLS Control Table Generator node.
This is an easy approach, however the downside is that it entails a lot
manual work creating the tag table and you have the problem that the tag
table is static. Therefore, this approach is only recommended for small
tables, where the number of rows and columns won’t change.
Open the configuration window of the Table Creator node to add one or
multiple tag values for each cell. If you want to enter multiple tags,
remember to separate them with a comma. The XLS Control Table
Generator node transforms the table into an XLS Control table and
replaces the column names with letters and the row IDs with numbers.
The checkbox “write column header to first row” gives you the option of
retaining the column headers, similar to the option “add column headers”
in the Excel Writer node.
Figure 4 Here you can see one option to create a control table
using the Table Creator node and the XLS Control Table Generator
node
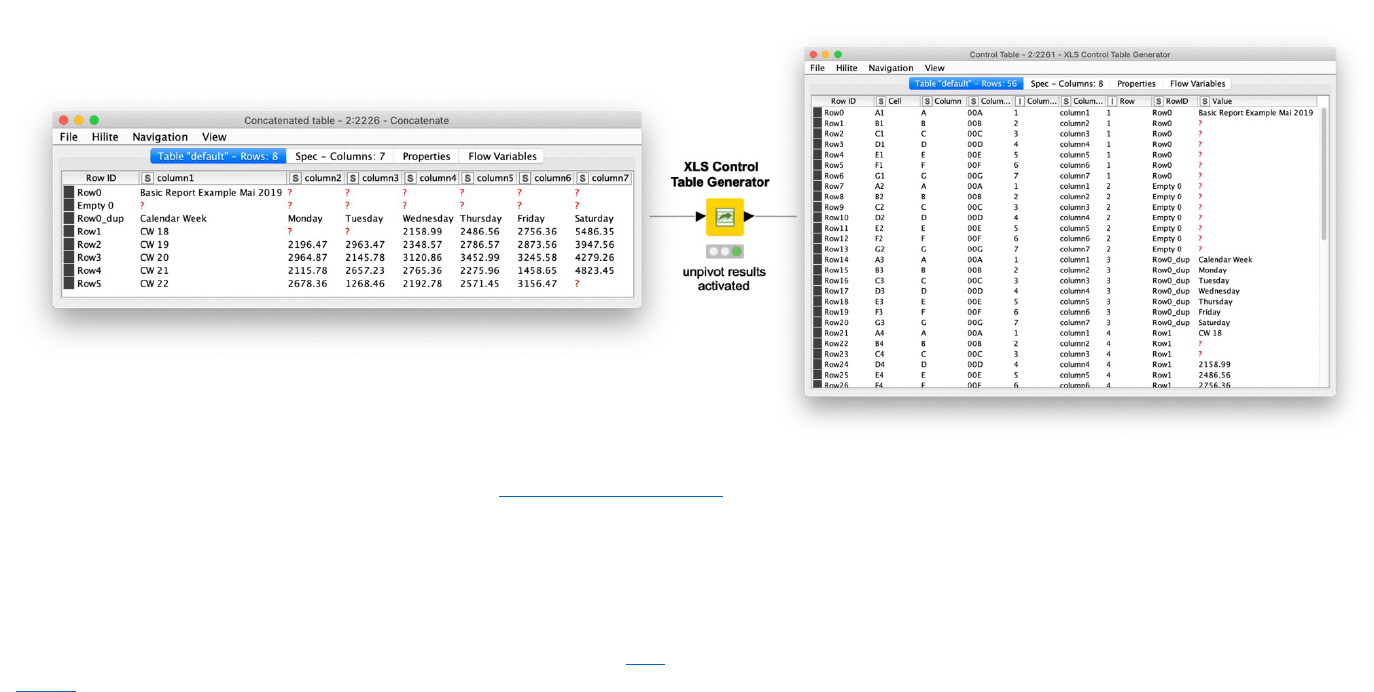
Approach 2: XLS Control Table Generator + Rule Engine
The second approach we want to show uses a combination of two XLS
Control Table Generator nodes with the unpivot option activated and a Rule
Engine node.
Activate the checkbox “unpivot result table” in the configuration window of
the first XLS Control Table Generator node to output a table that has one row
for each cell in the input table, including the value, the row number, the
column header, and more.
47
Figure 6 Here you can see the resulting table when activating the checkbox “unpivot result
table” in the XLS Control Table Generator node. The node creates one row for each cell
including value, row number, column header, etc.
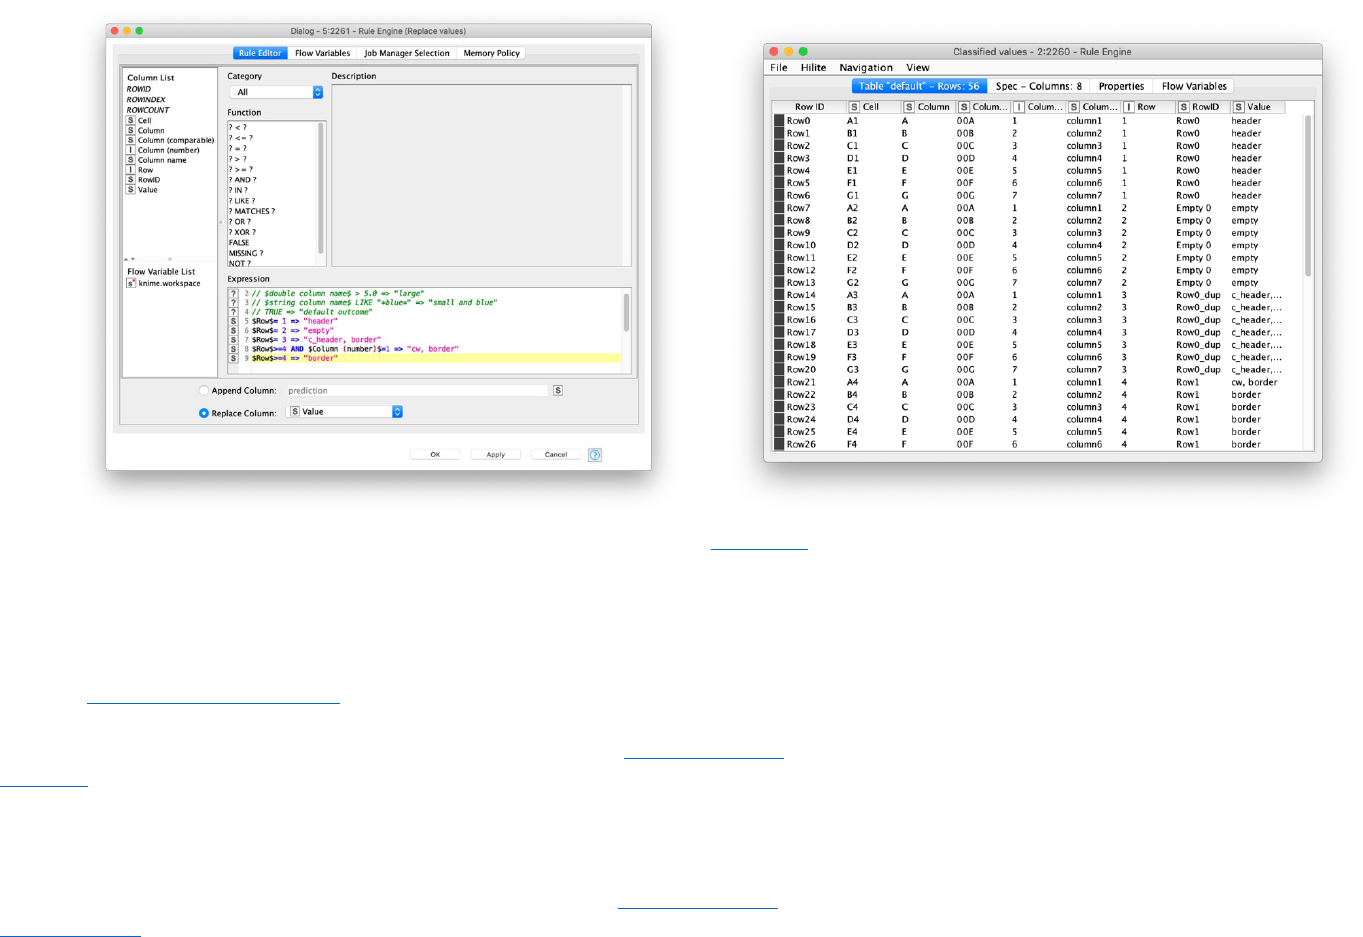
This table is a great basis to now transform values into tags with the Rule
Engine node. For example, we can replace all values in the first row with the
tag “header”, or replace all values in the first column that have a row number
higher than 3 three with the tag value “cw”.
Hint: Activate the checkbox “Replace Column” and select the column “Value”.
48
Figure 7 On the left is the configuration dialog of the Rule Engine node. In the Expression section you can see
defined rules to replace the original values with tags, based on the row and column number. On the right you
can see the output table where the rules are applied, and the values are replaced with the different tags
A second XLS Control Table Generator node can transform this table back into its original
form, where the values are replaced with the different tag. This feature is automatically
activated when the node detects an input table that was created by an XLS Control Table
Generator node in unpivot mode.
This approach involves much less manual work compared to the first approach and can be
implemented in a way to handle changing table dimensions gracefully.
Hint: Another helpful node to create a static XLS Control Tables is the XLS Control Table
from Cell Range node.
49
Adding Formatting Actions based on Tag Values
The next step to adding background colors or a border, etc. to your table is a sequence of
XLS Formatting nodes, similar to the workflow in figure 2.
As you can see all nodes in the example workflow have two input ports and one output port:
• a data input port
• an optional XLS Formatter input port (square with green border)
• an output port, which is an XLS Formatter port
The green square is a special port type of the extension, which collects the different
formatting instructions. The data input port expects the table with the tag values.
The optional input port can be used to feed an XLS Formatting table with previous
formatting instructions to which the instructions of the node should be added.
The figure on the right shows you an overview of all the nodes in the Continental extension. I
will introduce my favorite ones and leave it up to you to explore the others.
50
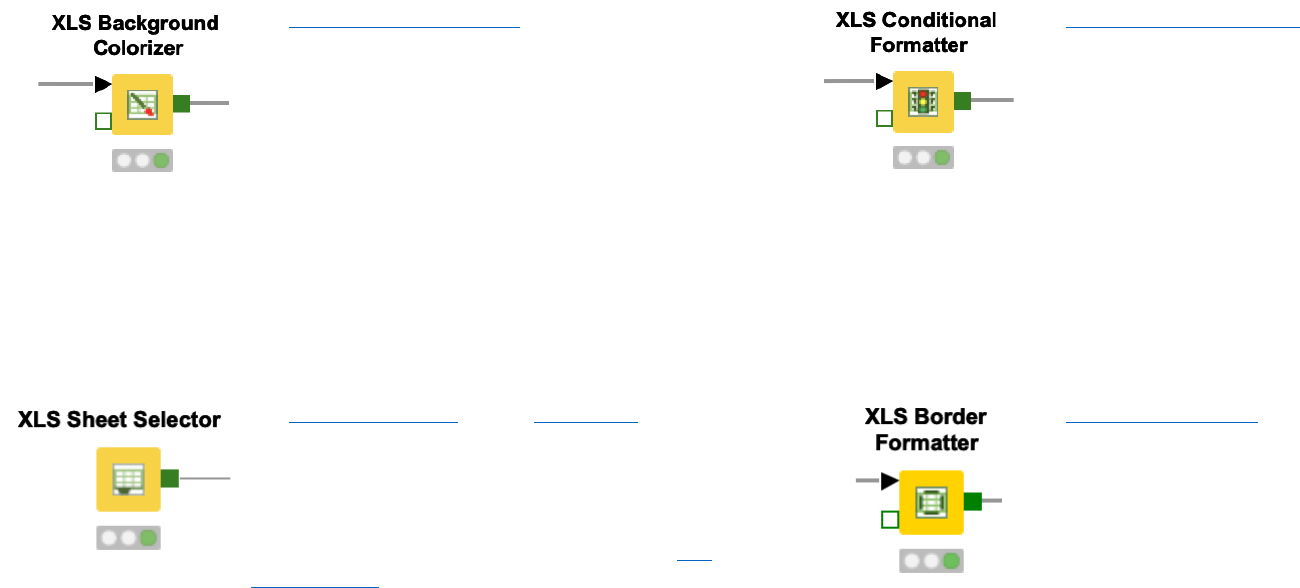
The XLS Background Colorizer node changes the
background color of cells. You can assign either a
static color and / or pattern fill. One option is to assign
the same color to all cells with a specific tag value, e.g.
all cells with tag “header” should have a yellow
background. Another option is to use RGB values in
either hex syntax #FFD800 or decimal syntax R/G/B as
tags and use them as the background color.
The XLS Conditional Formatter node changes the
background for the cells with a certain tag value
according to their numerical value. In the configuration
window you can define a color scale by setting a
minimum and maximum value and assigning a color to
each. Optionally you could set a mid point value and
assign a color to that. Cells with values higher or lower
than the thresholds will have the background color of
the minimum /maximum value.
The XLS Border Formatter node can add borders to a
given range specified by a certain tag or by all tags. By
activating the corresponding checkboxes, you can add
borders to the top, right, bottom, and left. In addition to
adding a border around the range specified by the tags,
the node gives you the option to use inner vertical and
horizontal boarder lines in each cell, too.
The XLS Sheet Selector and the XLS Merger node are
really helpful nodes if your EXCEL file has more than
one sheet. By default the formatting is always applied
to the first sheet. So, if you have an Excel file with only
one sheet you don’t have to worry about these two
nodes. However, if you have multiple sheets the XLS
Sheet Selector allows you to define which sheet your
XLS Control table is for.
51
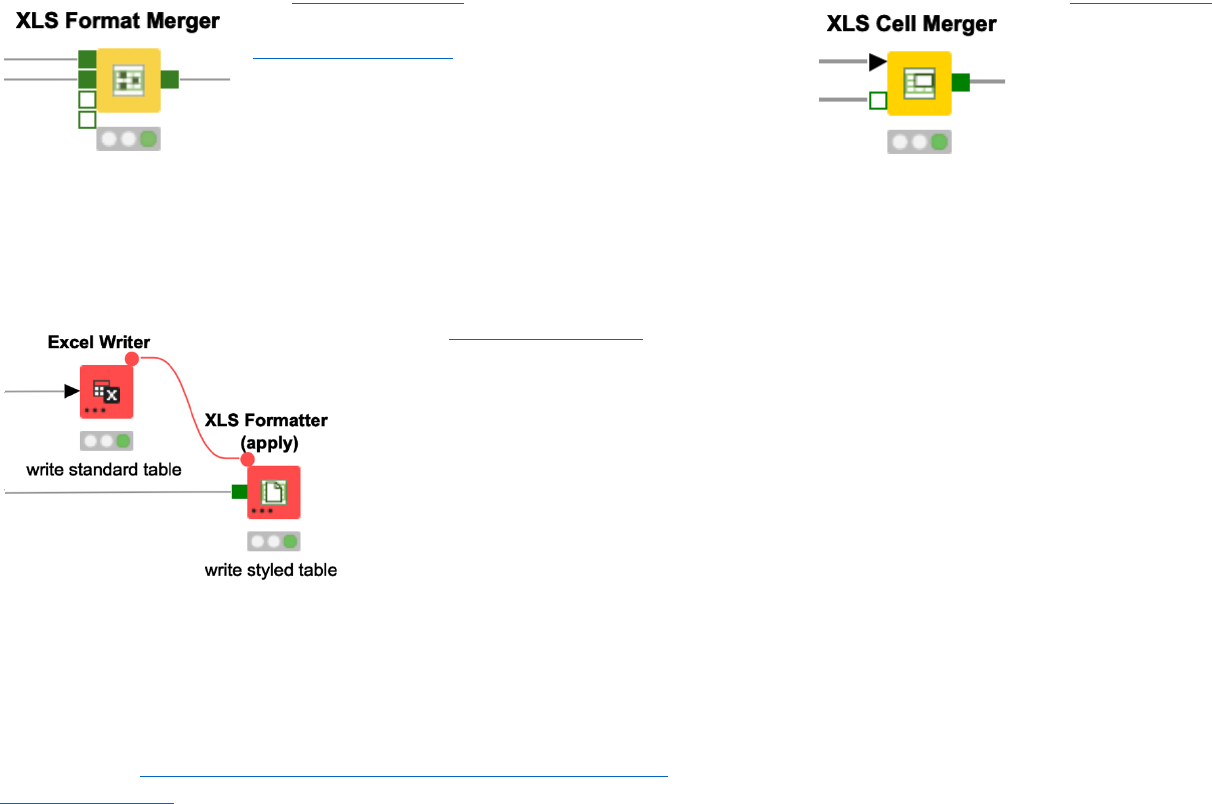
The XLS Cell Merger node merges the cells for given
rectangular ranges of input tags into one cell. For
example, we can merge all cells in the first row and
centralize the title with the XLS Font Formatter node.
This node works only on strictly rectangular ranges.
The value of the merged cell is the value of the most
top left cell of the merged range.
The XLS Format Merger node allows you to either combine
formatting instructions for different sheets prior to using the
XLS Formatter (apply) node or when applied to the same
sheet, it merges the properties at the lowest detail level (e.g.
the formatting instructions for the cell A1 is bold in control
table one and italic in control table two. The subsequent
formatting instruction for A1 is italic and bold). Thereby, the
upper input port overwrites a lower one in case of conflicting
information (e.g. two different font colors for the same cell).
The XLS Formatter (apply) node reads an unformatted Excel file, applies all the collected formatting
instructions, and saves the nice Excel file in the defined output location.
This was a short introduction. You can find further information about the
different XLS Formatter nodes in the Continental extension in the
documentation https://www.knime.com/community/continental-nodes-for-
knime-xls-formatter or, from within KNIME Analytics Platform, by looking in the
node description of each individual node.

52
The KNIME Booklet for Excel Users
Are you an experienced Excel user and want to start using KNIME Analytics Platform?
It’s sometimes difficult to switch from one software tool to another. But this booklet is the
perfect starting point as it maps the most commonly used Excel functions and techniques
to their KNIME equivalents. Find out, for example, how data reading, filtering, sorting, and
vlookup work in KNIME.
For a complete introduction to KNIME, please refer to my book “KNIME Beginner’s Luck”
available from KNIME Press under https://www.knime.com/knimepress
About the Author
Kathrin Melcher is currently a Data Scientist at KNIME. She holds an MSc in Mathematics,
from the University of Konstanz, Germany. She joined the KNIME Evangelism team in May
2017 and has a strong interest in data science, machine learning, and algorithms. She
enjoys teaching and sharing her knowledge on these topics.
