Cod. 598144
Rev. 12/1218
Operating Instructions Manual for
VENDED washers
GIRBAU, SA
Crta de Manlleu, km. 1
08500 VIC (Barcelona) • SPAIN
National sales:
T.(+ 34) 902 300 359
International sales:
T.(+ 34) 938 862 219
Service:
T.(+ 34) 902 300 357
www.girbau.es
For USA and CANADA:
CONTINENTAL GIRBAU Inc.
2500 State Road 44
WI 54904 Oshkosh • USA
Tel. 1(920) 231-8222
www.continentalgirbau.com
EN
COIN
CONTROL
PROFIT PLUS
CONTROL
HS-6/EH
RMS/RMG/REM

Cod. 598144
Rev. 12/1218
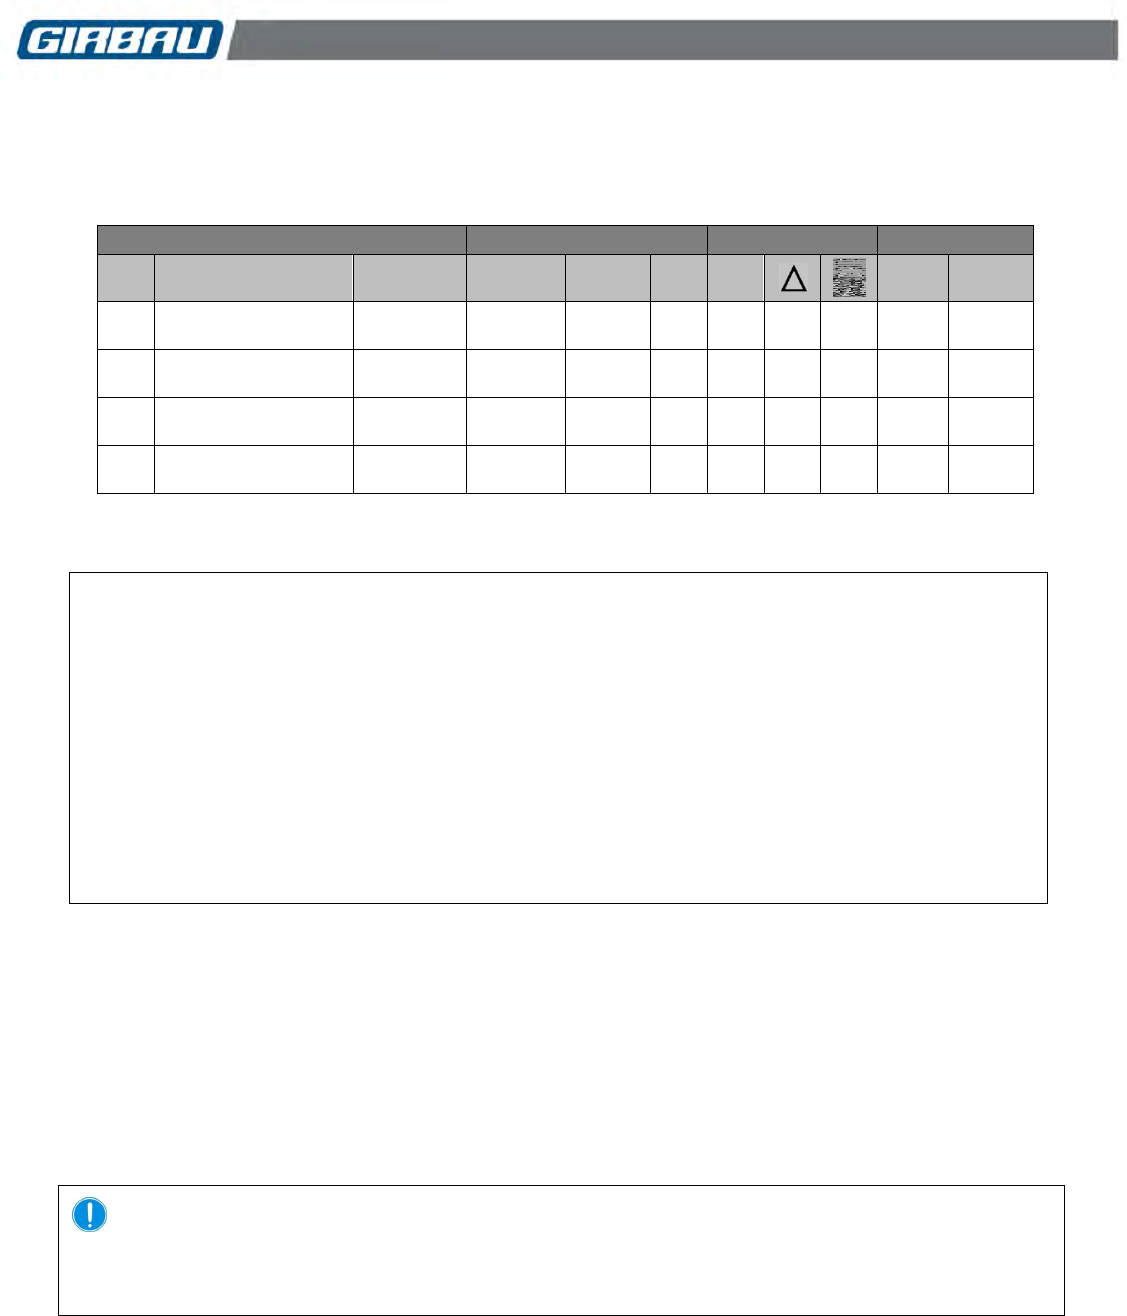
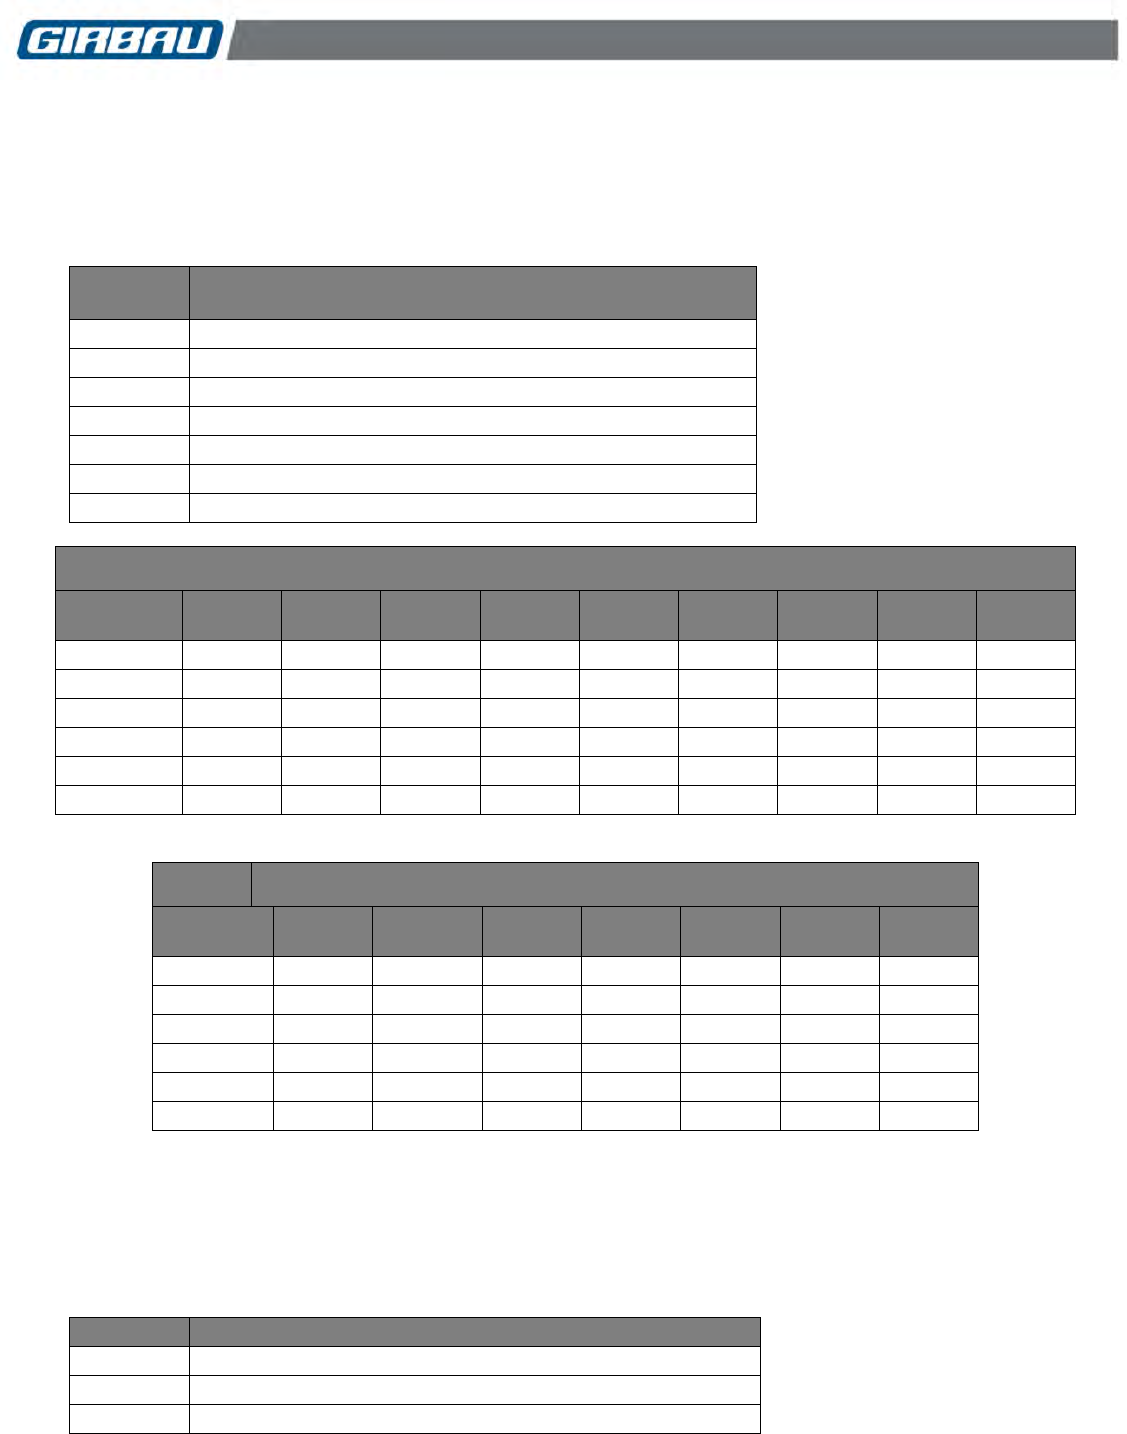
Models
High speed
From software
version
HS-6008
45
HS-6013
45
HS-6017
45
HS-6023
45
HS-6024
80
HS-6032
78
EH020
45
EH030
45
EH040
45
EH055
45
EH060
80
EH080
78
EH090
45
Models
Medium speed
From software
version
RMS610
45
RMS/RMG613
80
RMS/RMG617
80
RMS/RMG623
80
RMS/RMG628
80
REM025
45
REM/RMG033
80
REM/RMG040
80
REM/RMG055
80
REM/RMG070
80

Contents 3
Cod. 598144
Rev. 12/1218
CONTENTS ...................................................................................................................................................................... 3
SAFETY INSTRUCTIONS ................................................................................................................................. 5
1. INTRODUCTION AND APPLICATION .......................................................................................................... 9
2. DESCRIPTION ............................................................................................................................................... 9
2.1. Intended use of the washing machine .................................................................................................. 9
2.2. Construction characteristics .................................................................................................................. 9
2.3. Protection, safety and control elements .............................................................................................. 10
2.4. Safety functions ................................................................................................................................... 10
2.5. Characteristics of the control .............................................................................................................. 10
3. MODES OF USE .......................................................................................................................................... 11
4. PROGRAM EXECUTION MODE ................................................................................................................. 12
4.1. Control panel ....................................................................................................................................... 12
4.1.1. Machines with COIN CONTROL .................................................................................................. 12
4.1.2. Machines with PROFIT PLUS CONTROL ................................................................................... 12
4.2. Loading the washing machine ............................................................................................................ 13
4.3. Using the dispenser ............................................................................................................................ 14
4.4. Starting a program .............................................................................................................................. 16
4.4.1. Machines with COIN CONTROL .................................................................................................. 16
4.4.2. Machines with PROFIT PLUS CONTROL ................................................................................... 16
4.4.3. Door lock ...................................................................................................................................... 16
4.5. Program application and contents ...................................................................................................... 17
4.6. Unbalance control ............................................................................................................................... 18
4.7. Stop modes ......................................................................................................................................... 19
4.7.1. End of cycle and door opening ..................................................................................................... 19
4.7.2. Pressing the STOP key ................................................................................................................ 19
4.7.3. Interruption of the power supply ................................................................................................... 20
5. ADVANCED USE MODE ............................................................................................................................. 21
5.1. Access to the ADVANCED USE MODE ............................................................................................. 21
6. MODIFICATION OF THE PROGRAM CONTENTS. Menu Pro .................................................................. 21
6.1. Master program ................................................................................................................................... 22
6.2. Original content of the programs ......................................................................................................... 22
6.2.1. Program contents ......................................................................................................................... 22
6.2.2. Program contents. USA configuration .......................................................................................... 23
6.3. Definition of phases ............................................................................................................................. 24
6.4. Definition of programmable functions and values for each phase ...................................................... 24
6.5. Modifying a program ........................................................................................................................... 25
7. OPERATION MODE WITH PROGRAM ACCELERATOR. dEmo Menu ................................................... 29
8. INFORMATION MENU. InFO menu ............................................................................................................ 29
9. MODIFICATION OF OPERATING PARAMETERS. Mod menu ................................................................ 30
9.1. Parameters modification ..................................................................................................................... 30
10. MODIFICATION OF ACCESS CODE TO ADVANCED MODE. NCod menu .......................................... 34
11. PROGRAM PRICE. CASH Menu .............................................................................................................. 35
11.1. Single price for each program ........................................................................................................... 35
11.2. Programs price based on time bands ............................................................................................... 35
11.2.1. Hour Menu .................................................................................................................................. 36
11.2.2. CALE menu ................................................................................................................................ 36
11.2.3. CASH Menu ............................................................................................................................... 37
12. EXTRA OPTIONS MENU. EoPt menu ...................................................................................................... 39
13. TROUBLESHOOTING ............................................................................................................................... 41
13.1. Freeing a trapped person .................................................................................................................. 41
13.2. Manually releasing of the safety lock ................................................................................................ 41
13.3. Disassembling the door of the washing machine ............................................................................. 42
13.4. What to do when … ........................................................................................................................... 43
13.5. System alarms .................................................................................................................................. 44

Contents 4
Cod. 598144
Rev. 12/1218
14. MAINTENANCE ......................................................................................................................................... 45
14.1. Cleaning the washer ......................................................................................................................... 45
14.2. Cleaning the door seal ...................................................................................................................... 45
14.3. Cleaning the solenoid valve filters .................................................................................................... 46
14.4. Checking safety mechanisms ........................................................................................................... 46
14.4.1. Checking the door lock ............................................................................................................... 46
14.4.2. Verify the general Emergency Stop of the laundry .................................................................... 47
14.5. Cleaning the dispenser ..................................................................................................................... 48
14.5.1. Washers with front dispenser ..................................................................................................... 48
14.5.2. Washers with top dispenser ....................................................................................................... 48
14.6. Cleaning the drain pump ................................................................................................................... 49
14.7. Checking the condition of the bearing housing seals ....................................................................... 49
14.8. General Overhaul .............................................................................................................................. 49
15. WITHDRAWING FROM SERVICE ............................................................................................................ 50
Safety instructions 5
Cod. 598144
Rev. 12/1218
WARNING!
IMPORTANT SAFETY INSTRUCTIONS
WARNING: To reduce the risk of fire, electric shock or injury to persons when using the machine, follow basic
precautions, including the following:
1. READ all instructions before using the machine, and KEEP them in a prominent location for customer use.
2. Do not wash articles that have been previously cleaned in, washed in, soaked in, or spotted with gasoline,
dry cleaning solvents, and other flammable or explosive substances as they GIVE OFF VAPOURS that
could ignite or explode.
3. DO NOT ADD petrol, dry-cleaning solvents, or other flammable or explosive substances to the wash water.
These substances give off vapours that could ignite or explode.
4. Under certain conditions, hydrogen gas may be produced in a hot water system that has not been used for
two weeks or more. HYDROGEN GAS IS EXPLOSIVE. If the hot water system has not been used for such
a period, before using the washing machine, turn on all hot water faucets and let the water flow from each
for several minutes. This will release any accumulated hydrogen gas. As the gas is flammable, do not
smoke or use an open flame during this time.
5. Do not allow children to play on or in the washer. CLOSE SUPERVISION of children is necessary when the
washer is used near children.
6. Before the washer is removed from service or discarded, REMOVE the door.
7. DO NOT TRY TO OPEN THE WASHER’S DOOR if the drum is moving.
8. Do not install or store the washer where it will be exposed to the WEATHER.
9. DO NOT TAMPER with controls.
10. DO NOT REPAIR OR REPLACE any part of the washer or attempt any servicing, unless this is specifically
recommended in the user instructions or in published user-repair instructions that you understand and have
the skills to carry out.
11. DO NOT REMOVE any safety device OR MODIFY OR MANIPULATE any component or part of the
machine. DO NOT INSTALL any extra elements inside the machine.
12. Any part of the machine that is replaced may affect its operation and the user’s safety. For this reason,
USE ONLY THE MANUFACTURER’S ORIGINAL SPARE PARTS. Failure to comply with this warning can
cause serious accidents, malfunctions and the loss of the machine’s guarantee and certifications.
13. Failure to comply with or observe the legislation and regulations covering health, safety and prevention of
risks in the workplace applicable in the country where the machine has been installed, or actions contrary
to common sense, MAY CAUSE personal injury or even death to the user.
14. The machine should only be used for those purposes established by the manufacturer and following the
instructions for use set out in the instruction manuals. Any use not specified in the manuals may lead to
additional risks. Pay special attention to information headed DANGER, WARNING and PRECAUTION.
15. The room where the machine is located MUST comply with the environmental conditions (air venting,
temperature, humidity, etc.) specified in the technical specifications table. NEVER INSTALL THE
MACHINE IN ENVIRONMENTS where it will be splashed with water or where there is a very high level of
humidity in the atmosphere.
16. Clearly mark out danger areas and PREVENT public access to them when the machine is operating. Do
not expose yourself to drainage areas or to vapour, condensation, combustion gas or ventilation outlets.
17. All machines working at temperatures present a fire risk. Take EXTREME care: CLEAN the machine of
inflammable materials: lint, fluff, soot, etc. on a regular basis. KEEP the environment free of combustible
materials and PLACE suitable extinguishers near the machine in easily accessible places.

Safety instructions 6
Cod. 598144
Rev. 12/1218
18. All installations required for the proper operation of the machine MUST be carried out by a duly accredited
Registered Installation Contractors (see Note 3), in compliance with the legal regulations applicable in the
country of use.
19. The machine MUST be commissioned by the Authorised Technical Service in the presence of the
Customer Technical Service (see Notes 2 and 4) or a responsible person appointed by the customer.
20. This machine MUST BE USED by personnel who are properly trained in how to use it (see Note 1).
21. NEVER START THE MACHINE, OR USE IT, IF THE FOLLOWING ARE ABSENT, INCORRECTLY
POSITIONED OR MALFUNCTIONING:
COVERS (GUARDS) AND PROTECTIVE DEVICES
SAFETY DEVICES
CONTROL ELEMENTS
22. DO NOT USE the machine if you notice any abnormal noise or smell or if you suspect that the machine is
faulty or defective.
23. The inspections required by the regulations applicable to the country where the machine is being used
must be carried out. It is advisable to request an overall, detailed service of the machine by the Authorised
Technical Service every year (see Note 2).
24. WARNING!
INSPECTION, MAINTENANCE OR REPAIR OPERATIONS
Before carrying out any action on the machine:
Close and mechanically lock the manual fluid supply valves.
Check that the bath has COMPLETELY drained, that no part of the machine is at a high temperature
and that no circuits or containers are under pressure.
Check that all the machine’s moving parts are halted or in their rest position. Securely fix all the
machine’s moving parts that could cause an accident.
To reduce the risk of electric shock:
COMPLETELY disconnect the machine from the mains power supply and take steps to prevent
accidental reconnection. TURNING OFF THE ON SWITCH OR PRESSING THE STOP KEY IS NOT
ENOUGH.
Disconnect the electrical connection of any circuit external to the machine; for example external dosing
equipment, central vending units, linen feeders or folders, etc. The electrical connection for these circuits
is independent of the machine’s electrical connection.
To prevent the risk of electrical discharge caused by residual voltage, wait at least five minutes before
removing any guard or cover from the machine.
Failure to follow these warnings may cause a serious accident.
25. CONTACT the Installation Contractors or the Authorised Technical Service (see Notes 3 and 2) in the
event of any doubt, anomaly or problem.
26. It is advisable to copy and enlarge the SAFETY INSTRUCTIONS and place them in a visible place in the
laundry.
27. THE MANUFACTURER ACCEPTS NO RESPONSIBILITY IF THESE SAFETY INSTRUCTIONS AND
ALL THE INFORMATION IN THE CORRESPONDING MANUALS ARE NOT FOLLOWED.
SAVE THIS INSTRUCTIONS.
Safety instructions 7
Cod. 598144
Rev. 12/1218
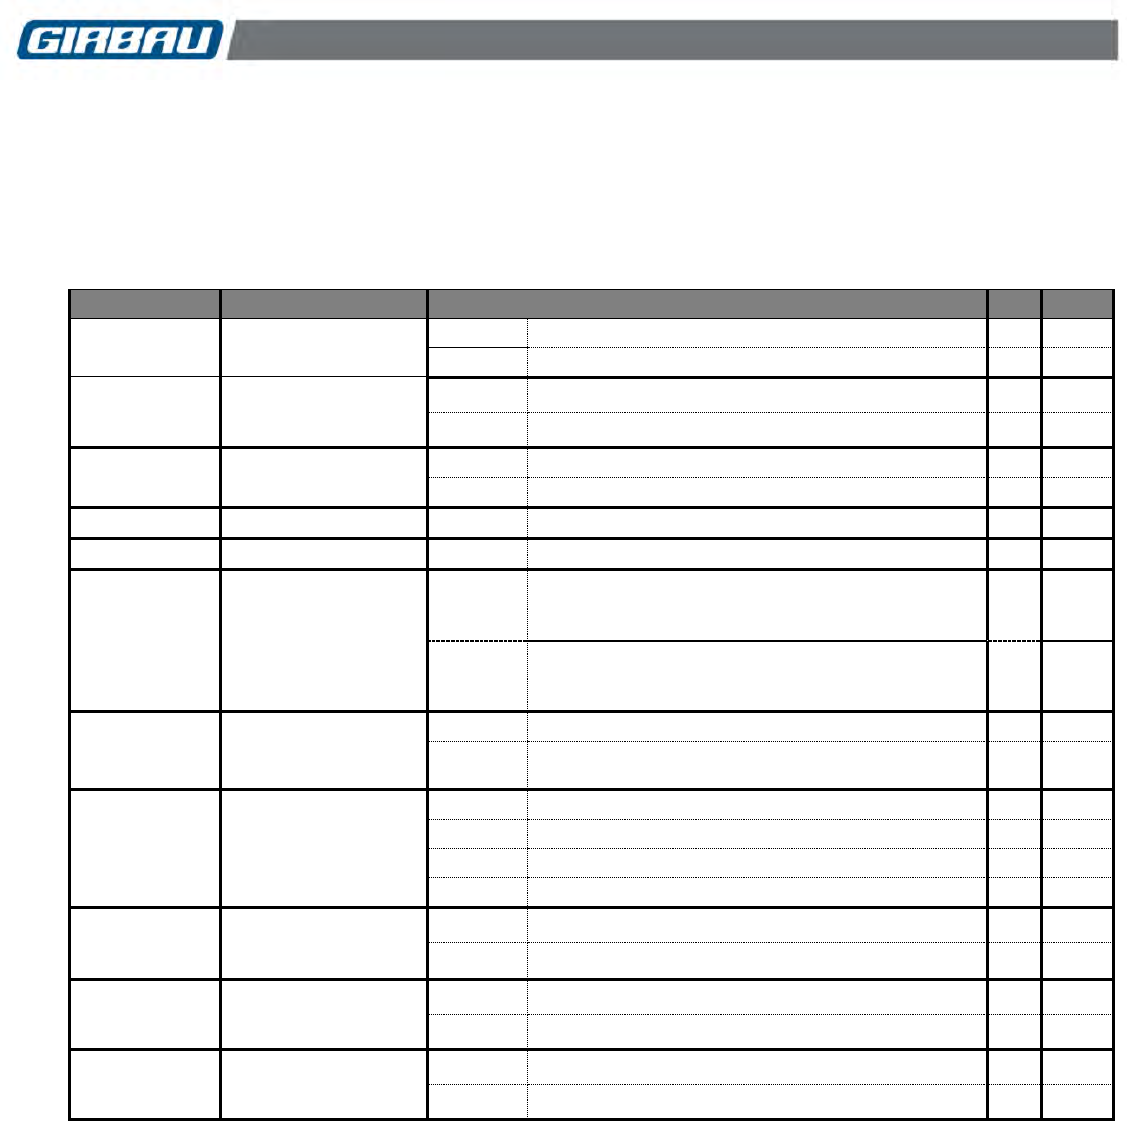
SYMBOLS USED IN MACHINE LABELLING
Electrical risk
Protective guard for elements carrying
an electric current.
High temperature risk
Handle with caution.
Use adequate protection.
Mechanical risk
Protective guard for moving parts.
Risk of inhaling harmful or irritant
vapours
Keep the doors/covers closed.
Use adequate protection.
Flame risk (only on some machines)
Protective guard for flame.
Risk of falling
Use proper access and safety methods.
Access prohibited
Refer to instruction manual/booklet
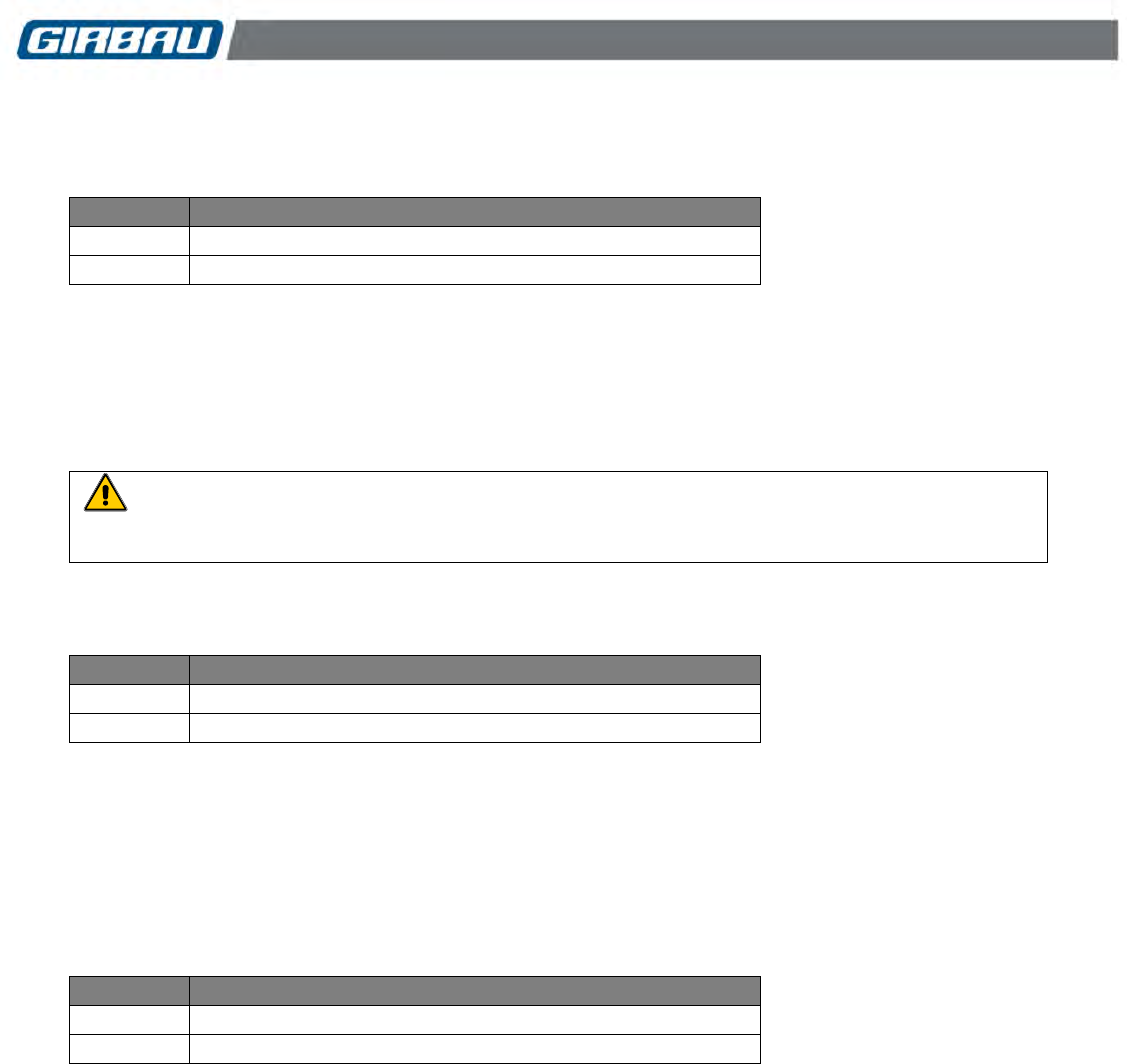
SYMBOLS USED IN THIS MANUAL
Symbol used to highlight a possible
HAZARD, WARNING or NOTE.
This symbol is used to emphasise a
particular explanation.
TRANSLATION OF THE ORIGINAL MANUAL
NOTES:
(1) Trained personnel refers to those who have read and understood the Instruction Manual, who have been trained by the Authorised
Technical Service or by a representative of the customer present at the start-up who is familiar with the operation of the machine and is
authorised to use it.
(2) Authorised Technical Service (ATS) is one that has been recognised under contract and properly trained by the manufacturer.
(3) Registered Installation Contractors are those officially approved by the government of the country the machine is to be installed.
(4) Customer Technical Service (CTS) is one that has been authorised by the customer and which has sufficient basic technical knowledge
to correctly interpret and carry out the actions attributed to it in this manual. The manufacturer strongly recommends that the customer
should have its own technical service, particularly in laundries with large-scale machinery installations.

Safety instructions 8
Cod. 598144
Rev. 12/1218
IMPORTANT INSTRUCTIONS FOR USE AND PRESERVATION
1. INTENDED USE OF THE MACHINE AND INAPPROPRIATE USE. This machine is designed and intended
solely for processing fabrics washed in a water bath or that have been previously treated in these
conditions. Any use other than this is contraindicated without written authorisation from the manufacturer.
2. Maximum output, performance, reliability and durability are achieved when the machine is installed, used
and maintained correctly, and if a comprehensive and detailed service is carried out annually by the
Authorised Technical Service.
3. The machine’s MATERIALS that are in direct contact with the chemical products involved in treating the
linen are detailed in the manual.
4. The user must consult the supplier of the chemical products USED THROUGHOUT THE WHOLE LINEN
TREATMENT PROCESS regarding the risks associated with its products and their combination. It must be
confirmed that the products are not flammable, ARE MUTUALLY COMPATIBLE, and that they will not
cause oxidisation or deterioration of the machine or any injury to the people using them.
It should be borne in mind that in certain conditions of use, hypochlorite (bleach) can generate chlorine gas.
Chlorine is a corrosive and oxidising substance which, at high concentrations and temperature, deteriorates
stainless steel and elastomers.
There are other highly oxidising agents, such as the ozone, that can have the same effect.
5. FOLLOW the treatment recommendations for each fabric indicated by its manufacturer. THE
MANUFACTURER OF THE MACHINE accepts no responsibility for damage caused by inappropriate
treatment of a fabric.
6. Periodically CLEAN the outside of the machine to prevent damage to its metal parts. This will improve
safety and extend its life. To clean the machine, use water and detergent. Rinse with a damp cloth and
then dry off. To remove accumulated lint, use a suitable vacuum cleaner. Cleaning with water jets or
pressurised steam is prohibited.
7. NEVER use harsh products to clean the machine and laundry room. Some products on the market give off
highly corrosive gases.
8. If machine is left idle for long periods of time, it must be PROTECTED from humidity and temperature
variations.
9. Faults arising from improper machine operation may VOID THE WARRANTY.
10. When asking for information on your machine, MENTION the model and serial number. This information
can be found on the specification nameplate incorporated into the machine.
With every machine, the manufacturer provides all the necessary technical information and documents required
for its use. KEEP IT IN GOOD CONDITION.

Description 9
Cod. 598144
Rev. 12/1218
1. INTRODUCTION AND APPLICATION
This manual contains the OPERATION and ADVANCED USE MODE instructions for washing machines with
COIN CONTROL system with or without extra options.
Application
This manual applies to the following models:
HS, EH, RMS610, REM025 models with software version 31 or higher
RMS, RMG and REM models with software version 65 or higher
2. DESCRIPTION
Washer extractor designed to wash or treat fabric in a water bath.
Control designed primarily for use in coin-op laundries.
2.1. Intended use of the washing machine
This machine has been made and designed for washing or treating textile materials in a water bath. These textile
materials must be free of flammable or explosive products. Unless approved by the manufacturer in writing, it is
not considered appropriate for any other use.
Under-loading as well as overloading is not recommended. Always endeavour to match the capacity of the
machine.
It is not advisable to insert bags full of laundry. Where necessary, load the machine up to its set limit.
It is not recommended to spin carpeting, canvas or waterproof fabrics.
2.2. Construction characteristics
HIGH SPEED MODELS (HS / EH). Washing machines capable of spinning at a speed higher than 350G
(280G in model HS-6008/EH020) and up to 400G without needing to be bolted down. The design of its
suspension system cushions up to 95% of the vibrations produced during the spin cycle.
MEDIUM SPEED MODELS (RMS/REM/RMG). Hard-mount construction. They have to be bolted down to
the floor.
- Approximate spin speed: 125G, 150G, on models RMS, REM.
- Spin speed: 200G on models RMG.
Stainless steel inner and outer drum. The openings in the drum blades promote the uniform distribution of
bath water and improve the yield of the washer both during the wash and the rinse cycles.
The drum rotation is produced by an asynchronous AC motor controlled by an inverter.
The hot and cold water connections have a safety mechanism to prevent contaminating by back-flowing
into the general drinking water system.
Large capacity drain valve. (Option for pump drainage in models HS-6008/EH020).
Water inlets and all product dispensers made using a common collector with an anti-siphon mechanism.
Option for heating the bath using electric heaters or steam injection.

Description 10
Cod. 598144
Rev. 12/1218
2.3. Protection, safety and control elements
Fixed guards: Covers. These prevent access to dangerous points or moving parts. Protect from accidental
machine spattering.
Moving guards:
- Dispenser cover.
- Door with interlock microswitch, door lock and delayed opening.
Overflow. When the bath level is exceeded duet to solenoid valve failure, the bath is drained through the
drain outlet.
Thermal fuse to protect the electric heaters.
Electric circuit safety measures: To protect the electric circuit against external malfunctions and prevent
any malfunctioning from causing harm to the operator.
Sound alarm: Among other functions, the acoustic signal warns of possible alarms.
Unbalance microswitch. (Only in high speed models). Additional electromechanical safety to protect
against unbalance of drum load during the spin cycle.
2.4. Safety functions
Bath level control. Allows selecting different bath levels during the wash cycle and controls the overflow
safety and minim level of connection to the heating system and door opening.
Temperature control. Allows selecting the bath temperature during the wash cycle and controls the bath
insufficient temperature and overheat safeties.
Unbalance control. Repositioning of the washer's load if the inverter power control detects unbalance.
Door opening safety. Allows the opening of the door in safety conditions.
Safety measures against entrapment. To reduce the risk of a child becoming trapped inside a washing
machine while playing, or to help in freeing them during the first moments of launching a program, the
running sequence of a wash cycle is as follows:
After giving the start order, a 30-second safety time is started during which the drum rotation and the water
inlet operate at short impulses and door remains released. Further information in Sections: Freeing a trapped
person (Chapter 9) and Stopping methods (Chapter 4).
2.5. Characteristics of the control
Operation of the washer controlled by microprocessor.
Operation of the washer adaptable to the possibilities of the installation and the needs of the user. Designed
primarily for use in coin-op laundries.
Great versatility in individually modifying the content of each program. Further information in specific sections
of the ADVANCED USE MODE.
Temperature control in the wash phase achieved by the hot and cold water mixer in accordance with the
programmed temperature and the activation of the heating system. Precision of +/- 2 ºC (+/- 3.5 ºF).
Level control achieved using an electronic pressure transmitter.
Series communication between the washer microprocessor and the inverter’s control of the motor.
Multiple controls that assure the safe use of the washer.
Washing programs: availability of 4 pre-programmed programs. Each program allows for: pre-wash, wash
with a maximum temperature of 80 ºC and four rinse phases with a final spin at high speed.
The programs are activated by the introduction of coins or tokens into the washing machine’s meter o by a
signal from the central vending point.
Programming programs price. Option for automatically changing the prices for each program depending on
time period and day of the week.
Executed individual program counters.

Modes of use 11
Cod. 598144
Rev. 12/1218
3. MODES OF USE
The COIN CONTROL has TWO MODES OF USE.
PROGRAM EXECUTION MODE
This mode groups together the functions or actions aimed at selecting and executing the different wash
programs.
Information regarding this intervention mode: chapter 4 of this manual.
ADVANCED USE MODE
Covers the functions or interventions aimed at:
Modifying or displaying the content of the washing programs.
Consult the software version for the washer and the contents of the different program meters.
Modifying the general operating parameters.
Modifying the access code for ADVANCED USE MODE.
Setting the time of the system clock (optional).
Managing programs price.
Information regarding this intervention mode: From Chapter 5.
Program execution mode 12
Cod. 598144
Rev. 12/1218
4. PROGRAM EXECUTION MODE
4.1. Control panel
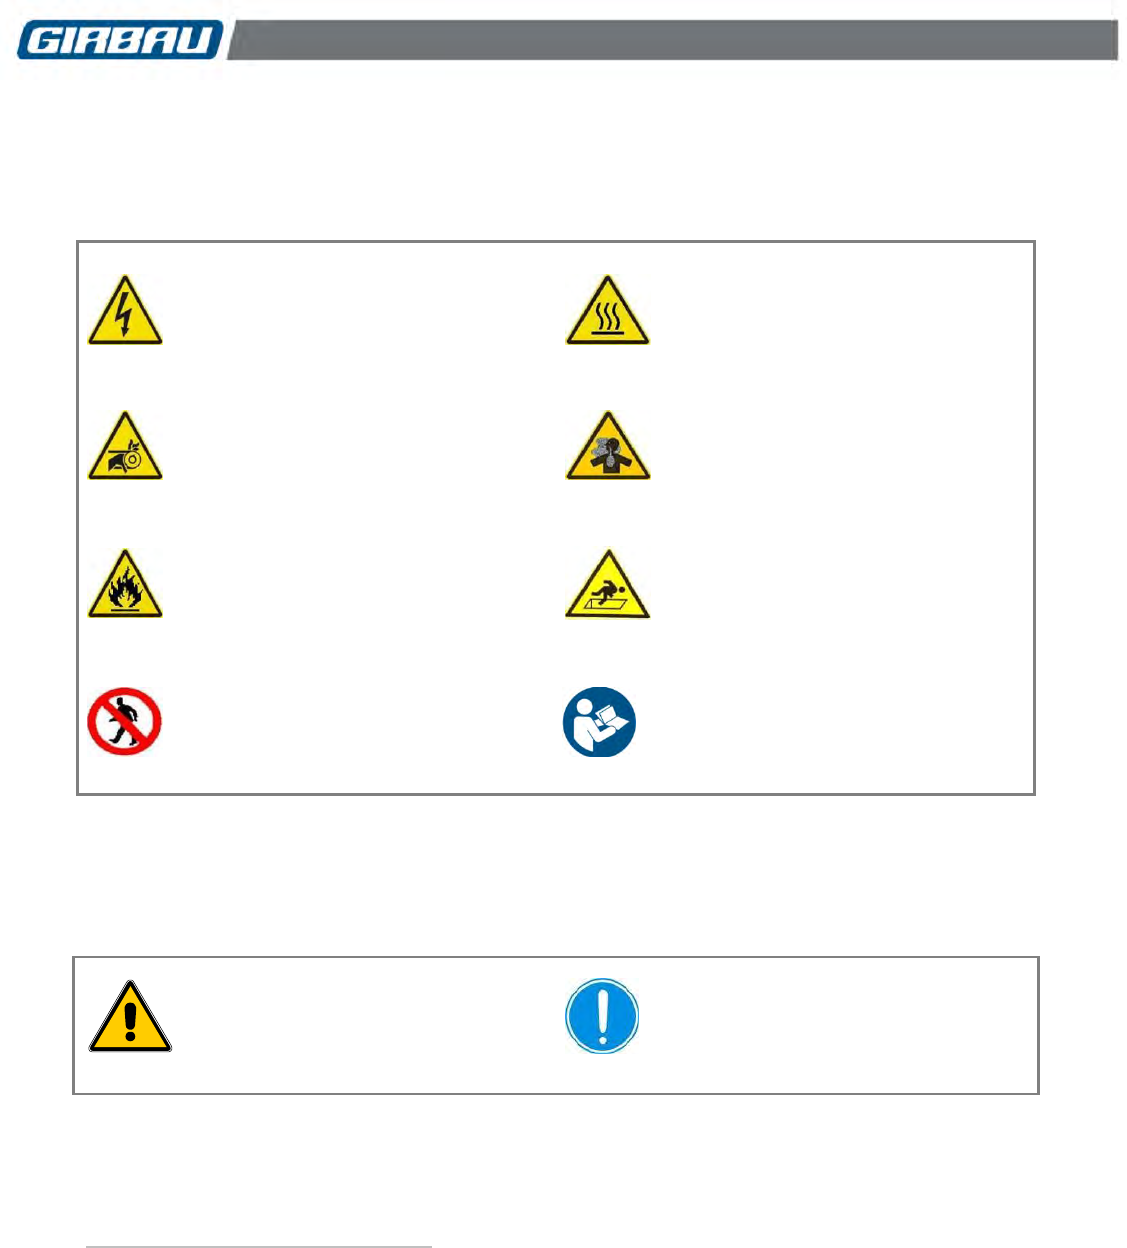
4.1.1. Machines with COIN CONTROL
Fig. 4.1
KEYS
A: Washing program selection
keys.
Each key corresponds to a
program. The selection of a
program is indicated by the
LED associated with the key.
B: The key: Program stop.
INDICATOR LIGHTS for a
program’s start sequence:
C: Phase of the program in
progress
D: Display
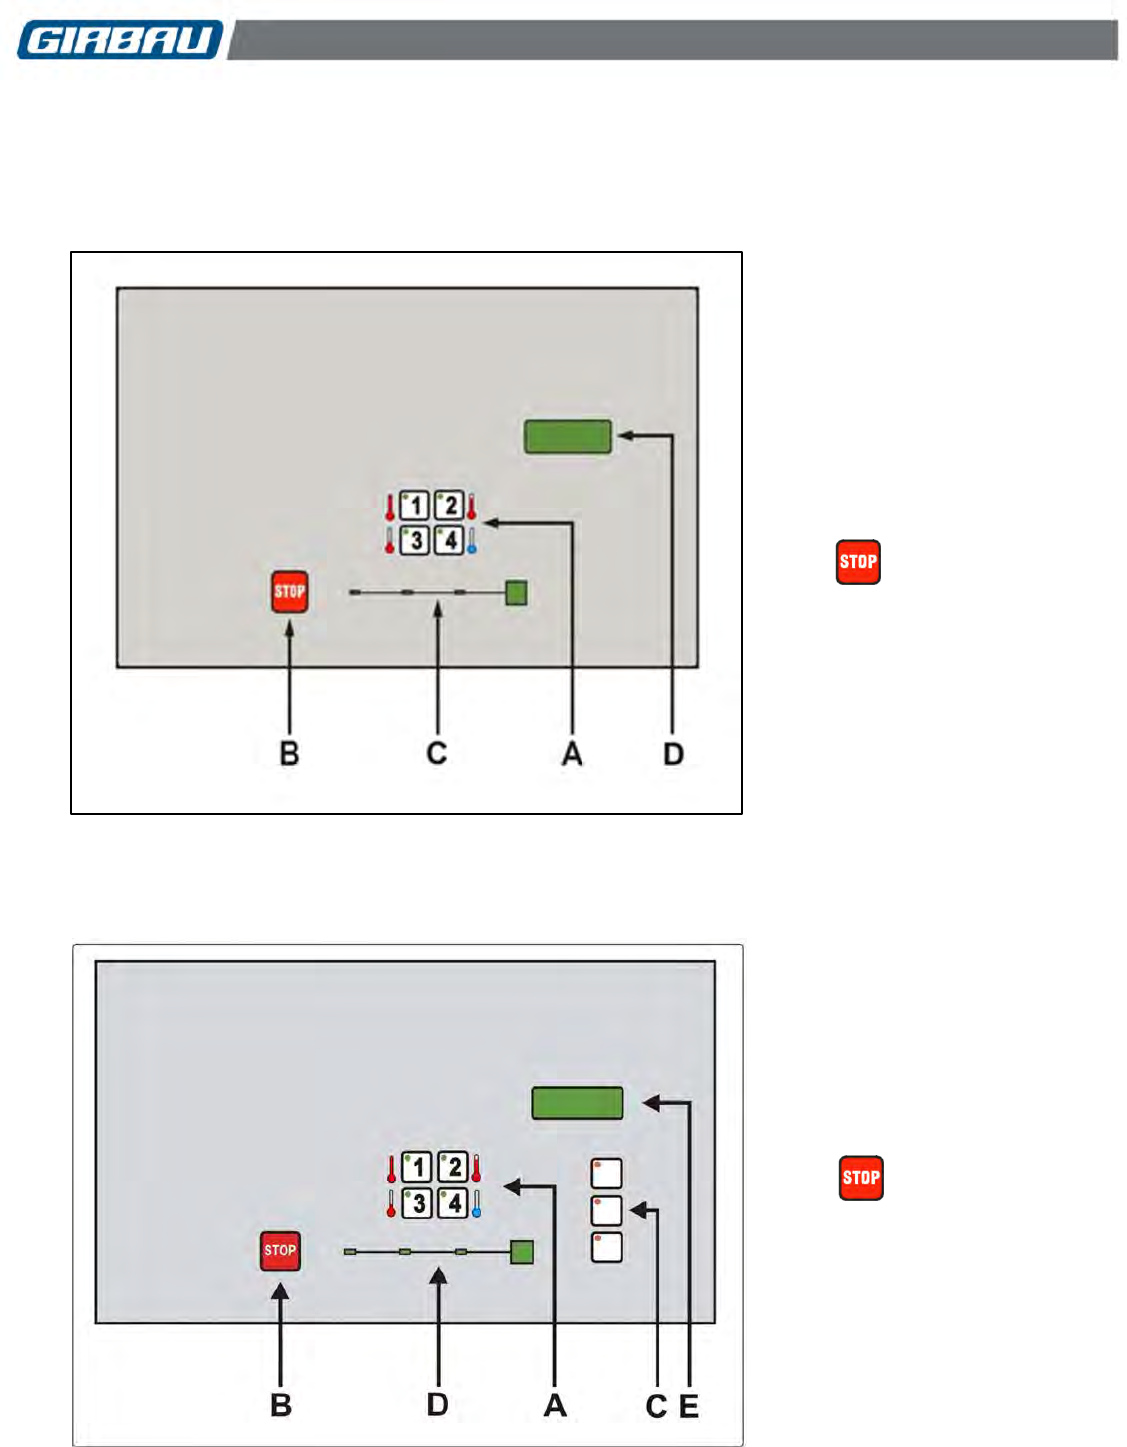
4.1.2. Machines with PROFIT PLUS CONTROL
Fig. 4.2
KEYS
A: Washing program selection
keys.
Each key corresponds to a
program. The selection of a
program is registered by the LED
associated to the key.
B: The key: Program stop.
C: Keys for selecting the extra
options
INDICATOR LIGHTS for a
program’s start sequence:
D: Phase of the program in
progress
E: Display

Program execution mode 13
Cod. 598144
Rev. 12/1218
SPECIFIC KEYBOARD FOR KOREA
The washing machines for Korea have a keyboard with the following special features:
COIN CONTROL keyboard:
The 1, 2 and 4 keys are coloured black.
The C, D and F LEDs and the LEDs associated with the 1, 2, 3 and 4 keys are not visible.
PROFIT PLUS CONTROL keyboard:
The 1, 2, 3 and 4 keys are coloured black.
The C, D and F LEDs and the LEDs associated with the 1, 2, 3 and 4 keys are not visible.
MAIN REPORTS that appear on the display:
REPORT
MEANING
door
Washer with door open. Machine ready to start a program
SEL
Indicates program selection
Pr-*
Program selected
C** / F***
Bath temperature (machines with heating)
8888
Program price
Minutes remaining in the program
End
End of program. Door unlocked. Machine in idle mode
4.2. Loading the washing machine
Group the fabrics to be washed into homogeneous loads, attempting wherever possible to reach the nominal
value of the load.
Empty all pockets, fasten buttons, close zippers and remove accessories that are not machine-washable.
Mixing whites with other colours is not recommended.
Open the door and load the machine. The LED of washer loading and program selection blinks.
Washer load recommendations according to the type of fabric to be washed:
Cotton fabrics: nominal load
Synthetic fabrics: between 80% & 90% of nominal load
Delicate fabrics: between 35% & 50% of nominal load
Do not overload the machine; the door must be able to close easily.
Whilst the door is open, the display reads door, indicating that the door must be closed in order for the program
to begin.
Health and safety instructions for loading and unloading the washer
Installing washing machines on raised bases, in accordance with the instructions set out in the corresponding
installation manuals, aids in loading and unloading the machine by avoiding the need to adopt awkward
positions.
Use linen collecting and transporting containers that are of a suitable height for the washer size. Consult the
dimensions of the washers set out in the corresponding installation manual.
Take care not to overload the machine. Overloading the washer leads to excessive strain when processing the
linen.
Certain chemical products that are used in the washing process are toxic. Handle them with care and wear
appropriate protection.
Follow the legislation and regulations for Health and Safety in the Workplace in force in the country where the
machine has been installed.
Program execution mode 14
Cod. 598144
Rev. 12/1218
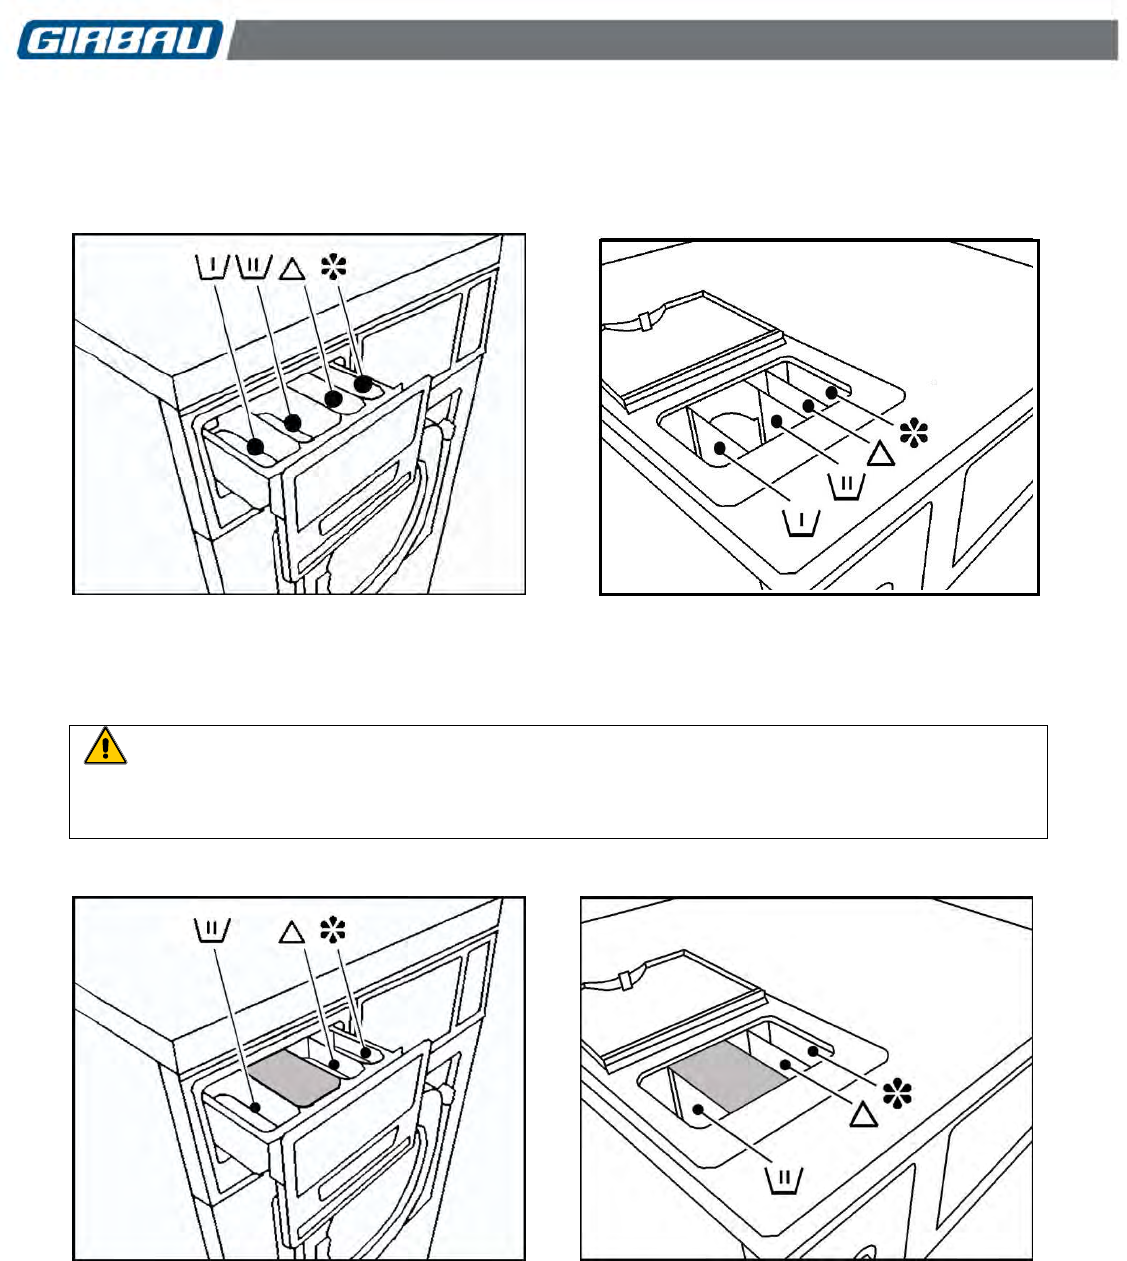
4.3. Using the dispenser
HS, RMS and RMG models
Fig. 4.3 Fig. 4.4
Washing machines models EH, REM, RMG (USA/CANADA)
WASHING MACHINES WITHOUT PRE-WASH PHASE
To avoid clogging the dispenser, products are prevented from being added in the unused
compartments (Fig. 4.5 and 4.6). It is important to warn the operator about the correct use of the
dispenser.
Fig.4.5 Fig.4.6
Program execution mode 15
Cod. 598144
Rev. 12/1218
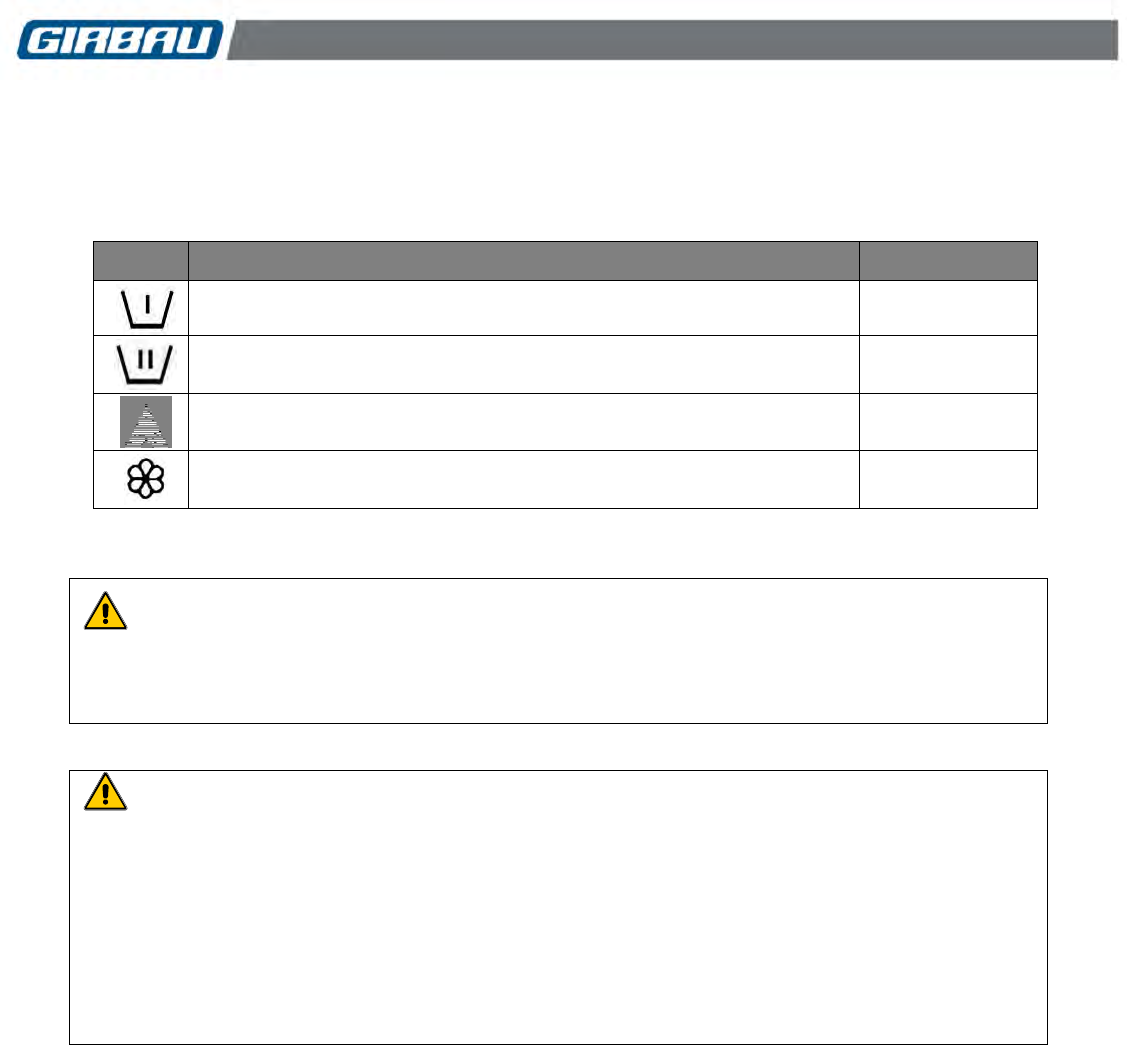
Fill the compartments with the corresponding products, according to these symbols.
Symbols used in the dispenser (Fig. 4.2, 4.3, 4.4 and 4.5)
FUNCTION
PROGRAMMING
Powdered detergent. Normally used in the pre-wash phase
d1
Powdered detergent. Normally used in the wash phase
d2
Liquid product. Normally used for bleaching (chloride, bleach, etc.)
d3
Liquid product. Normally used as a softener/neutraliser
d4
IN ORDER TO OPERATE CORRECTLY AND TO PREVENT POSSIBLE DAMAGE AND SPLASHING,
THE DISPENSER DRAWER MUST ALWAYS REMAIN CLOSED, EXCEPT WHEN ADDING
PRODUCTS.
SUDS CONTROL
The mechanical action of front-loading washing machines improves the quality of the wash but
encourages the creation of suds.
Remember that a suds bath always reduces the efficiency of your wash. ALWAYS USE
CONTROLLED SUDS DETERGENT.
Oversudsing causes an increase in the pressure inside the machine and decreases the efficiency of
the sealing systems.
Repeated washing with a large amount of suds considerably reduces the life of seals and bearings.
THIS CIRCUMSTANCE IS NOT COVERED BY THE MACHINE’S WARRANTY.
Program execution mode 16
Cod. 598144
Rev. 12/1218
4.4. Starting a program
4.4.1. Machines with COIN CONTROL
Close the door of the washing machine. SEL report displayed.
Place the washing products in the dispenser and close it (refer to section 4.3).
Select the desired program by pressing the corresponding keys. (For information on the characteristics of
each program, refer to section 4.5: Wash Programs). The selected program will be shown on the display.
The LED associated with the selected program key will light up.
The price for the program or the number of tokens to be inserted will be displayed, and the LED will light up,
indicating that the payment must be made for the program.
Insert the coins or tokens requested. The display will show the price or the number of tokens left to start the
selected program.
It is possible to change the selected programme while inserting the coins or tokens. The price of the
program adapts according to the new selection and the value of the coins or the number of tokens
introduced will remain in the memory. The newly selected program will be displayed on the LED relating to
the key.
Once all the coins or tokens have been inserted, the selected wash program will start.
4.4.2. Machines with PROFIT PLUS CONTROL
Close the door of the washing machine. SEL report displayed.
Place the washing products in the dispenser and close it (refer to section 4.3).
Select the desired program by pressing the corresponding keys. (For information on the characteristics of
each program, refer to section 4.5: Wash Programs). The selected program will be shown on the display.
The LED associated with the key for the program selected will light up, and the price for the program or the
number of tokens to be inserted will be displayed.
Select the extra options you want by pressing the corresponding key. The LED for the option selected will
light up and stay lit, and the price will be updated to the new selection.
Insert the coins or tokens requested. The display will show the price or the number of tokens left to start the
selected program.
It is possible to change the selected program and/or extra options while inserting the coins or tokens. The
price of the program adapts according to the new selection and the value of the coins or the number of
tokens introduced will remain in the memory. The newly selected program will be displayed on the LED
relating to the key.
Once all the coins or tokens have been inserted, the selected wash program will start.
4.4.3. Door lock
Door lock. After giving the start order, a 30-second safety time is started during which the drum rotation
and the water inlet operate at short impulses and door remains released. At the end of this time, the locking
mechanism closes and the wash cycle begins.
Throughout the program’s duration, the door remains locked until the LED indicating the end of the program
lights.
Risk of entrapment
To avoid the risk that, while playing, a child gets entrapped inside a washer IT IS CAUTIONED THAT:
After giving the start order, a 30-second safety time is started during which the drum rotation and the
water inlet operate at short impulses and door remains released.
Program execution mode 17
Cod. 598144
Rev. 12/1218
DOOR FITTED WITH SAFETY LOCK
Never attempt to open the door if:
the program has not finished.
the drum has not come to a complete halt.
the bath has not been completely evacuated.
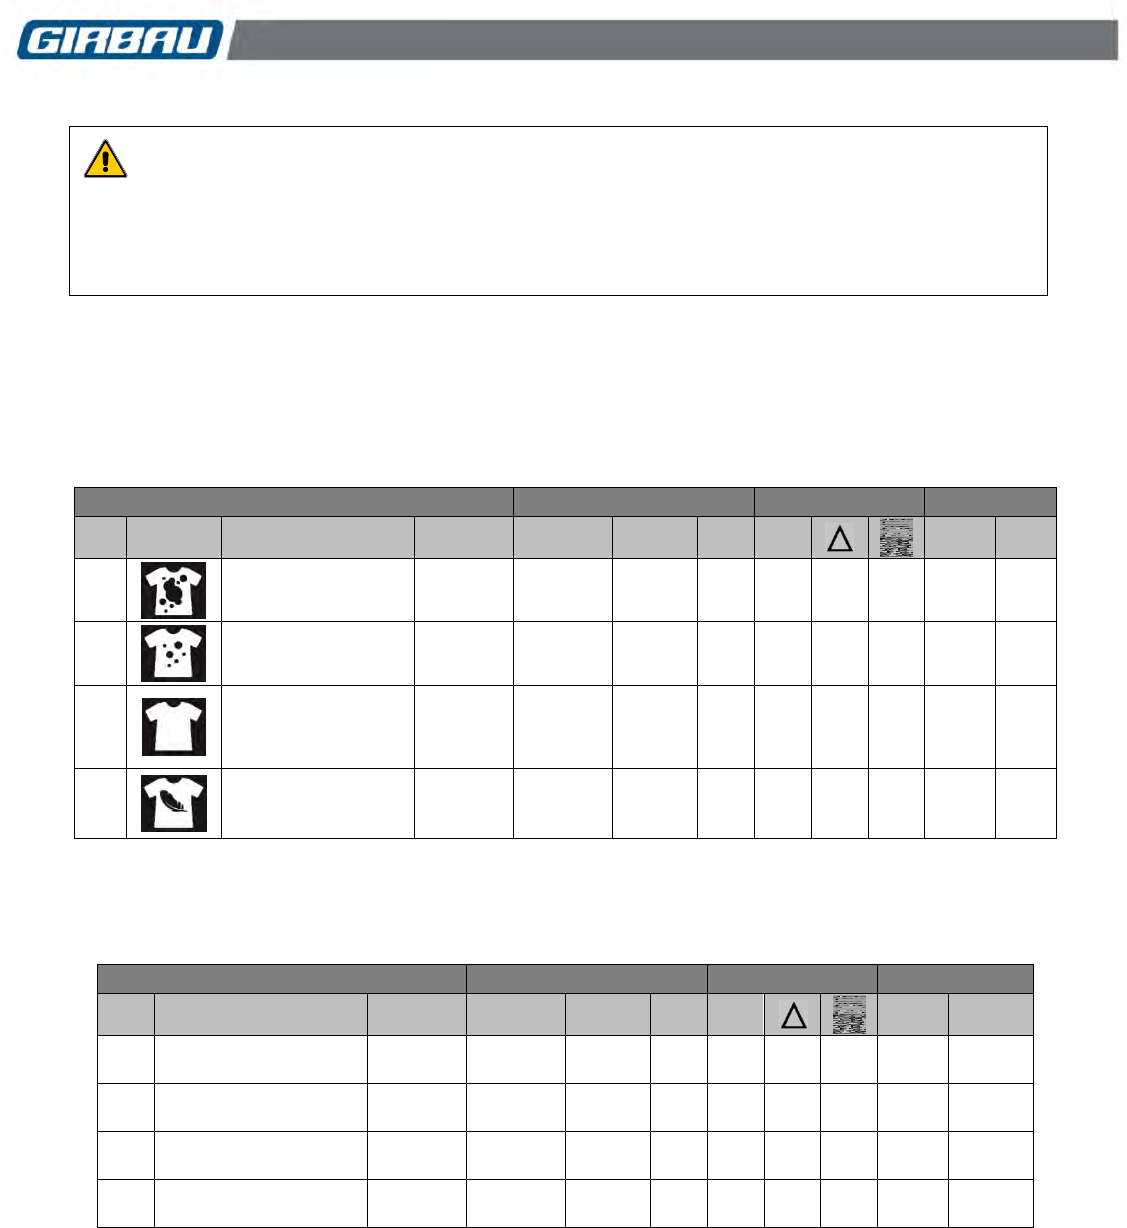
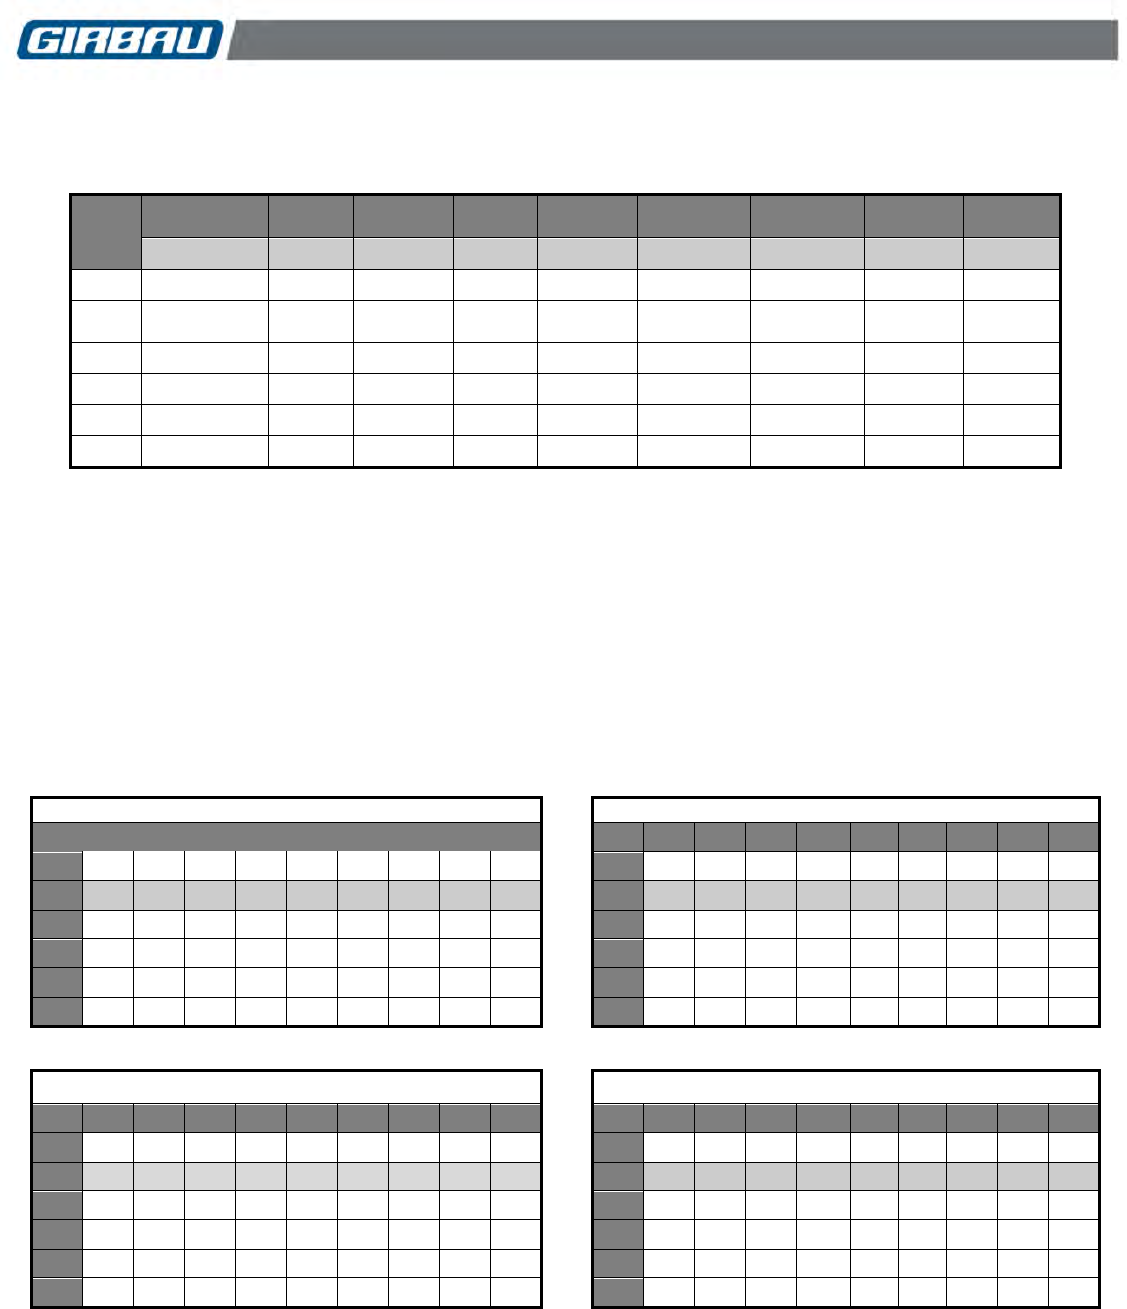
4.5. Program application and contents
In the default configuration, the program content is defined as indicated in the following charts:
General application programs
HS, RMS and RMG models
PROGRAM
WASH
RINSES
FINAL SPIN
No.
icon
application
estimated
time
rotation
ºC
min
No.
type
min
1
HEAVY SOILED
Cotton. Very dirty
poly-cotton
31 min
heavy
duty
50
10
3
high
6
2
SOILED
Cotton. Poly-cotton.
with normal soiling
31 min
heavy
duty
40
10
3
high
6
3
NORMAL
Poly-cotton.
Synthetics
with normal soiling
29 min
heavy
duty
30
8
3
high
6
4
DELICATE
Wool. Synthetics.
Mixture
26 min
normal
20
10
3
mediu
m
3
USA / CANADA programs
EH, REM and RMG models. SP-0
PROGRAM
WASH
RINSES
FINAL SPIN
No.
application
estimated
time
rotation
ºF / ºC
min
No.
type
min
1
SUPER WASH
Heavy soil
22 min
heavy
duty
90 / 32
7
2
high
6
2
HOT
White
19 min
heavy
duty
90 / 32
4
2
high
6
3
WARM
Color-fast. Perm press
19 min
heavy
duty
82 / 28
4
2
high
6
4
COLD
Colors.Normal
19 min
normal
32 / 00
4
2
high
6
Program execution mode 18
Cod. 598144
Rev. 12/1218
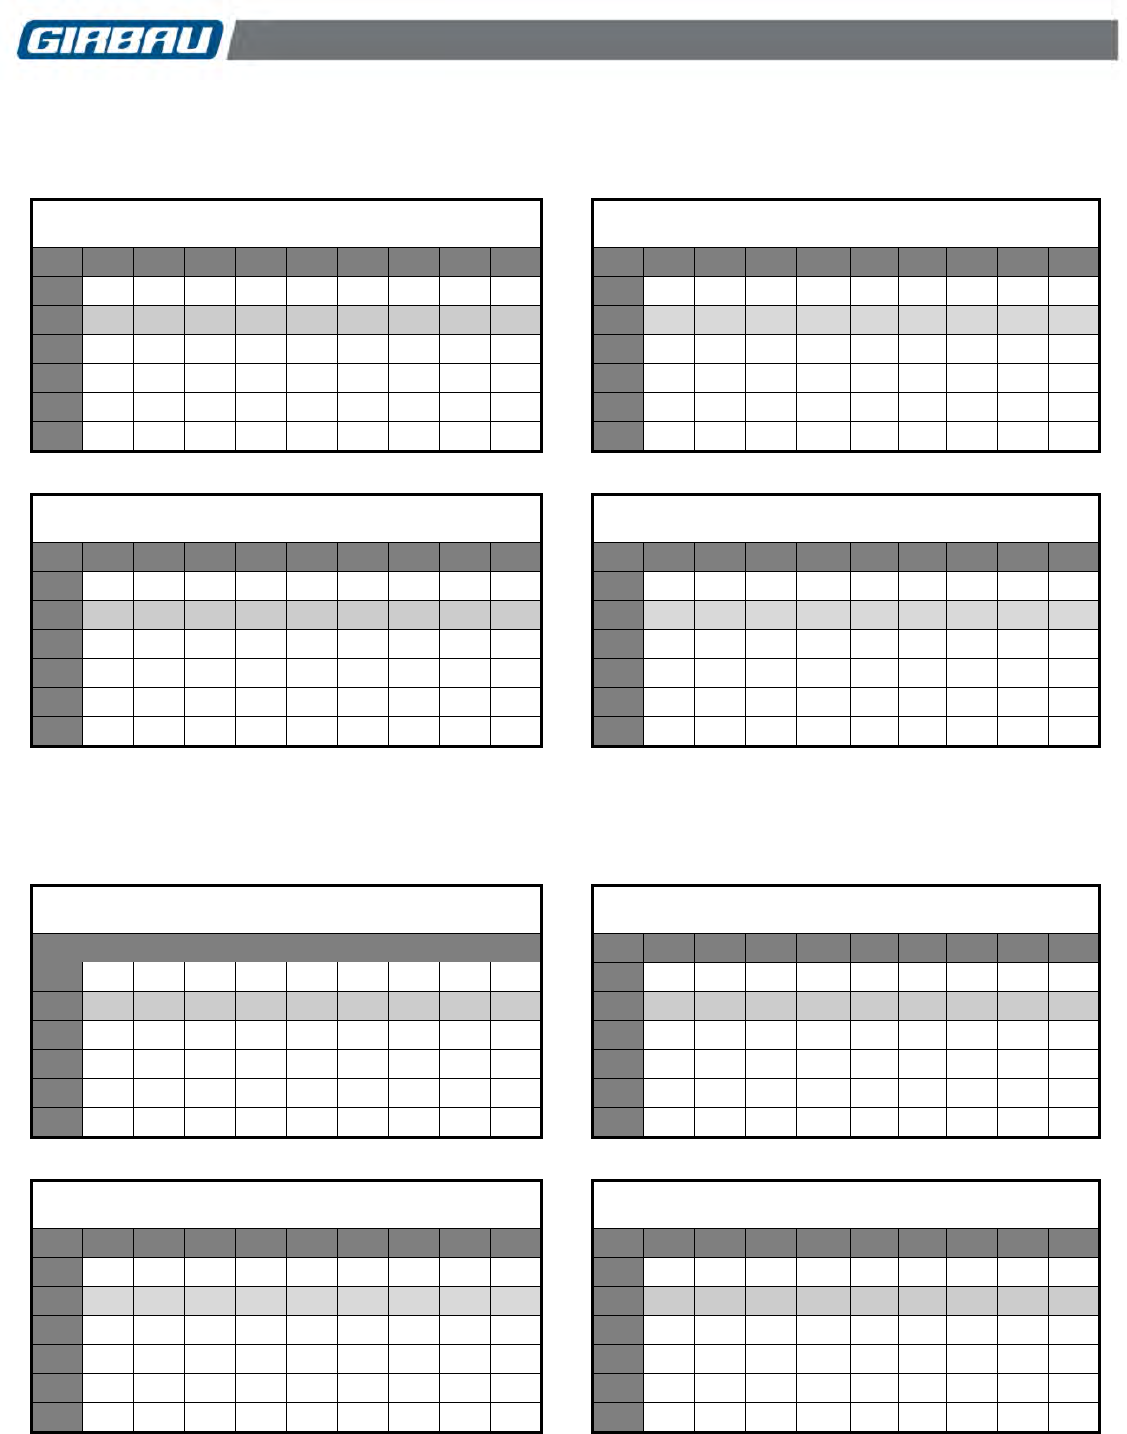
USA / CANADA programs
EH020 and REM025 models. SP-1, SP-2, SP-3
Other EH, REM and RMG models.SP-1
PROGRAM
WASH
RINSES
FINAL SPIN
No.
application
estimated
time
rotation
ºF / ºC
min
No.
type
min
1
SUPER WASH
Heavy soil
26 min
heavy
duty
113 / 45
7
3
high
6
2
HOT
White
23 min
heavy
duty
104 / 40
7
2
high
6
3
WARM
Color-fast. Perm press
23 min
heavy
duty
86 / 30
7
2
high
6
4
COLD
Colors.Normal
21 min
normal
68 / 20
7
2
mediu
m
4
AREA OF USE JPN in CONFIGURATION menu
Program contents
CP option OFF (CP-0) in the MACHINE CONFIGURATION menu.
The content of the four programs is the same as in the Programs for general application configuration -
HS, RMS and RMG models.
CP option ON (CP-I) in the MACHINE CONFIGURATION menu.
The content of the first three programs is the same as in the Programs for general application
configuration - HS, RMS and RMG models.
Program 4 transforms into a program of very short duration (less than 2 minutes), designed for washing
the machine’s drum before loading the clothes for a wash cycle.
The values of the DRUM CLEANING program cannot be modified, except for the bath level, which will
be the level programmed in Phase 6 of this program.
See Sections 6.1 and 6.2 for further information.
4.6. Unbalance control
Before starting the spin, the washing machine’s electronic control checks the correct distribution of the load.
If it detects that the load is not well distributed and that can cause an excessive unbalance during the spin, a new
positioning of the clothes will be carried out.
If there’s still unbalance during the spin of the last phase, the washer can end the washing cycle reducing the
spin speed. If this is the situation, the report End/bAL will be showed alter the delay of the door opening.
Unbalance control with a micro-switch. Activates only in cases of extreme unbalance.
To improve the efficiency of the washer’s spin, it is advisable to:
Load the washer until its nominal value
Load the washer with homogeneous loads
Program execution mode 19
Cod. 598144
Rev. 12/1218
4.7. Stop modes
4.7.1. End of cycle and door opening
The End report will be displayed.
The buzzer and the LED indicating the end of the cycle inform that the program has finished and the door lock is
released.
From this moment on, the door can be opened.
Failure in the realising of the door
At the end of a cycle, if the end of cycle warning LED is not illuminated or a countdown of 120 seconds appears
on the display, push the door firmly using the handle and press any key on the keyboard to start a new attempt at
unlocking the safety lock.
If the problem persists, wait for a minimum of three minutes until the thermal locking device allows the door to
unlock.
4.7.2. Pressing the STOP key
Pressing the interrupts the programme being executed.
The drum stops rotating and the drain valve opens.
At the end of the safety delay, the buzzer informs the user that door lock is unlocked and the display shows
STOP – PUSH – Pr-* (number of program being executed).
From this moment onwards:
One press on the key corresponding to the program currently being executed resumes the cycle.
Opening the door cancels the cycle.
STOP key operating options
A parameter from the CONF menu can be used to select two different options for operating the STOP key.
Selectable options:
Immediate response
Pressing the STOP key immediately stops the program that is running.
Delayed response
To stop the program that is running, hold the key down continuously for at least 3 seconds.
Warnings regarding the HOLD STOP KEY DELAYED RESPONSE
Option available on machines with software Version 31 / 65 and later (see Section 1).
Option unavailable in machines configured for Japan Area of use.
To use this operating option, the corresponding parameter must be enabled in the machine’s
CONFIGURATION menu. This operation must be carried out by the Authorised Technical
Service.
The HOLD STOP KEY DELAYED RESPONSE option can only be activated on machines that
have the message “Push and hold for 3 seconds” inscribed next to the STOP key.
Program execution mode 20
Cod. 598144
Rev. 12/1218
4.7.3. Interruption of the power supply
These stop modes are not recommended, except in an emergency.
They may be caused by turning off the external switch, by activating the laundry’s general emergency stop (see
Installation Manual) or by a fault in the power supply.
In these cases the unlocking of the safety lock may be delayed for up to three minutes.
If the is door closed when the power supply is restored, the machine will interpret that there has been a power
failure and will resume the washing program in progress.
When a washing program is interrupted by electrical power failure or activating the general
Emergency Stop of the installation, the door lock mechanism stops being controlled by the
microprocessor and the opening of the door is thermally delayed.
In these cases the unlocking of the safety lock may be delayed for up to three minutes.
On restoring the power supply, it is normal for the washer to remain inactive for approximately 3 minutes.
On machines with pumped draining or a valve that is normally closed, interruption of the power
supply prevents the bath from being drained.
Advanced use mode 21
Cod. 598144
Rev. 12/1218
5. ADVANCED USE MODE
The ADVANCED USE MODE offers some menus, which allow the modification of program contents, the price
management of the programs, the modification of operating parameters, etc.
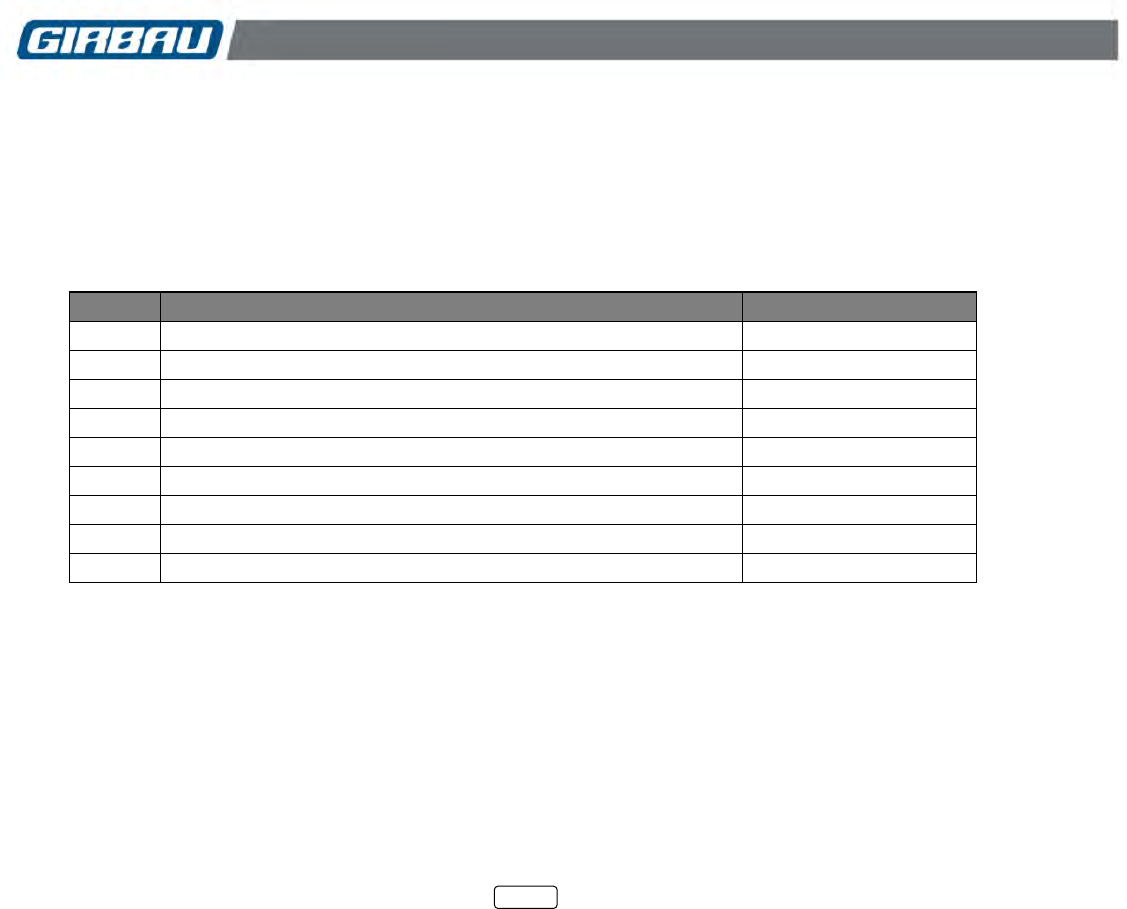
The ADVANCED USE MODE is made up of the menus defined in the following chart.
MENU
PURPOSE
CHAPTER /SECT.
Pro
Modification of the program contents
6
dEmo
Operation mode with program accelerator
7
InFO
Information menu
8
Mod
Modification of operation parameters
9
NCod
Modifying of the access code
10
CASH
Programming and/or modifying each program price
11.1; 11.2.3
Hour
Adjustment of the system time
11.2.1
CALE
Prices allocation according to hour band
11.2.2
EoPt
Options menu
12
5.1. Access to the ADVANCED USE MODE
Connect the washer and open the door. The display will show door.
Press and hold down key 1 until the Cod report appears on the display.
Enter the access code into the menus by pressing the sequence of eight keys of the code without interruption.
In basic configuration (when the machine is delivered) the access code to ADVANCED MODE is: 12341234.
If the sequence entered is correct, the display will show Pro, corresponding to the first menu ADVANCED
MODE.
Keys 2 and 4 allow the selection of the precedent table menus. The menu selected is shown on the display
following its keyword. To enter in it, press key 1 when displaying it.
If wished to skip the ADVANCED MODE, press and machine will return to program execution mode.
6. MODIFICATION OF THE PROGRAM CONTENTS. Menu Pro
In its original configuration, the washing machine has four wash programs with content adapted to a wide range
of usage. However, the content of each program can be modified to be adapted to the specific needs of different
situations.
The modifications are always made from a MASTER PROGRAM that includes the possible programmable
parameters and the maximum and minimum values of certain options.
The master program is composed of six phases. At the start of each phase, a parameter of the value Ph-Y / Ph-
N (executable phase YES / executable phase NO) will allow the user to determine whether the accessed phase
should either be executed or omitted.
Once the phase is defined as to be executed, proceed to the display and modification (if desired) of the
parameters or values of the phase.
STOP
Modification of the program contents 22
Cod. 598144
Rev. 12/1218
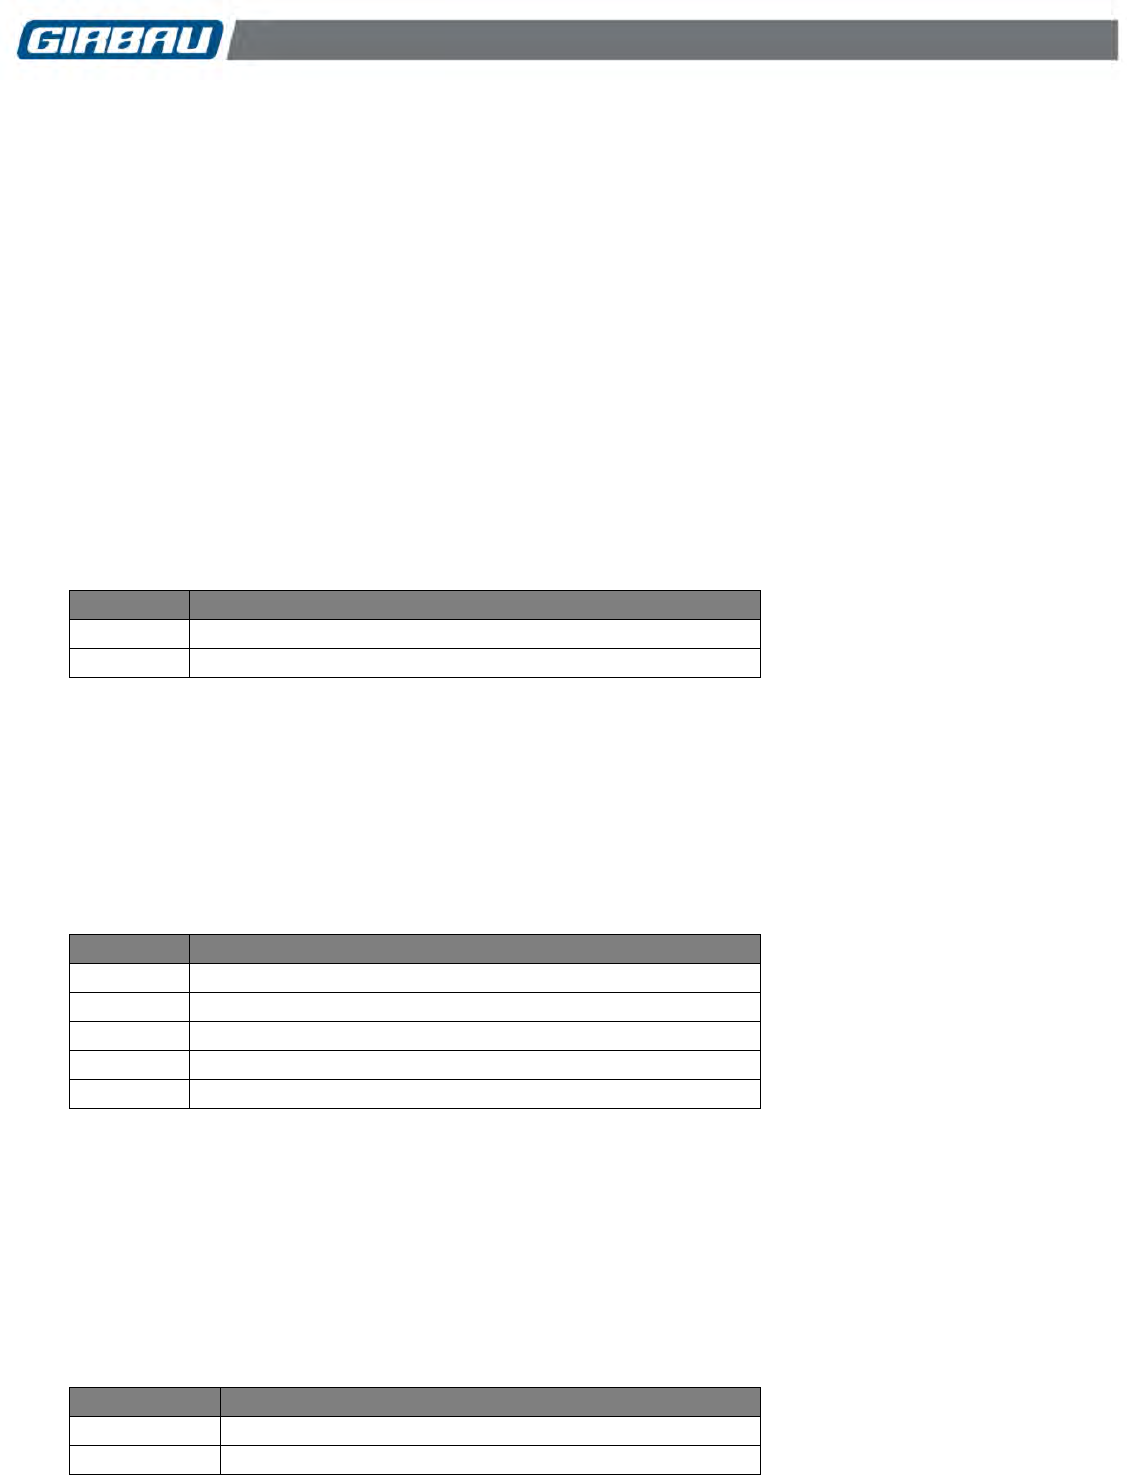
6.1. Master program
PHASE
EXECUTION
LEVEL
TEMP.
DISP.
TIME DISP.
ROTATION
ROTATION
TIME
EXTRACT
EXTRACT
TIME
Ph
L
C / F
d
t
r
rt
E
Et
1
Y / N
0…4
n.p.
0…3.4
1…99
1...3
0...6
0...3
n.p. 2...3
2
Y / N
0…4
0 ... 80
32 ... 176
0…3.4
1…99
1...3
0...20
0…2
n.p. 2
3
Y / N
0…4
n.p.
0…3.4
1…99
1...3
0...6
0…3
n.p. 2...3
4
Y / N
0…4
n.p.
0…3.4
1…99
1...3
0...6
0…3
n.p. 2...3
5
Y / N
0…4
n.p.
0…3.4
1…99
1...3
0...6
0 , 1
n.p.
6
Y
1…4
n.p.
0…3.4
1…99
1...3
1...6
1...6
n.p. 2...7
See Sections 6.2, 6.3 and 6.4 for the definition of the phases, functions and values programmable in each
phase.
See the warnings on machines configured for Area of use - JPN in Section 4.5
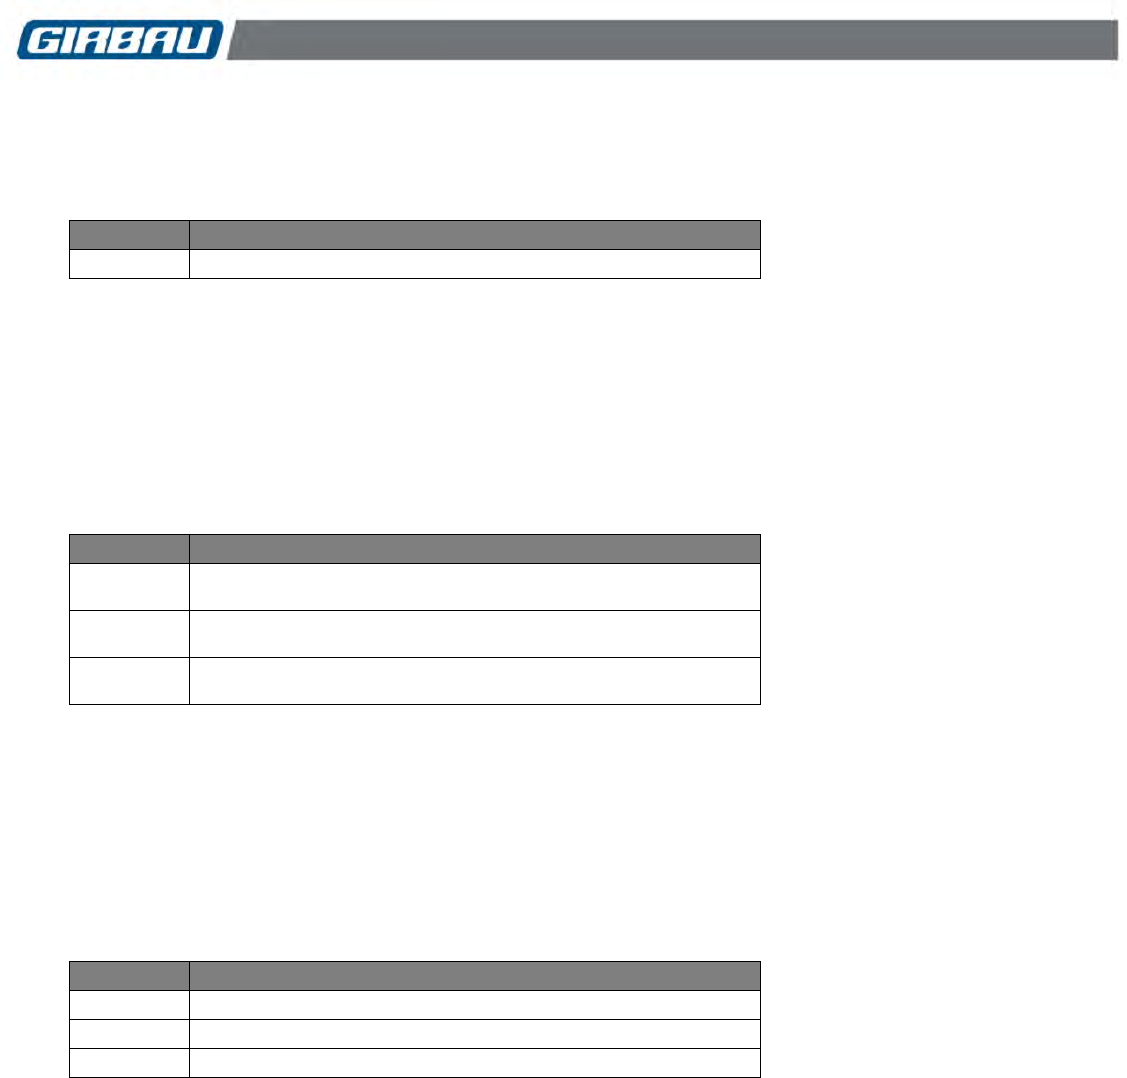
6.2. Original content of the programs
6.2.1. Program contents
All models
Pr - 1. HEAVY SOILED 31 min
Pr - 2. SOILED 31 min
Ph
Ph
L
C
d
t
r
rt
E
Et
Ph
Ph
L
C
d
t
r
rt
E
Et
1
N
2
- - -
1
30
1
3
1
1
1
N
2
- - -
1
30
1
3
1
1
2
Y
1
50
2
30
1
10
1
1
2
Y
1
40
2
30
1
10
1
1
3
Y
2
- - -
3
30
1
3
1
1
3
Y
2
- - -
3
30
1
3
1
1
4
Y
3
- - -
- - -
- - -
1
2
2
2
4
Y
3
- - -
- - -
- - -
1
2
2
2
5
N
3
- - -
- - -
- - -
1
2
1
1
5
N
3
- - -
- - -
- - -
1
2
1
1
6
Y
2
- - -
4
30
1
2
6
6
6
Y
2
- - -
4
30
1
2
6
6
Pr - 3. NORMAL 29 min
Pr - 4. DELICATE 26 min
Ph
Ph
L
C
d
t
r
rt
E
Et
Ph
Ph
L
C
d
t
r
rt
E
Et
1
N
2
- - -
1
30
1
3
1
1
1
N
2
- - -
1
30
2
3
1
1
2
Y
1
30
2
30
1
8
1
1
2
Y
1
20
2
30
2
10
1
1
3
Y
2
- - -
3
30
1
3
1
1
3
Y
2
- - -
3
30
2
2
1
1
4
Y
3
- - -
- - -
- - -
1
2
2
2
4
Y
3
- - -
- - -
- - -
2
2
1
1
5
N
3
- - -
- - -
- - -
1
2
1
1
5
N
3
- - -
- - -
- - -
2
2
1
1
6
Y
2
- - -
4
30
1
2
6
6
6
Y
2
- - -
4
30
2
2
4
3
Modification of the program contents 23
Cod. 598144
Rev. 12/1218
6.2.2. Program contents. USA configuration
All models. SP-0
PR - 1. SUPER WASH 22 min
HEAVY SOIL
PR - 2. HOT 19 min
WHITE
Ph
Ph
L
F
d
t
r
rt
E
Et
Ph
Ph
L
F
d
t
r
rt
E
Et
1
N
2
- - -
1
30
1
4
2
2
1
N
2
- - -
1
30
1
3
2
2
2
Y
1
90
2
30
1
7
1
1
2
Y
1
90
2
30
1
4
1
1
3
Y
1
- - -
3
30
1
2
1
1
3
Y
2
- - -
3
30
1
2
1
1
4
N
2
- - -
- - -
- - -
1
1
1
1
4
N
2
- - -
- - -
- - -
1
1
1
1
5
N
2
- - -
- - -
- - -
1
1
1
1
5
N
2
- - -
- - -
- - -
1
1
1
1
6
Y
2
- - -
4
30
1
2
6
(*)
6
6
Y
2
- - -
4
30
1
2
6
(*)
6
PR - 3. WARM 19 min
COLOR-FAST. PERM PRESS
PR - 4. COLD 19 min
COLORS. NORMAL
Ph
Ph
L
F
d
t
r
rt
E
Et
Ph
Ph
L
F
d
t
r
rt
E
Et
1
N
2
- - -
1
30
1
3
2
2
1
N
2
- - -
1
30
1
3
2
2
2
Y
1
82
2
30
1
4
1
1
2
Y
1
32
2
30
1
4
1
1
3
Y
2
- - -
3
30
1
2
1
1
3
Y
2
- - -
3
30
1
2
1
1
4
N
2
- - -
- - -
- - -
1
1
1
1
4
N
2
- - -
- - -
- - -
1
1
1
1
5
N
2
- - -
- - -
- - -
1
1
1
1
5
N
2
- - -
- - -
- - -
1
1
1
1
6
Y
2
- - -
4
30
1
2
6
(*)
6
6
Y
2
- - -
4
30
1
2
6
(*)
6
EH020 and REM025 models. SP-1, SP-2, SP-3
Other EH, REM and RMG models. SP-1
PR - 1. SUPER WASH 26 min
HEAVY SOIL
PR - 2. HOT 23 min
WHITE
Ph
Ph
L
F
d
t
r
rt
E
Et
Ph
Ph
L
F
d
t
r
rt
E
Et
1
N
2
- - -
1
30
1
2
2
2
1
N
2
- - -
1
30
1
2
2
2
2
Y
2
113
2
30
1
7
1
1
2
Y
2
104
2
30
1
7
1
1
3
Y
2
- - -
3
30
1
2
3
2
3
Y
2
- - -
3
30
1
2
3
2
4
Y
2
- - -
- - -
- - -
1
1
1
1
4
N
2
- - -
- - -
- - -
1
1
1
1
5
N
3
- - -
- - -
- - -
1
1
1
1
5
N
2
- - -
- - -
- - -
1
1
1
1
6
Y
2
- - -
4
30
1
2
6
(*)
6
6
Y
2
- - -
4
30
1
2
6
(*)
6
PR - 3. WARM 23 min
COLOR-FAST. PERM PRESS
PR - 4. COLD 21 min
COLORS. NORMAL
Ph
Ph
L
F
d
t
r
rt
E
Et
Ph
Ph
L
F
d
t
r
rt
E
Et
1
N
2
- - -
1
30
1
2
2
2
1
N
2
- - -
1
30
1
2
2
2
2
Y
2
86
2
30
1
7
1
1
2
Y
2
68
2
30
1
7
1
1
3
Y
2
- - -
3
30
1
2
3
2
3
Y
2
- - -
3
30
1
2
3
2
4
N
2
- - -
- - -
- - -
1
1
1
1
4
N
2
- - -
- - -
- - -
1
1
1
1
5
N
2
- - -
- - -
- - -
1
1
1
1
5
N
2
- - -
- - -
- - -
1
1
1
1
6
Y
2
- - -
4
30
1
2
6
(*)
6
6
Y
2
- - -
4
30
1
2
6
(*)
4
(*) In Models RMG033/40/55/70 the default spin value is 5.

Modification of the program contents 24
Cod. 598144
Rev. 12/1218
6.3. Definition of phases
PHASE
S
DEFINITION
1
2
3
4
5
6
Pre-wash. Optional execution phase.
Wash. Obligatory execution phase. The mixing of hot and cold water and/or water
heating is permitted.
First Rinse. Obligatory execution phase.
Second rinse. Optional execution phase.
Third rinse. Optional execution phase.
Fourth rinse. Obligatory execution phase.
6.4. Definition of programmable functions and values for each phase
FUNCTION
CONCEPT
OPTIONS
Ph
Phase execution
Ph-Y
Phase can be executed
Ph-N
Phase cannot be executed
L
Bath level
L-0
Phase without water inlet
L-1
Low level
L-2
Medium level
L-3
High level
L-4
Extra high level
C / F
Wash phase
temperature
0 / 80
Programmable range in degrees Celsius
32 / 176
Programmable range in degrees Fahrenheit
n.p.
Temperature cannot be programmed in the phase
d
Dosings
d-0
Phase without dosing
d-1
Dosing of powdered detergent
d-2
Dosing of powdered detergent
d-3
Dosing of liquid dosing
d-4
Dosing of liquid dosing
t
Dosing time
1 … 99
Programmable time in seconds
r
Rotation type
r-1
Heavy duty rotation: 25 sec. ON - 5 sec. OFF
r-2
Normal rotation: 15 sec. ON - 15 sec. OFF
r-3
Light rotation: 5 sec. ON - 25 sec. OFF
rt
Rotation time
(in minutes)
0
Phase without rotation
1...6
Programmable range in the pre-wash phase
1...20
Programmable range in the wash phase
1...6
Programmable range in the rinse phase
E
Bath drain
0
Phase without draining
1
Drain + wash speed
2
Drain + positioning speed
3
Drain + low spin speed
4
Drain + medium spin speed
5
Drain + medium/high spin speed
6
Drain + high spin speed
Et
Spin time
n.p.
Time not programmable
2...3
Programmable range in intermediate spins
2...7
Programmable range in E-4 - E-6 spins
For further information on the programmable functions, see section below.
Modification of the program contents 25
Cod. 598144
Rev. 12/1218
6.5. Modifying a program
Access the ADVANCED MODE (Section 5.1). The display shows Pro.
Press key 1 to access the PROGRAMMING menu.
The display shows Pr-1. Program 1 is ready for modification. The 2 / 4 keys allow the selection of another
menu. Press key 1 to access the modification of the displayed program.
The display shows Pr-1. Phase 1 is ready for modification. The 2 / 4 keys allow the selection of another phase.
Press key 1 to start the modification to the values of the selected phase.
When the number of the phase is displayed (at the start of phase), the STOP key is used to finalise the program
modification.
Once a program modification has been finalised, the display will show the Pr-* (modified program). Pressing the
STOP key once allows the user to access the higher level of the menu. Pressing twice consecutively allows the
user to exit the ADVANCED USE MODE.
Activation of the phase
Allows the user to program the execution of the selected phase.
Once the desired phase to be modified has been selected, press the 1 key. The display shows Ph-*.
OPTIONS
MEANING
Ph-Y
The phase to be executed is available
Ph-N
The phase to be executed is unavailable
Phases 2, 3 and 6 are phases of obligatory execution.
The 2 / 4 keys allow the modification of the option displayed.
The 1 key validates the selection on the display and allows the user to access the following programmable
function.
Bath level
Bath level allows the selection of the bath level inside the washer.
OPTIONS
MEANING
L-0
Phase without water inlet. Programmable only in phase 1.
L-1
Low level
L-2
Medium level
L-3
High level
L-4
Extra high level
For safety reasons, options L-3 and L-4 are not programmable in machines with a pump drain or a valve closed
without current.
The 2 / 4 keys allow the modification of the option displayed.
The 1 key validates the selection on the display and allows the user to access the following programmable
function.
Temperature of the washing phase
Allows modifying the water temperature in the washing phase. In other phases, it is not possible to program the
water temperature.
OPTIONS
MEANING
C-0 ... C-80
Programmable range in degrees Celsius
F 32 ... F 176
Programmable range in degrees Fahrenheit
The 2 / 4 keys allow the modification of the option displayed.
The 1 key validates the selection on the display and allows the user to access the following programmable
function.

Modification of the program contents 26
Cod. 598144
Rev. 12/1218
Dosings
This allows the user to activate or deactivate the dosing signals that appear in the master table.
If product dosing occurs via the machine’s dispenser, the dosing options are as follows (see dispenser
distribution in Section 4.3).
OPTIONS
MEANING
d- 0
Without dosing
d- 1
Powdered detergent. Normally used in the pre-wash phase
d- 2
Powdered detergent. Normally used in the wash phase
d- 3
Liquid product. Normally used for bleaching (chloride, bleach, etc.)
d- 4
Liquid product. Normally used as a softener/neutraliser
n.p.
Dosing cannot be programmed in the phase
Other possible programming options:
OPTIONS
MEANING
d-12
Simultaneous activation of dosings 1 and 2.
d-13
Simultaneous activation of dosings 1 and 3.
d-14
Simultaneous activation of dosings 1 and 4.
d-23
Simultaneous activation of dosings 2 and 3.
d-24
Simultaneous activation of dosings 2 and 4.
d-34
Simultaneous activation of dosings 3 and 4.
The 2 key allows the user to modify the option displayed.
The 1 key validates the selection on the display and allows the user to access the following programmable
function.
Phase 1 peculiarity
Application designed for machines connected to an external dosing control unit and using this unit’s
own dosing programs.
Phase 1 allows the value 0 to be programmed in the level, rotation time and bath draining functions, using the
dosing and dosing time signals to inform the central dosing unit of the program selected in the washer. After
receiving this information, the central dosing unit will execute the appropriate product dosings for the program
selected in the washer.
Examples of first phase programming used as information to the central dosing unit
Example 1
d
t
information
1
30
Dosing in accordance with Program 1
2
30
Dosing in accordance with Program 2
3
30
Dosing in accordance with Program 3
4
30
Dosing in accordance with Program 4
Example 2
d
t
information
1
2
Dosing in accordance with Program 1
1
4
Dosing in accordance with Program 2
1
6
Dosing in accordance with Program 3
1
8
Dosing in accordance with Program 4
CAUTION!
When dosing signals d3 and d4 are used to inform the central dosing unit, it is advisable to activate the dC
(dispenser cleaning) option in order to remove traces of water from the dispenser. (See Mod menu, Chapter
9)
Modification of the program contents 27
Cod. 598144
Rev. 12/1218
Dosing time
Duration of the dosing or dosings programmed in the phase. Value in seconds.
This only appears only if the dosing value has been programmed in the phase.
OPTIONS
MEANING
1 ... 99
Programmable values
The 2 / 4 keys allow the modification of the option displayed.
The 1 key validates the selection on the display and allows the user to access the following programmable
function.
Rotation
The mechanical action of the washing machine on the linen is different depending on the rotation selected.
Time ON: drum rotating
Time OFF: drum stopped
OPTIONS
MEANING
r-1
Heavy duty rotation
ON: 25 sec. - OFF: 5 sec.
r-2
Normal rotation
ON: 15 sec. - OFF: 15 sec.
r-3
Light rotation
ON: 5 sec. - OFF: 25 sec.
The 2 key allows the user to modify the option displayed.
The 1 key validates the selection on the display and allows the user to access the following programmable
function.
Rotation time
Rotation time programmed in the phase. Time in minutes.
This time is started once the programmed level is reached.
OPTIONS
MEANING
0
Phase without rotation. Programmable only in phase 1.
1 ... 6
Programmable range in the pre-wash and rinse phases
1 ... 20
Programmable range in the wash phase
The 2 / 4 keys allow the modification of the option displayed.
The 1 key validates the selection on the display and allows the user to access the following programmable
function.
Modification of the program contents 28
Cod. 598144
Rev. 12/1218
Bath drain
The draining of the water from the washing machine is achieved by activating of the drain system and a drum
rotation speed.
Options E-1 and E-2 imply a default time value.
The duration of options E-3 – E-6 is programmable within a determined range.
OPTIONS
MEANING
0
Phase without draining. Programmable only in phase 1.
E-1
Drain + wash speed
E-2
Drain + positioning speed
E-3
Drain + low spin speed
E-4
Drain + medium spin speed
E-5
Drain + medium/high spin speed
E-6
Drain + high spin speed
RPM (G FORCE) FOLLOWING MACHINE MODEL
OPTIONS
RMS610
REM025
RMS613
REM033
RMS617
REM040
RMS623
REM055
RMS628
REM070
RMG613
RMG033
RMG617
RMG040
RMG623
RMG055
RMG628
RMG070
E-1
54
47
47
44
40
47
47
45
40
E-2
100
100
100
100
86
100
100
100
86
E-3
410(48)
300(31)
300(31)
300(35)
342(50)
380(50)
380(50)
360(50)
342(50)
E-4
500(75)
400(56)
400(56)
400(63)
433(80)
574(115)
574(115)
505(100)
485(100)
E-5
580(100)
500(87)
500(87)
500(98)
530(120)
635(140)
635(140)
600(140)
570(140)
E-6
600(108)
600(125)
600(125)
600(140)
592(150)
760(200)
760(200)
715(200)
685(200)
RPM (G FORCE) FOLLOWING MACHINE MODEL
OPTIONS
HS-6008
EH020
HS-6013
EH030
HS-6017
EH040
HS-6023
EH055
HS-6024
EH060
HS-6032
EH080
EH090
E-1
50
48
45
43
38
42
40
E-2
100
100
100
87
86
83
79
E-3
400
400
375
330
350
335
325
E-4
600
600
570
525
550
528
490
E-5
800
800
750
725
725
698
675
E-6
970(283)
1000(351)
950(354)
920(350)
966(400)
932(400)
870(381)
The 2 / 4 keys allow the modification of the option displayed.
The 1 key validates the selection on the display and allows the user to access the following programmable
function.
Spin time
Spin time programmed in the phase. Time in minutes.
OPTIONS
MEANING
n.p.
Draining time E-1 and E2
2 ... 3
Programmable range not in final phase of the program
2 ... 7
Programmable range in final phase of the program
The 2 / 4 keys allow the modification of the option displayed.
The 1 key validates the displayed selection and ends the phase programming.
The display will show the following phase.
When finalising the programming of the last phase of the program, display shows Pr-* (modified program).

Demo and Info menu 29
Cod. 598144
Rev. 12/1218
7. OPERATION MODE WITH PROGRAM ACCELERATOR. dEmo Menu
It allows executing one of the four COIN programs with the possibility of reducing the program time.
Program to facilitate maintenance interventions and preparation of programs.
Execution of a program in dEmo mode
Access to the ADVANCED MODE. Section 5.1. The display shows Pro.
Press the 2 key twice. The displays shows CASH and dEmo successively. (In machines with extra options,
press Key 2 three times. The displays shows CASH, EoPt, dEmo successively.
Press the 1 key to access the dEmo menu. The display shows door.
Close the door. The display shows Pr-1.
Ready to execute program 1. Keys 2 and 4 allow the selection of another menu.
Press STOP key to start the program on the display.
The program will be executed following the present contents of it.
During the execution of the program, it is possible to modify it:
Press the 3 key. The information on the display starts flashing.
Press 4 to advance to the following function or to reduce the rotation and spin times.
Key 2 allows increasing the rotation times.
Once the program is finished, open the door.
The washer can be normally used.
8. INFORMATION MENU. InFO menu
Information menu of different parameters.
PARAMETERS
MEANING
COIN
Coin-op washers control
EP**
Program version
Pr-
Total number of cycles run
Pr-1
Number of cycles executed with program 1
Pr-2
Number of cycles executed with program 2
Pr-3
Number of cycles executed with program 3
Pr-4
Number of cycles executed with program 4
EUA
Number of cycles run with extra washing option
Eri
Number of cycles run with extra rinsing option
EdS
Number of cycles run with extra spinning option
SUD
Number of times the anti-suds function has been activated
Access to the ADVANCED MODE. Section 5.1. The display shows Pro.
Press key 2 three times. In the display reports CASH, dEmo, InFO are showed successively. (In machines with
extra options, press Key 2 four times. The displays shows CASH, EoPt, dEmo and InFO successively.)
Press the 1 key to sequentially access the listing of the different parameters and the values of the
corresponding counters.
Once the last option is listed, press the 1 key. The display shows InFO.
The keys 2 and 4 allow the access to other menus.
To exit the ADVANCED MODE press the STOP key.
Modification of operation parameters 30
Cod. 598144
Rev. 12/1218
9. MODIFICATION OF OPERATING PARAMETERS. Mod menu
The Mod menu allows the user to modify the operation parameters of all the programs.
The modifications carried out from Mod menu affect the four programs.
Summary table of the changeable parameters:
PARAMETER
MODIFICATION OF
OPTIONS
CE
USA
C / F
Temperature unit
C
Temperature displayed in degrees Celsius
F
Temperature displayed in degrees Fahrenheit
dc
Cleaning the dispenser
dc-0
Dispenser cleaning NO activated
dc-1
Dispenser cleaning YES activated
Ed
External dosing
Ed-0
Units without external dosing
Ed-1
Units with external dosing
bt
Beep time
bt10
Beep time when machine restarts
dp
Program by default
1 … 4
Selected program by default
3
3
UCM
Locking the coin
meter box
UCM-0
Coins/tokens accepted at the beginning of the
cycle regardless of the status of the door and the
program selected.
UCM-1
Coins/tokens accepted at the beginning of the
cycle only after the door is closed and the
program selected.
PSH
Order for cycle start
PSH-0
Cycle start by inserting coins
PSH-1
Cycle start by inserting coins and key for the
program selected
SP
Levels of suds
prevention
(EH020 and REM025
models only)
SP-0
Without suds prevention
SP-1
First level of suds prevention
SP-2
Second level of suds prevention
SP-3
Third level of suds prevention
Hr
Program price
according to hour
band
Hr-0
Option not available
Hr-1
Option available
dSP
Temperature display
dSP0
No temperature value displayed
dSP1
Temperature value displayed
Id
Network identifier
Id-0
Disabled communication
Id-1..99
Enabled communication
Indicates default option according to settings.
9.1. Parameters modification
Access to the ADVANCED MODE. Section 5.1. The display shows Pro.
Press key 2 four times. In the display reports CASH, dEmo, InFO, Mod are showed successively.
(In machines with extra options, press Key 2 five times. The displays shows CASH, EoPt, dEmo, InFO and
Mod successively.)
Press the 1 key to display the first parameter.
Modification of operation parameters 31
Cod. 598144
Rev. 12/1218
Temperature unit
The bath water temperature can be displayed in Celsius or Fahrenheit degrees.
OPTIONS
MEANING
C
Temperature unit in Celsius degrees
F
Temperature unit in degrees Fahrenheit
The 2 / 4 keys allow the modification of the option displayed.
The 1 key validates the selection on the display and allows the user to access the following programmable
function.
Dispenser cleaning
CAUTION!
DO NOT ACTIVATE THIS OPTION IN MACHINES CONNECTED TO EXTERNAL DOSING
INSTALLATIONS.
This option activates the cleaning of the dispenser liquid product compartments by opening their water filling
valves to eliminate the possible remaining products.
Option available from software version no. 22.
OPTIONS
MEANING
dc-0
Dispenser cleaning NO activated
dc-1
Dispenser cleaning YES activated
The 2 / 4 keys allow the modification of the option displayed.
The 1 key validates the selection on the display and allows the user to access the following programmable
function.
External dosing
Adapts the operation of the control panel LEDs to the washer operation.
Option Ed-1 has to be programmed only if washer uses wash products form an external dosing installation.
OPTIONS
MEANING
Ed-0
Units with external dosing unavailable
Ed-1
Units with external dosing available
The 2 / 4 keys allow the modification of the option displayed.
The 1 key validates the selection on the display and allows the user to access the following programmable
function.
Beep time
It determines the beep duration when a program stopped by the STOP key restarts.
Minimum programmable time: 10 sec.
Maximum programmable time: 60 sec.
The 2 / 4 keys allow the modification of the option displayed.
The 1 key validates the selection on the display and allows the user to access the following programmable
function.
Selected program by default
Determines the selected program by default when the door is closed.
Selected program by default: program 3.
The 2 / 4 keys allow the modification of the option displayed.
The 1 key validates the selection on the display and allows the user to access the following programmable
function.
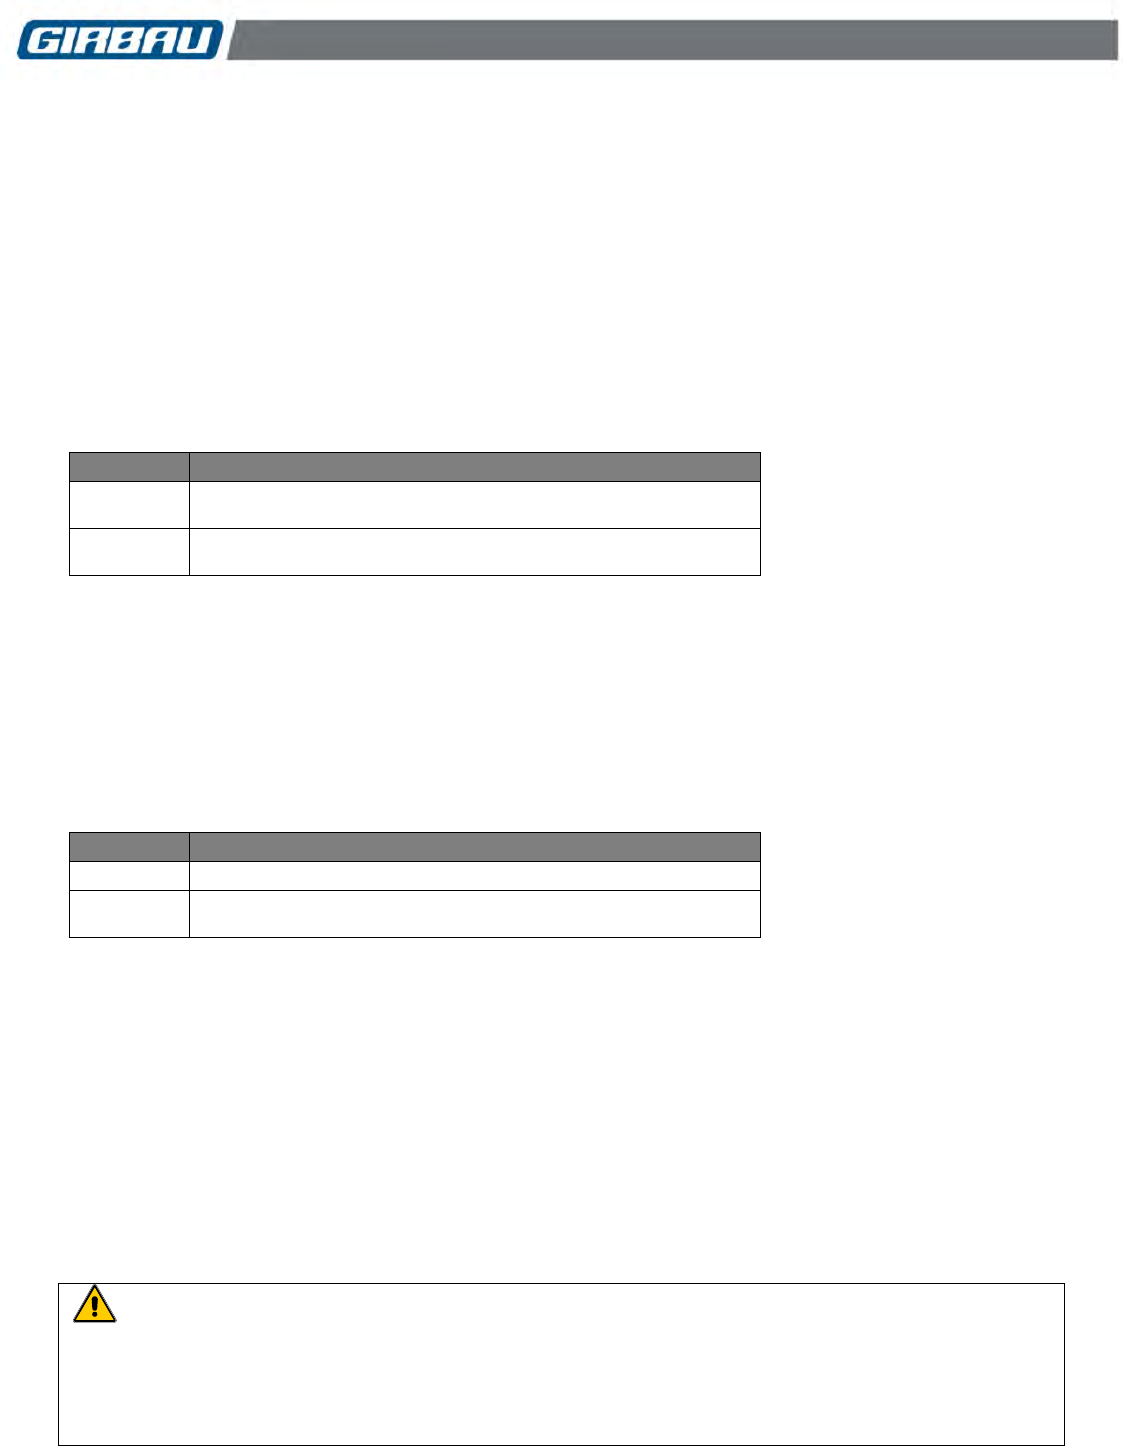
Modification of operation parameters 32
Cod. 598144
Rev. 12/1218
Locking the coin meter box
In UCM0 configuration, locking the coin meter box allows coins or tokens to be inserted at the beginning of the
cycle, regardless of whether the door of the machine is open or closed, or whether a program is selected.
The UCM-0 configuration is especially recommended for connecting the washing machine to the central
vending units.
In UCM-I configuration, locking the coin meter box allows coins or tokens to be inserted at the beginning of the
cycle only if the door is closed and a program has been selected.
Once the door has been closed and the program selected, there is a safety delay of 1 minute that makes it
necessary to select the program again if the payment has not been made before the specified time.
OPTIONS
MEANING
UCM-0
Tokens/ coins accepted regardless of the status of the door
and the program selected.
UCM-1
Tokens/ coins accepted only if the door has been closed and
the program selected.
The 2 / 4 keys allow the modification of the option displayed.
The 1 key validates the selection on the display and allows the user to access the following programmable
function.
Order to start program
In PSH-0 configuration the washing programs will start when the number of tokens or coins inserted is equal to
the price shown on the display.
In PSH-I configuration pressing the key for the program selected once is required to start the program once the
value of it has been inserted in the unit coin meter.
OPTIONS
MEANING
PSH-0
Program start by paying its value
PSH-I
Program starts as a result of paying its value and pressing the
key for the program selected
The 2 / 4 keys allow the modification of the option displayed.
The 1 key validates the selection on the display and allows the user to access the following programmable
function.
Suds prevention program
(Option available on EH020 and REM025 models only).
Certain detergents commonly used in some countries produce large quantities of suds and can complicate the
proper functioning of the wash programs.
To mitigate this difficulty it is advisable to use the suds-prevention options.
The levels of prevention 1, 2 and 3 modify the wash programs values (refer to section 6.2 on this manual).
The levels of prevention 2 and 3 execute as well additional options to increase the efficiency of rinses.
CAUTION!
THE ACTIVATION OF SUDS PREVENTION LEVELS 2 & 3 MEAN A SMALL INCREASE OF THE
PROGRAMME DURATION AND WATER AND ENERGY CONSUMPTION.
THE USE OF SOAP CHEMICALS WITH SUDS CONTROL IS RECOMMENDED. DO NOT EXCEED THE
RECOMMENDED DOSAGE.
Modification of operation parameters 33
Cod. 598144
Rev. 12/1218
OPTIONS
MEANING
SP-0
Without suds prevention
SP-1
First level of suds prevention
SP-2
Second level of suds prevention
SP-3
Third level of suds prevention
The 2 / 4 keys allow the modification of the option displayed.
The 1 key validates the selection on the display and allows the user to access the following programmable
function.
Prices allocation according to hour band
Option possible only on machines with clock option installed.
The activation of option Hr-1 modifies the contents of the CASH menu, allowing programming of three different
prices for each program and permits the access to the CALE menus: definition of hour band for each day of the
week and Hour: setting the clock and programming the day of the week.
OPTIONS
MEANING
Hr-0
Single price for each program
Hr-1
Variable price based on the established calendar
Note: The modification of Hr-1 to Hr-0 programming causes the washing machine to automatically select as
price of each program the values programmed as Low value.
The 2 / 4 keys allow the modification of the option displayed.
The 1 key validates the selection on the display and allows the user to access the following programmable
function.
Viewing the temperature value
Available only for heated units.
It allows or prevents the water temperature display during the wash phase heating.
OPTIONS
MEANING
dSP0
No temperature value displayed
dSPI
Temperature value displayed
The 2 / 4 keys allow the modification of the option displayed.
The 1 key validates the selection on the display and allows the user to access the following programmable
function.
Network identifier
This parameter assigns a network identifier to the washer. This identifier enables the communication of the
washer with the environment through a protocol based on RS-485.
Selected option by default: Id-0.
OPTIONS
MEANING
Id-0
Disabled communication
Id-1..99
Enabled communication
For further information, see the Communication Protocol Instruction Manual.
Press the 1 key. The display shows Mod.
The 2 / 4 keys allow the access to other menus.
To exit the ADVANCED MODE press the STOP key.

Modification of operation parameters 34
Cod. 598144
Rev. 12/1218
10. MODIFICATION OF ACCESS CODE TO ADVANCED MODE. NCod menu
As described in Section 5.1 the access to ADVANCED MODE is restricted by an access code.
This code can be modified by the user if so desired.
It must always contain a combination of EIGHT keys.
Modifying of the access code
Access to the ADVANCED MODE. Section 5.1. The display shows Pro.
Press key 2 five times. In the display reports CASH, dEmo, InFO, Mod, Ncod are showed successively.
(In machines with extra options, press Key 2 six times. The displays shows CASH, EoPt, dEmo, InFO Mod and
Ncod successively.)
Press key 1 to access the set of a new code. All the information on the display will disappear.
Enter a combination of eight keys using the four central keys in the control panel.
The key pressed is displayed in the display with its corresponding numeric value.
At the end of the sequence the SURE report will be showed.
Confirm the new code with the 3 key.
If you don’t want to validate the code, press the STOP key.
Display will show NCod.
The keys 2 and 4 allow the access to other menus.
To exit the ADVANCED MODE press the STOP key.
Program price 35
Cod. 598144
Rev. 12/1218
11. PROGRAM PRICE. CASH Menu
The CASH menu allows allocating one or more prices, individually, to each program.
This price can be the value in coins or in tokens, depending on the coin meter in the machine.
Coin counter meter: The price of each program is set by its value in coins. The programming or modification of
the program price will always be a multiple of the coin used. For meters accepting coins of different values, the
program value will always be a multiple of the less valuable coin accepted by the coin meter.
Price programming = 0000 allows the free use of the washing machine. When selecting a washing program, the
report FrEE is showed in the display and the washing program is started pressing the key.
Token counter meter: The price of each program is fixed by the number of tokens to be introduced to start the
program. The programming or modification of the program price will always be in units.
CLOCK option. Washers with this option installed and suitably activated in the Mod menu (Chapter 9) allow the
use of multiple prices for every program, according to the day of the week and three programmable time bands.
(Consult sections 11.1 and 11.2)
11.1. Single price for each program
Price programming / modification
Access to the ADVANCED MODE. Section 5.1. The display shows Pro.
Press the 2 key. Display shows CASH.
Press the 1 key to access the management price menu. Display shows Pr-1 (selected program.)
The 2 / 4 keys allow the selection of the program number desired in a cyclical way.
Press the 1 key to modify the selected program price. The display will show the current price of the selected
program.
Press the 2 key to increase or the 4 key to reduce the program price.
Press the 1 key to validate the price displayed in the display.
Pr-* is showed in the display. Next program.
The 1 key allows the price modification of the new program displayed.
The key allows the access to the higher programming level. Display shows CASH. Keys 2 / 4 allow the
selection of another menu.
To leave the ADVANCED MODE press the key twice with Pr-* on display.
11.2. Programs price based on time bands
The price option based on the time bands allows the access to the programming of the different prices for each
program according to the time and day of the week. After programming the washing machine, the price of each
program is modified automatically depending on the rates and the calendar set up.
In this chapter are described the steps to program this way of programs price management.
NEVER FORGET THAT PRIOR TO SET THE HOUR TO THE SYSTEM AND THE PRICE
PROGRAMMING, THE WASHING MACHINE MUST HAVE THE CLOCK KIT AND THE PROGRAMMING
OPTION MUST BE SET UP, AS IT IS DESCRIBED IN CHAPTER 9.
If this kit is not set up originally in your washing machine it can be added later. Ask your dealer.
STOP
STOP
STOP

Program price 36
Cod. 598144
Rev. 12/1218
Table of the price management system menus:
MENU
PURPOSE
Hour
To set the clock of the system and the weekly calendar
CALE
Definition of the different time bands for each day of the week
CASH
Price of each program according to the time band
11.2.1. Hour Menu
It is essential to have the clock set at the real time for the good operation of the payment system according to the
time bands.
The HOUR menu allows seeing and / or modifying the hour of the system:
Setting clock time and day of the week
Access to the ADVANCED MODE. Section 5.1. The display shows Pro.
Press the 2 key seven times. In the display reports CASH, dEmo, InFO, Mod, Ncod, CALE, Hour are showed
successively.
Press the 1 key. The display reports SURE (access confirmation to time modification).
Press the 3 key to display the current time. The system time is shown on the display in the format: hh.mm (24
hour time format).
The minutes are showed flashing. Modification by keys 2 and 4.
Press the 3 key to validate the minutes and go to hour modification.
The hours are showed flashing. Modification by keys 2 and 4.
Press the 1 key to validate the hour on the display.
Select the day of the week (from 1-Mo to 7-Su) by 2 and 4 keys.
Press 1 to accept the day displayed. The display shows Hour.
The 2 / 4 keys allow the access to other menus.
To exit the ADVANCED MODE press the STOP key.
11.2.2. CALE menu
By this menu are defined the time bands for each day of the week. It is possible to define up to four time bands
per day.
The first time band starts always at 00 hours.
The last time band finishes at 24 hours.
In the CASH menu, each time band will be allocated a different price for each program and each rate.
The rates are defined as:
LOW rate: low price. When the laundry is not very full.
MId rate: normal price. When the laundry is quite full.
HIGH rate: high price. When the laundry is very full.
The values programmed by default on the CALE menu are:
One daily time band of 24 hours and at a normal rate.
Time programming
Access to the ADVANCED MODE. Section 5.1. The display shows Pro.
Press key 2 six times. In the display reports CASH, dEmo, InFO, Mod, Ncod, CALE are showed successively.
Press key 1 to access the menu. Display shows 1-Mo.
The 2 and 4 keys allow the selection of another day.
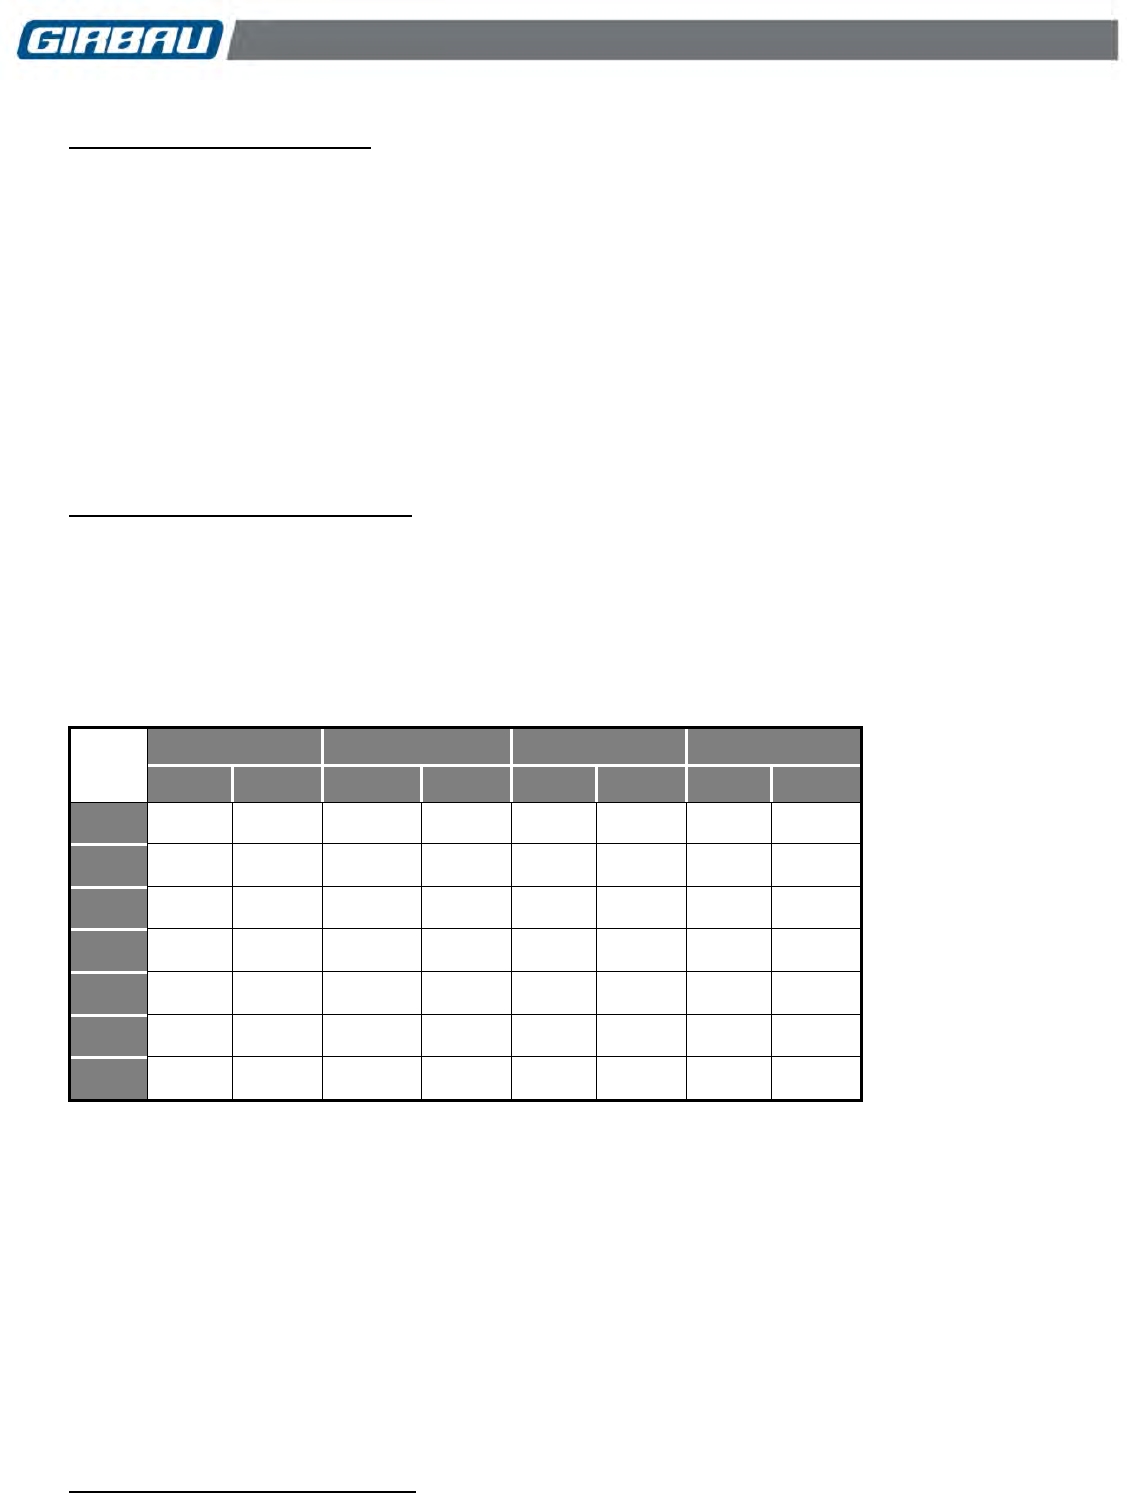
Program price 37
Cod. 598144
Rev. 12/1218
Programming a day of the week
Press 1 to accept the day displayed. The display shows the report 1-** (first time band and end time).
The 2 and 4 keys allow the modification of the end time of the first stage.
Press 1 to accept the hour programming. The display will show the rate of the first time band.
Possible programming: LOW rate: low price; MId rate: medium price; HIGH rate: high price.
The 2 and 4 keys allow the selection of the desired rate.
Press 1 to accept the programmed rate.
If the end of the first time band has been programmed at 24 h, that will access to the time bands programming of
the following day.
If the end of the first time band has been programmed before the 24 h, the display will show the report 2-**:
Second band and end time.
To program the following time bands, repeat the operation described for programming the first band. Maximum
number of time bands per day: four.
The last time band ends at 24 h. It’s not modifiable.
Programming of the remaining days
Select by keys 2 and 4 the day that you want to modify.
Repeat the procedure: programming a day of the week.
The STOP key allows the access to the superior programming level. The display shows CALE.
The 2 / 4 keys allow the access to other menus.
To exit the ADVANCED MODE press the STOP key.
Example: Example of the weekly programming of the time band.
BAND 1
BAND 2
BAND 3
BAND 4
DAY
TIME
RATE
TIME
RATE
TIME
RATE
TIME
RATE
1-Mo
00-12 h.
LOW
12-18 h.
MId
18-22 h.
HIGH
22-24 h.
LOW
2-tU
00-13 h.
LOW
13-24 h.
MId
-
-
-
-
3-UE
00-24 h.
MId
-
-
-
-
-
-
4-tH
00-24 h.
MId
-
-
-
-
-
-
5-Fr
00-24 h.
HIGH
-
-
-
-
-
-
6-SA
00-13 h.
MId
13-19 h.
HIGH
19-24 h.
MId
-
-
7-SU
00-11 h.
LOW
11-14 h.
MId
14- 19 h.
HIGH
19-24 h.
LOW
11.2.3. CASH Menu
Following the steps of previous section some time bands have been defined to which we have given a rate:
LOW: low price. MId: medium price. HIGH: high price.
In the CASH menu we give a price to each program according to the rate chosen.
The price will be programmed in number of tokens or in value of coins, depending on the coin meter in the
machine.
Price of each program according to the three rates
Programming the HR-1 option (consult Mod Menu in Chapter 9) extends the options of the CASH menu.
Access to the ADVANCED MODE. Section 5.1 Display shows Pro.
Press the 2 key. Display shows CASH.
Press the 1 key to access the menu. The display shows Pr-1.
Keys 2 and 4 allow the selection of another menu.
Programming the price of a program
Press the 1 key to program the prices of the program displayed.
LOW report is showed in the display. Press again the 1 key.
The display shows the value of the low rate of the program displayed.
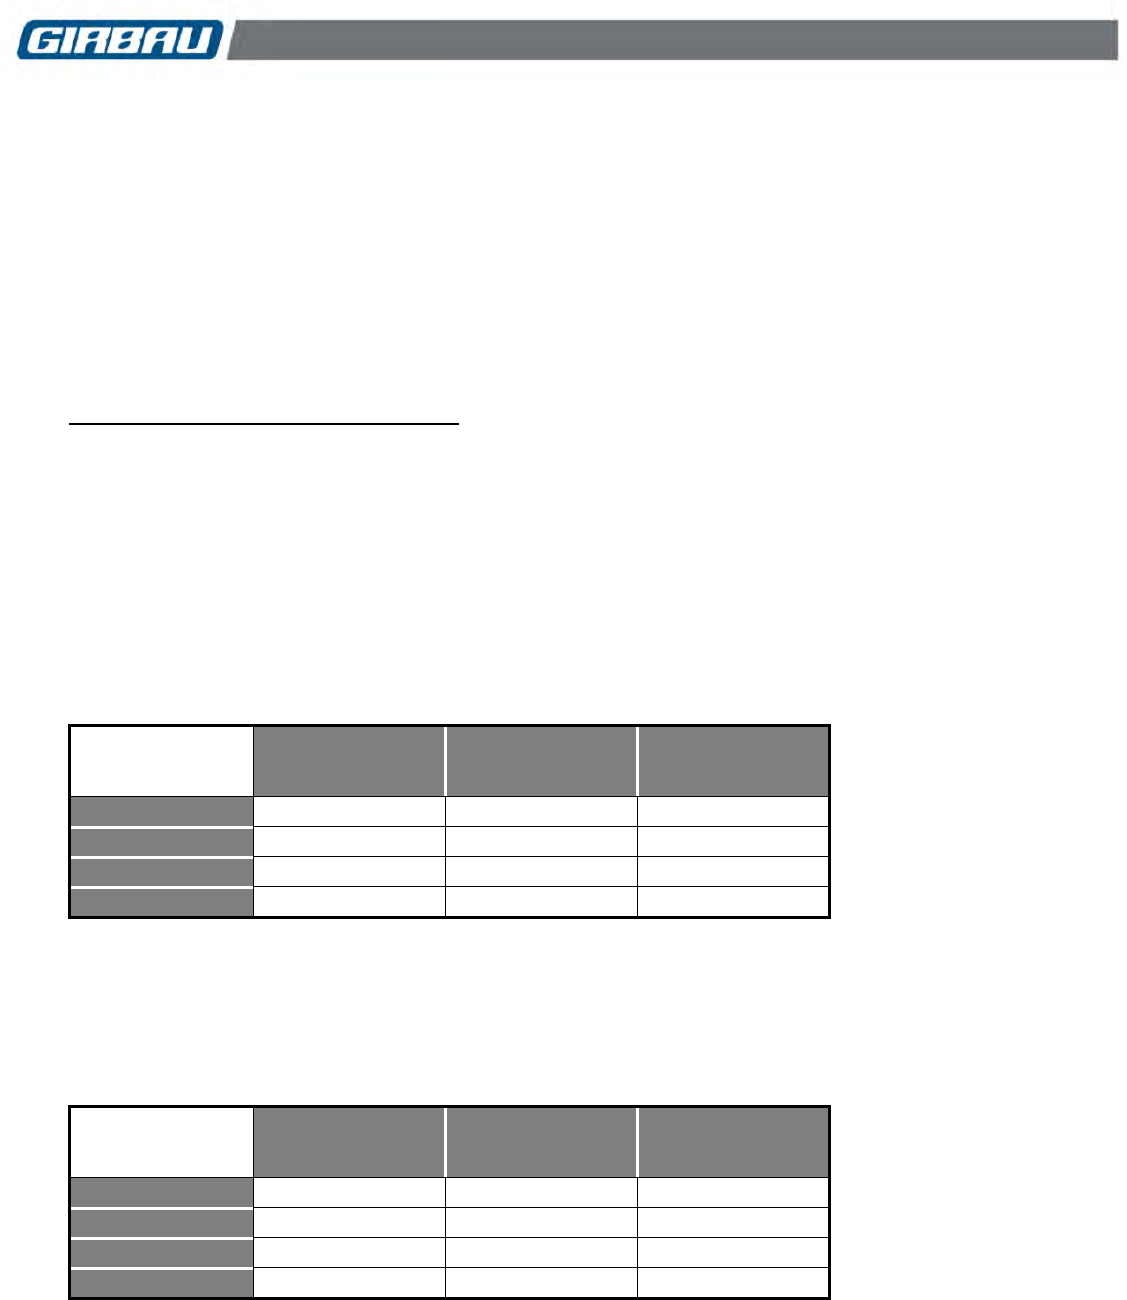
Program price 38
Cod. 598144
Rev. 12/1218
The 2 and 4 keys allow the modification of the program price.
Press the 1 key to validate the program price.
MId report is showed in the display. Press again the 1 key.
The display shows the value of the medium rate of the program displayed.
The 2 and 4 keys allow the modification of the program price.
Press the 1 key to validate the program price.
HIGH report is showed in the display. Press again the 1 key.
The display shows the value of the high rate of the program displayed.
The 2 and 4 keys allow the modification of the program price.
Press the 1 key to validate the program price.
Pr-* report is showed in the display. Next program.
Programming of the remaining programs
Select by keys 2 and 4 the program that you want to modify.
Repeat the procedure: programming the price of a program.
Press the 1 key to program the prices of the program displayed.
The STOP key allows the access to the superior programming level. Display shows CASH.
Keys 2 and 4 allow the selection of another menu.
To skip the ADVANCED MODE press STOP key twice with Pr-* on display.
Example: rate programming using 0.20 € & 2 € (example only)
Programming made in a washer with dual coin meter.
PROGRAM
RATE
LOW
(LOW)
RATE
NORMAL
(MId)
RATE
HIGH
(HIGH)
1
€3.00
€3.60
€4.20
2
€2.40
€3.00
€3.60
3
€2.40
€3.00
€3.60
4
€2.00
€2.60
€3.20
Example: rate programming using 0.25 US$ (example only)
Programming made in a washer with single coin meter.
PROGRAM
RATE
LOW
(LOW)
RATE
NORMAL
(MId)
RATE
HIGH
(HIGH)
1
$2.75
$3.00
$3.50
2
$2.50
$2.75
$3.25
3
$2.50
$2.75
$3.25
4
$2.25
$2.50
$3.00
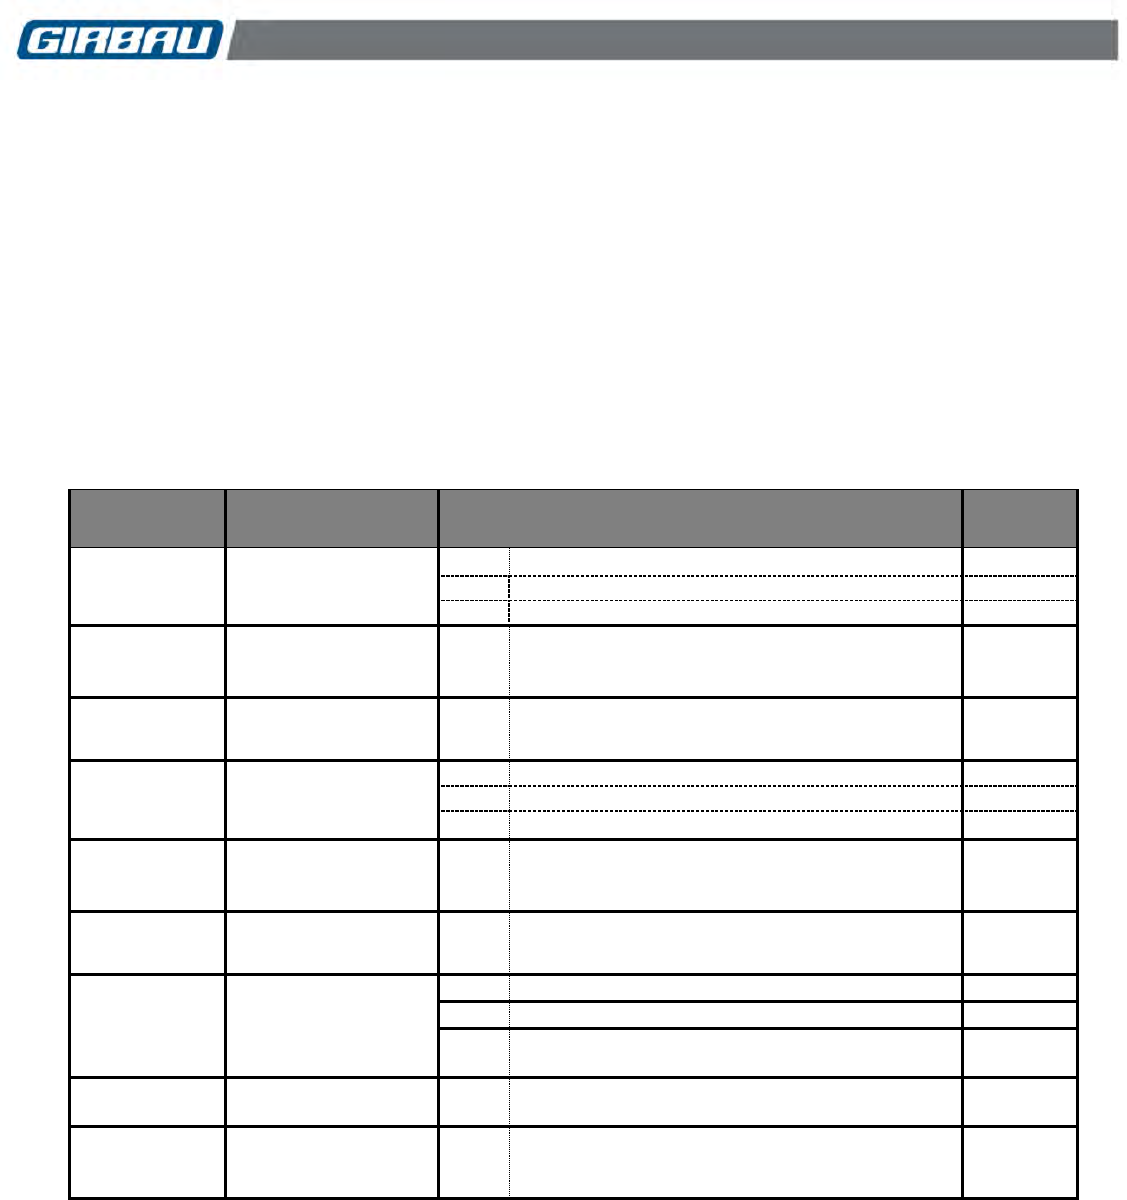
Extra options menu 39
Cod. 598144
Rev. 12/1218
12. EXTRA OPTIONS MENU. EoPt menu
On machines with extra options, the EoPt menu makes it possible to modify the parameters of these options. If
the machine does not have these options, this menu will not be displayed.
The extra options are: Extra wash, extra rinse and extra spin. These options can be selected, independently
from each other, once the washing cycle has been selected. In the EoPt menu each of the extra options can be
turned on/off.
In the case of the extra wash and extra rinse, the user can choose between increasing the time of the
corresponding phase or adding a new phase. Phase 2 and 3 respectively must be active.
This same menu makes it possible to enter the price of each of the extra options.
Table summarising the modifiable parameters for the extra options:
PARAMETER
MODIFICATION OF
OPTIONS
DEFAULT
EUA
Extra wash
0
Off
1
Increases the wash cycle time (Phase 2)
2
Adds washing phase 1
Ut-x
Extra washing time in
minutes
1 … 9
Time added to the washing phase (if EUA=1)
1
8888
Price of the extra
wash
0000
9999
0000
Eri
Extra rinse
0
Off
1
Increases the rinse cycle time (Phase 3)
2
Adds rinsing phase 5
rt-x
Extra washing time in
minutes
1 … 9
Time added to the rinsing phase (if EUA=1)
1
8888
Price of extra rinse
0000
9999
0000
EdS-x
Extra spin
0
Off
1
It modifies the spinning time
2
It modifies the spinning time and the spin speed
at E6
St-x
Extra spinning time in
minutes
1 ... 3
Time added to the spinning (if EdS=1)
3
8888
Price of extra spin
0000
9999
0000
Indicates default option according to settings.

Extra options menu 40
Cod. 598144
Rev. 12/1218
To access the EoPt menu with a control that has the extra options function, follow these steps:
Access to the ADVANCED MODE. The display shows Pro.
Press the 2 key twice. The displays shows CASH, EoPt successively.
Press the 1 key to sequentially access the listing of the different parameters.
Once the last option is seen or modified, press the 1 key. The display shows EoPt.
The keys 2 and 4 allow the access to other menus.
To exit the ADVANCED MODE press the STOP key.
Refer to the operation manual on the manufacturer’s website.
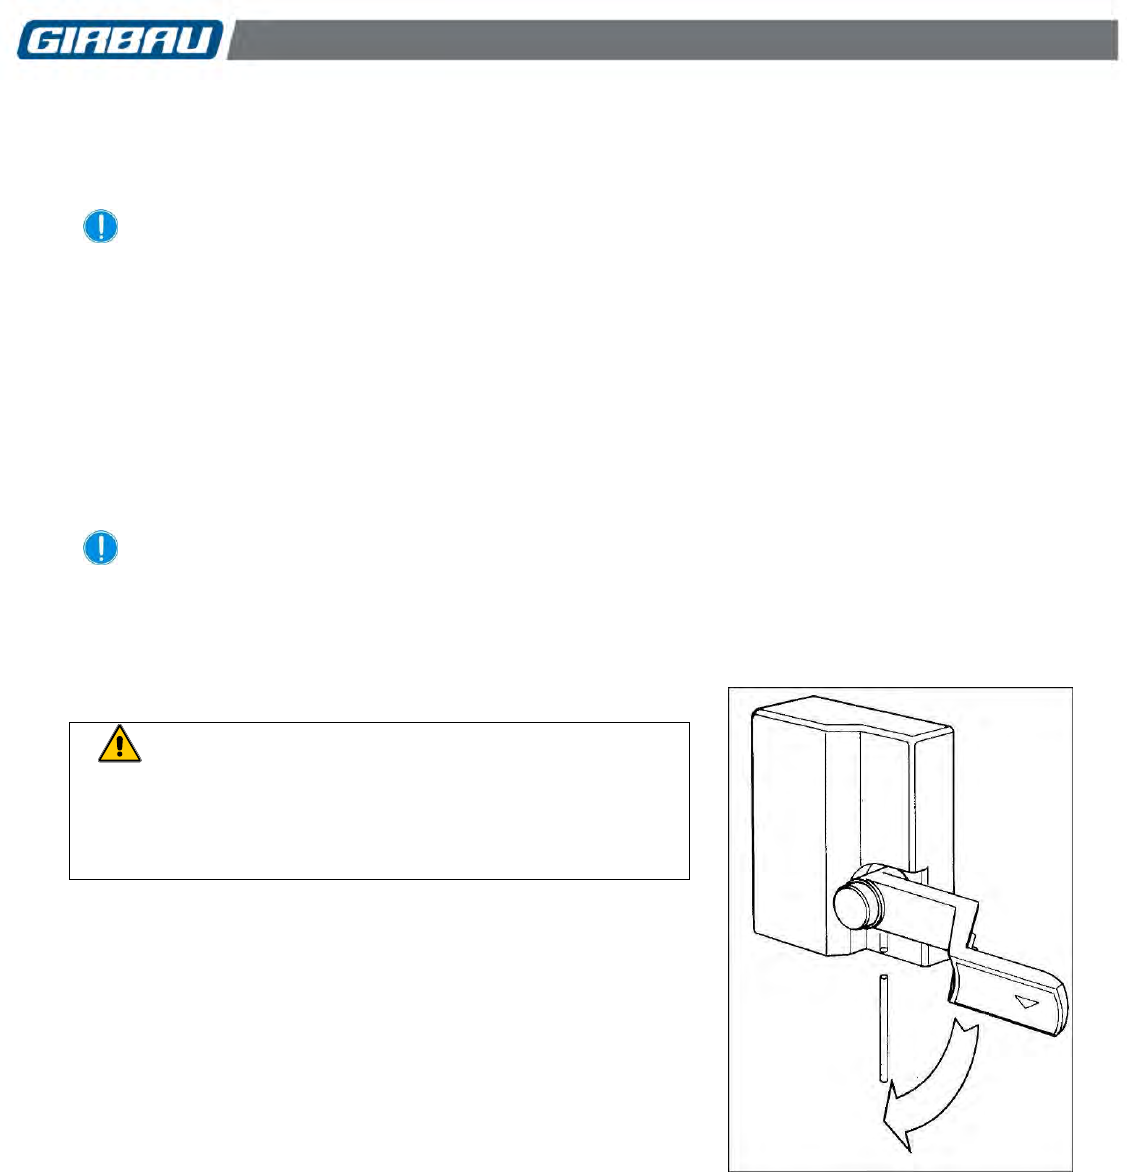
Troubleshooting 41
Cod. 598144
Rev. 12/1218
13. TROUBLESHOOTING
13.1. Freeing a trapped person
PROCEDURE IN THE EVENT OF ENTRAPMENT OF A PERSON OR AN ANIMAL
INSIDE THE WASHER
1. Press the STOP key. This action interrupts the wash cycle in operation and opens the washing machine
drain. The washing machine control circuit remains in operation.
2. Open the door. After the bath has been drained and the drum rotation has ended, the door lock is
unblocked allowing the door to be opened.
3. If the door fails to release: Consult the following sections: disassembling the door of the washing
machine or manually releasing of the safety lock (Sections 13.2 and 13.3)
CAUTION! If instead of pressing the STOP key you perform one of the following actions
THE DOOR LOCK WILL NOT BE RELEASED immediately:
Pressing the EMERGENCY STOP
Disconnecting the ON/OFF SWITCH
Disconnecting the SWITCH DISCONNECTOR
13.2. Manually releasing of the safety lock
Fig.13.1
CAUTION
This procedure is recommended in problems caused by a
failure to realise the door of the machine. It should only be
carried out by the Authorised Technical Service except in
emergency situations.
Specific information for HS-6023, EH055, HS-6024, HS-6032,
EH060, EH080, RMS/RMG628, REM/RMG070.
Before disassembling the door of the washing machine:
Check that the bath level does not exceed the door opening
level.
Close and mechanically lock the manual water supply valves.
Close and mechanically lock the manual steam inlet valve
(steam heated washing machines).
Disconnect and mechanically lock the External Automatic Switch or
the of the washing machine disconnector switch.
In order to release the safety lock manually, completely insert a rod
of 0.2 inches (3 mm) and an approximate length of 4 inches (100
mm) into the bottom side of the safety lock cover, and at the same
time turn the knob downwards (Figure 13.1).
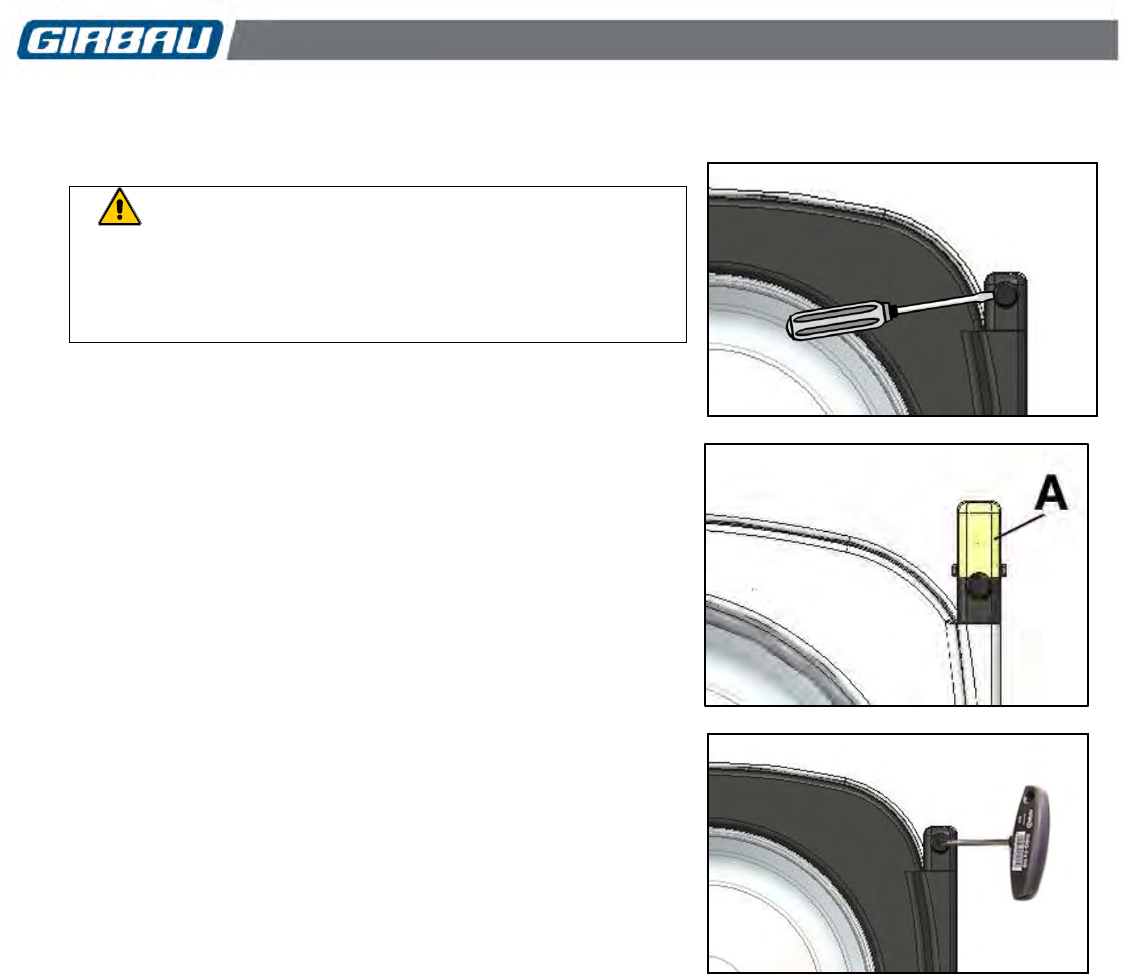
Troubleshooting 42
Cod. 598144
Rev. 12/1218
13.3. Disassembling the door of the washing machine
Fig. 13.2
Fig. 13.3
Fig. 13.4
CAUTION
Only to be performed by the Authorised Technical Service
except in emergency situations. Procedure recommended in
problems caused by a failure in the realising of the door of
the machine.
Specific information for RMS610, RMS/RMG613, RMS/RMG617,
RMS/RMG623, RMS/RMG628, HS-6008, HS-6013, HS-6017, HS-
6023, HS-6024, HS-6032, REM025, REM/RMG033,
REM/RMG040, REM/RMG055, REM/RMG070, EH020, EH030,
EH040, EH060, EH080.
Before disassembling the door of the washing machine:
Check that the bath level does not exceed the door opening
level.
Close and mechanically lock the manual water supply valves.
Close and mechanically lock the manual steam inlet valve
(steam heated washing machines).
Disconnect and mechanically lock the External Automatic
Switch or the of the washing machine disconnector switch.
Door disassembly.
Remove the protective caps of the hinge locking screws (Fig.
13.2). In models RMS/RMG628, REM/RMG070, HS-6024,
HS6032, EH060 and EH080, first remove the plastic guard
(Fig.13.3/A).
Disassemble the hinge locking screws. (Fig. 13.4).

Troubleshooting 43
Cod. 598144
Rev. 12/1218
13.4. What to do when …
Some of the washing machine’s operating problems can be solved by the user intervention. These problems are
detailed below.
Should you have any questions, remember to consult the Authorised Technical Service.
..... the wash cycle ends with the report: END/BAL
This report indicates that the final spin cycle is not possible because the load is unbalanced.
Unload the machine and reload it.
Begin the wash cycle and accelerate the program to the last phase.
The washing machine will repeat the last spin cycle without refilling with water.
If the problem persists, or occurs often, contact the Authorised Technical Service.
..... the machine makes a strange noise during the spin cycle
Contact the Authorised Technical Service.
..... the door is leaking
Clean the door seal of any possible deposits or remains of linen.
..... there is water leaking inside the washer cabinet
Check the outlet draining pipe.
Check the seals on the water inlet hoses; tighten the connection couplings.
Check the condition of the door seal and check whether there are any ruptures.
If the problem persists, seal all of the water inlets and contact the Authorised Technical Service.
..... you have forgotten the access code for the ADVANCED MODE
Contact the Authorised Technical Service.
..... the clock (option) stops working correctly
Possible battery failure. Contact the Authorised Technical Service to have it replaced.
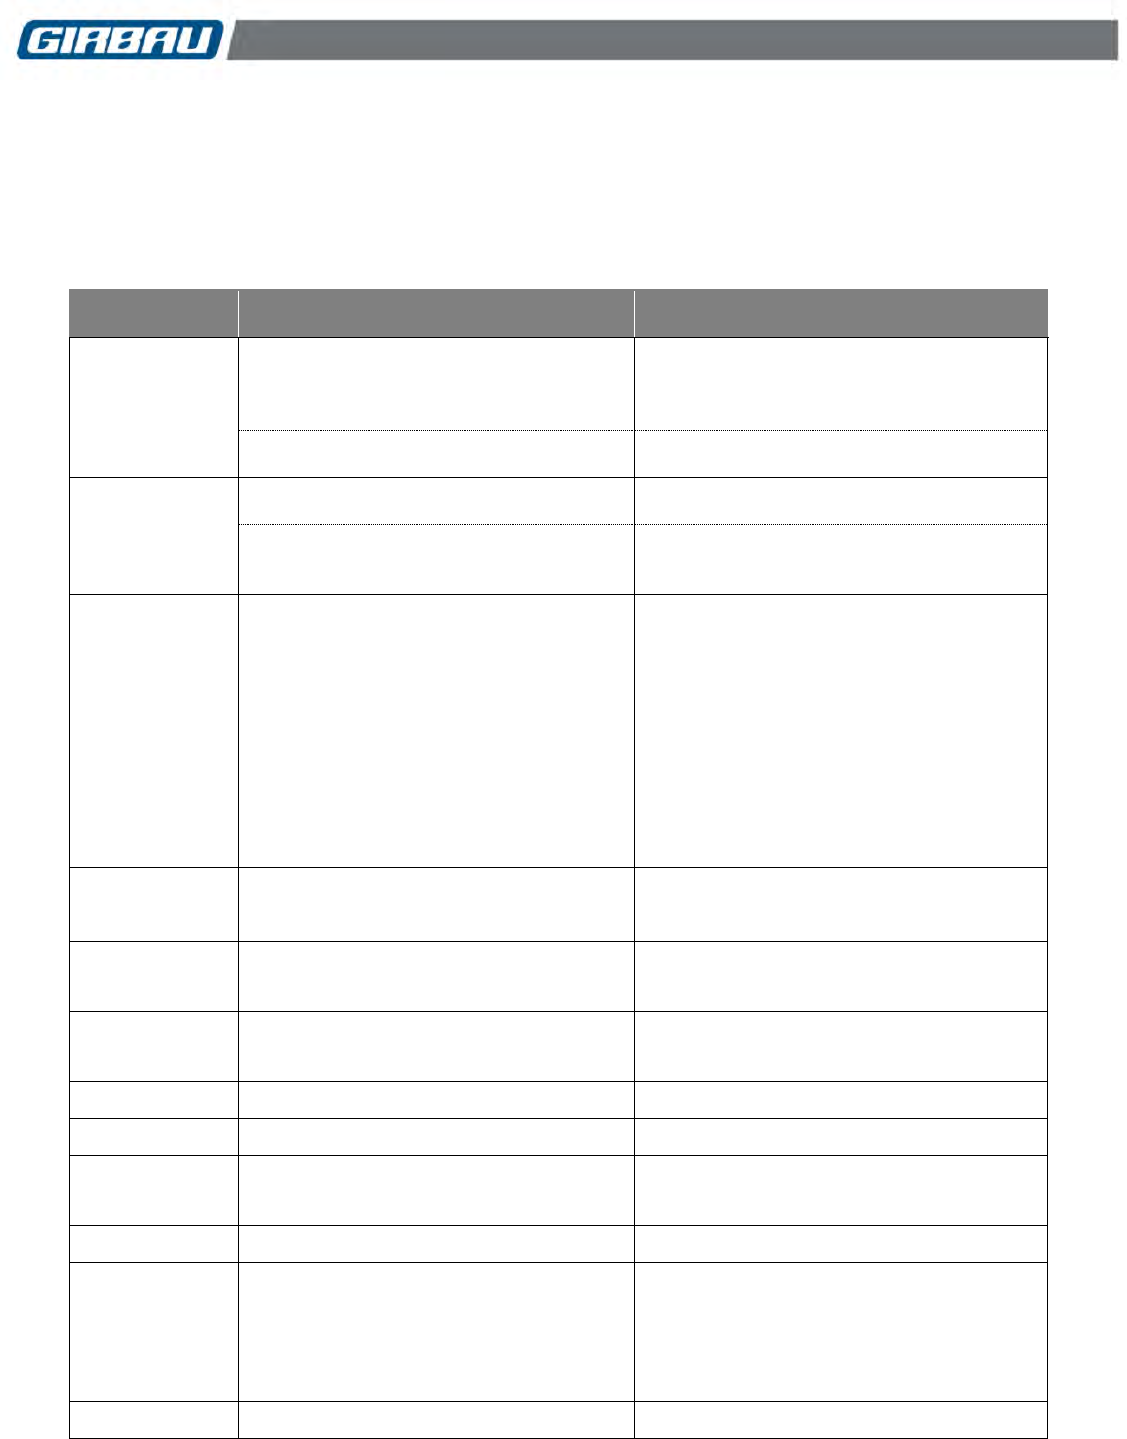
Troubleshooting 44
Cod. 598144
Rev. 12/1218
13.5. System alarms
The safety of the washing machine in use requires the machine to monitor itself closely for any possible
anomalies. These anomalies are reported in the form of alarms.
The ALM message will appear on the washing machine’s display alternating with the specific alarm report.
REPORT ON
DISPLAY
LIKELY CAUSE
RESPONSE
ALM/A-*
Faulty water inlet
Check water input pressure.
Check manual water inlet valves.
Check the status of the filters in the solenoid
valves. (See Section 13: Maintenance)
Defect in the solenoid valves
Defect in the level control system
Call Service.
ALM/E
Machines with pump drain: obstruction of
the draining pump
Call Service.
Anomaly in the drain system
Error in drain configuration
Check the status of the washing bath’s
output hoses.
Call Service.
ALM/HOT
Inadequate stop of the washing machine
with bath at high temperature
Excessive temperature when machine is
stopped
Anomaly in the heating system
Close the door of the washing machine to
allow opening of cold water valve.
Press STOP key to drain the bath and
access to the door opening.
Repeat this operation until the alarm report
disappears.
If the alarm report does not disappear after
five attempts, disconnect the general power
supply and close water inlet manual valves.
Call Service.
ALM/L
Leakage in the solenoid valve
Bath level with machine idle
Close manual water inlet valves.
Call Service.
ALM/SL
Bath level exceeded
Close manual water inlet valves.
Call Service.
ALM/C
Defect in the temperature probe
Error in the heating configuration
Defect in the heating circuit
Call Service.
ALM/Prob
Defect in the temperature probe
Call Service.
ALM/BAL
Defect in the unbalance control switch
Call Service.
ALM/VAR*
Disconnection of the motor’s thermal
protection
Alarm set off by the inverter
Call Service.
ALM door
Faulty door lock
Call Service.
Hot
Interruption of the program by STOP key
with bath at high temperature
The washing machine will automatically
accept cold water and will not allow the door
unlock.
When the bath temperature is below 45 ºC
(133 ºF) the bath will drain and the safety
door lock will be released.
door
Door badly closed
Open and close door.
Maintenance 45
Cod. 598144
Rev. 12/1218
14. MAINTENANCE
Caution
The users must refrain from carrying out actions reserved for the Authorised Technical
Services.
Before performing any work on the washing machine, disconnect and mechanically lock the
external switch, and close and mechanically lock the manual water inlet valves.
Check that the temperature of the parts to be handled represents no risk of burns.
The dispenser may contain residues of chemical products. In cleaning operations, avoid
direct contact with the skin and protect the eyes.
The draining pump and valve may contain residual water. When handling this component,
avoid direct contact with the skin and use eye protection.
Remember to reassemble ALL of the panels and replace them correctly after any
maintenance work.
It is highly recommended to ask the Authorised Technical Service for a register or report of
all the maintenance and service work done on your washer.
Operations described
USER-MAINTENANCE INSTRUCTIONS
Cleaning the washer (Section 14.1)
Cleaning the door seal (Section 14.2)
Cleaning the solenoid valve filters (section 14.3)
Checking safety devices (section 14.4)
ONLY TO BE PERFORMED BY THE AUTHORISED TECHNICAL SERVICE
Cleaning the dispenser (Section 14.5)
Cleaning the draining pump (models HS-6008/EH020) (section 14.6)
Checking the condition of the bearing housing seals (Section 14.7)
General overhaul (Section 14.8)
14.1. Cleaning the washer
We recommend cleaning the outside of the washing machine periodically. Use a damp cloth or sponge.
To remove grease marks use a neutral soap and rinse well.
Never use abrasive products or tools that could scratch or damage the surface of the washing machine.
14.2. Cleaning the door seal
Use a damp cloth or sponge.
Be especially careful to remove traces of laundry products or pieces of fabric that could be caught between
the folds of the seal.
Never use abrasive products or tools that could cut or damage the seal.
Maintenance 46
Cod. 598144
Rev. 12/1218
14.3. Cleaning the solenoid valve filters
Only by qualified personnel
Required tools:
Disassembly of the fittings: Slip-joint pliers or pipe wrench diam. 1-½ in (35 mm).
Disassembly of the filter supports: wrench 1-3/8 in (34 mm).
Disassembly of the filters: pliers.
Steps to follow
Disconnect and mechanically lock the external switch. Close and mechanically lock the manual water
supply valves.
To avoid the risk of burns, check the temperature of the hot water inlet hose.
Disassemble the fittings that connect the hoses to the washing machine.
Disassemble the filter supports (according to model).
Remove the filters from their housings and clean the filters with pressurised water. Refit them in their
housings.
Assemble the solenoid valve supports (according to model).
Assemble the hoses in their corresponding inputs. Tighten the fittings.
Connect the external switch, open the manual water input valves and check the water-tightness of the
coupling.
14.4. Checking safety mechanisms
14.4.1. Checking the door lock
DAILY check the door lock.
CAUTION. Only by qualified personnel
Use great prudence in checking the door lock.
Carry out the check described bellow while the drum is turning at washing speed and never at a higher
speed.
If there is a failure in the door lock, never place one’s hand in the loading area of the washer.
Checking procedure:
Close and mechanically interlock the manual water supply valves (and steam inlet valve in washers with this
option included).
Open the washing machine door. The display will read door.
Close the door.
Select and start a wash cycle.
About a minute after starting the cycle, check that the door is locked.
Press the STOP key to finish the verification.
After a safety delay of about 30 minutes, the door will be unblocked.
Open the washing machine door. The check is completed.
If no anomaly has been detected, open the fluid inlet valves.
Remember that programs can be selected and started by using the dEmo mode operation. See Chapter 7 of
this manual.
CAUTION
If anything other than that was described is detected during the operation, disconnect the washer, do not use
it, and contact the Authorised Technical Service URGENTLY.

Maintenance 47
Cod. 598144
Rev. 12/1218
14.4.2. Verify the general Emergency Stop of the laundry
It is important to remember the obligation to install a general Emergency Stop, in all coin-op laundry
establishments. More information regarding this device is in the Installation Manual.
Inspect the Emergency Stop weekly and check that:
Operating the Emergency Stop disconnects ALL the machines in the laundry.
The Emergency Stop releasing mechanism doesn’t connect the machines.
The Emergency Stop’s START command restores the electricity supply.
CAUTION
If anything other than that was described is detected during the operation, disconnect the power supply of
the establishment, and contact the Authorised Technical Service URGENTLY.
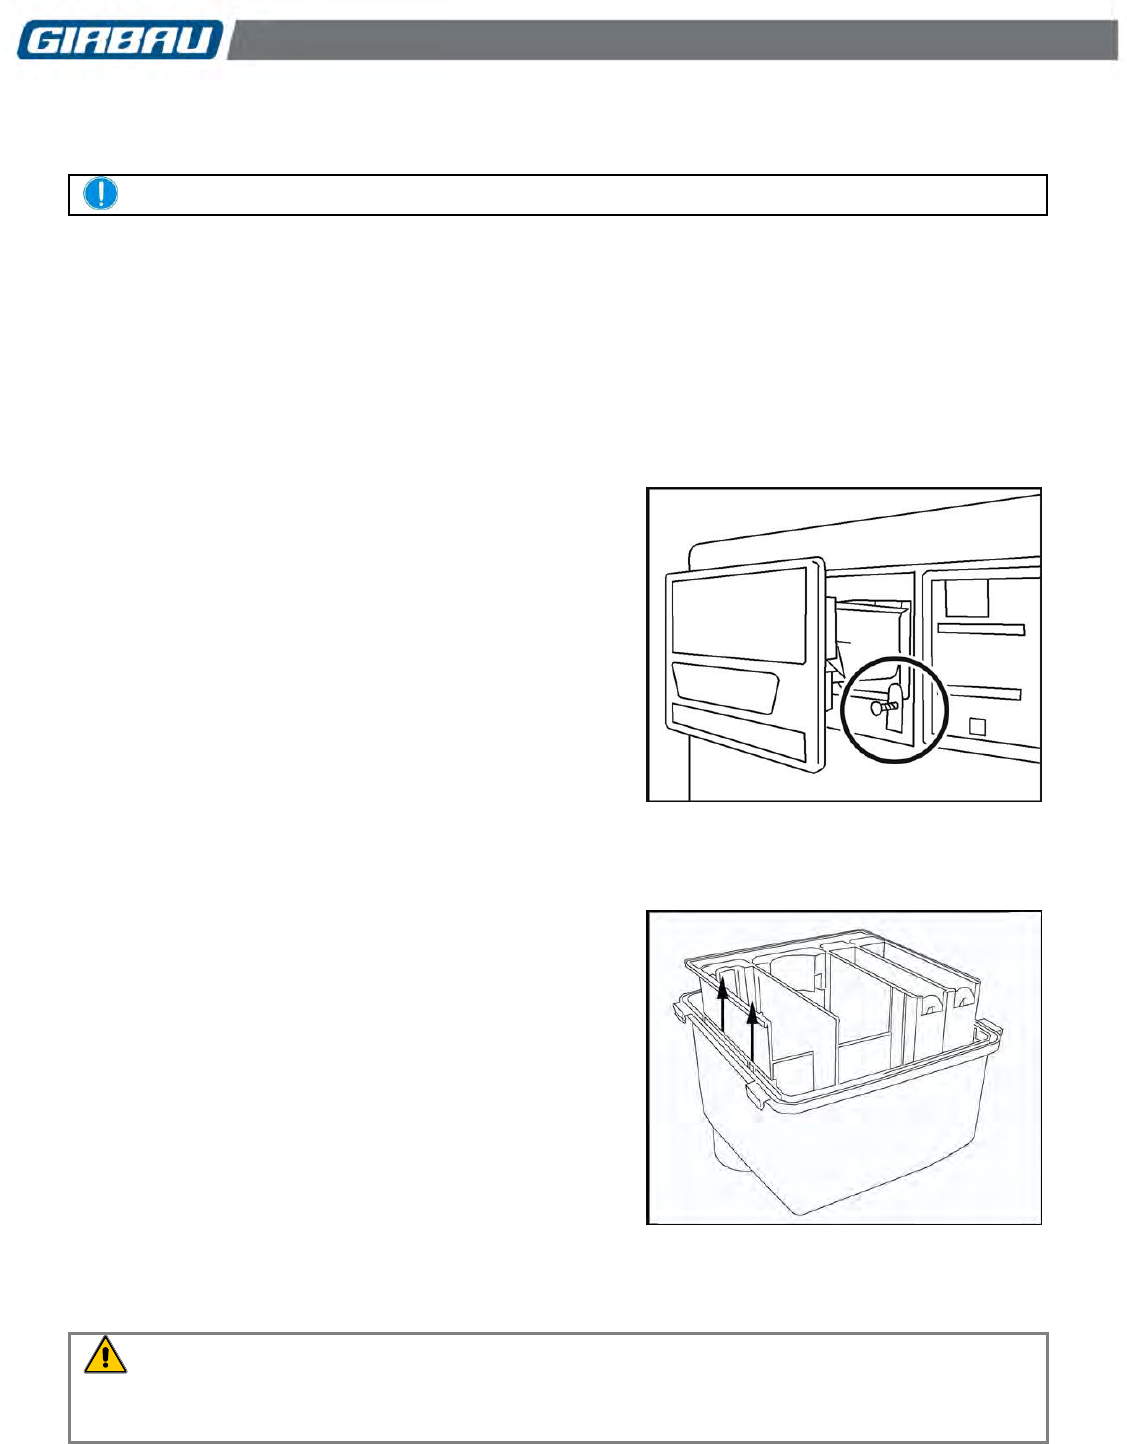
Maintenance 48
Cod. 598144
Rev. 12/1218
14.5. Cleaning the dispenser
Only to be performed by the Authorised Technical Service
Disconnect and mechanically lock the external switch. Close and mechanically lock the manual water
supply valves.
Clean the dispenser by using a cloth or sponge dampened with water. Warm water makes cleaning easier.
Never use abrasive products, solvents or tools that could scratch or damage the dispenser.
Once the dispenser cleaning and assembly operations are finished:
Connect the external switch and open the manual water inlet valves.
Start a washing program that uses a bleaching agent and softener and check that both compartments drain
properly.
14.5.1. Washers with front dispenser
Required tools:
Unscrewing the fastening tabs: Torx T20 screwdriver
Disassembly and assembly:
Open the dispenser drawer and loosen the screws on
the retaining tabs visible along the bottom (Fig. 14.1).
Completely remove the drawer and dismount the siphon
tubes from the liquid compartment by pulling them
upwards.
Once the cleaning operations are over:
Replace the siphon tubes and replace the drawer in its
housing.
Refit the fastening tabs and check that the drawer cannot
be completely removed.
Fig.14.1
14.5.2. Washers with top dispenser
Disassembly and assembly
Open the fastening clasps on the top cover. The
dispenser is now accessible.
Detach the siphon tubes from the liquid compartment by
pulling them upwards.
To clean the lower basin, remove the leak seal and
separate the two dispenser bodies by separating the side
lips (Fig. 14.2).
Once the cleaning operations are over:
Refit the two dispenser bodies and check that the side
lips fasten both pieces.
Replace the siphon tubes.
Check that the dispenser is set well in its bracket.
Check the condition of the top cover seal. If seal is
damaged, deformed or has lost elasticity, it must be
replaced.
Replace the seal. Fit the top cover. Close the clasps.
Fig.14.2
VERY IMPORTANT
The dispenser protection seal is necessary to prevent humidity and corrosion inside the machine
and the premature damage of the electrical and electronic circuits of machine control.

Maintenance 49
Cod. 598144
Rev. 12/1218
14.6. Cleaning the drain pump
(Drain pump washers. Fig.14.3)
Only to be performed by the Authorised Technical Service
Required tools. Disassembly of the lower front panel: Torx T25 screwdriver.
Before disassembling the lower front panel of
the washing machine, disconnect and
mechanically lock the external switch, and close
and mechanically lock the manual water inlet
valves.
Empty any residual water contained in the drain
ducts, placing the corrugated rear tube
horizontally on the floor. The water will come out
of the end.
Disassemble the lower front panel. The draining
pump is accessible.
Turn the filter counter-clockwise and separate it
from the pump body.
Clean the filter and any possible deposits from
the inside of the pump body.
Assemble the filter and the draining pump.
Replace the bottom panel.
Connect the external switch and open the
manual water inlet valves.
Begin a washing program and check that there
are no water leaks.
Fig.14.3
The bottom front cover is a stabilising element of the washer cabinet. Make sure that it is
properly mounted and fastened.
14.7. Checking the condition of the bearing housing seals
Only to be performed by the Authorised Technical Service.
At regular intervals check that no water is leaking out of the bearing drain pipe located at the back of the washer
at the bottom. Water loss indicates that the seals are in poor condition and need to be replaced.
14.8. General Overhaul
Only to be performed by the Authorised Technical Service
As preventive maintenance action, it is very important to request the Authorised Technical Service for a
periodic overhaul of the washing machine.
Recommended periodicity: every year or each 3000 washing cycles.
When performing this revision in models HS-6008 / EH020, due to the fatigue they are subject to, we
recommend carefully checking the door seal and replacing if wear is noticed.
Withdrawing from service 50
Cod. 598144
Rev. 12/1218
15. WITHDRAWING FROM SERVICE
Removing the washer from service requires a specialised company.
Never release the washer unsecured.
To release the washer and subsequent transportation, refer to the same specifications and
cautions indicated for Installation.
When removing the machine from service:
Disconnect and mechanically lock the external switch. Remove the supply cables.
Close and mechanically lock the manual water supply valves. Remove the water supply hoses.
Disassemble the drain outlet pipe and empty any residual water left in the washing machine.
Assemble the shipping restraints.
Disassemble the door of the washing machine (consult the Authorised Technical Service).
Dismantling
Most of the machine’s components are made of recyclable or recoverable materials.
The injected pieces bear information on the materials that were used to make them.
The main materials are:
Steel plates
Stainless steel plate
Grey cast iron
Aluminium
Glass
Polypropylene (PP)
Ethylene Propylene (EPDM)
ABS
Copper
Electronic components
Management of waste from electronic devices
In compliance with Directive 2002/96/EC on the management of waste from electronic devices, it
is the obligation of the manufacturer to warn that:
The electronic components installed in the washing machine, must be dismantled and delivered
to treatment facilities authorised for this purpose.
