Programming
Topload Washer
Refer to Page 9 for Model Identification
TLW25C_SVG
Soil
Cycle
Temp
MEDIUM
Original Instructions
Keep These Instructions for Future Reference.
CAUTION: Read the instructions before using the machine.
(If this machine changes ownership, this manual must accompany machine.)
Part No. 204370ENR1
January 2019

WARNING
Failure to install, maintain, and/or operate this ma-
chine according to the manufacturer's instructions
may result in conditions which can produce bodily
injury and/or property damage.
W030
WARNING
For your safety and to reduce the risk of fire or an
explosion, do not store or use gasoline or other
flammable vapors and liquids in the vicinity of this or
any other appliance.
W022
NOTE: The WARNING and IMPORTANT instructions ap-
pearing in this manual are not meant to cover all possi-
ble conditions and situations that may occur. It must
be understood that common sense, caution, and care-
fulness are factors which cannot be built into these
washers. These factors MUST BE supplied by the per-
son(s) installing, maintaining, or operating the unit.
Always contact the distributor, service agent, or the manufacturer
about any problems or conditions you do not understand.
Read all instructions before using unit.
Hazardous voltage inside. Disconnect power before serv-
icing.
This product uses FreeRTOS V7.2.0 (www.freertos.org).
©
Copyright, Alliance Laundry Systems LLC -
DO NOT COPY or TRANSMIT
3 Part No. 204370ENR1
Table of Contents
Model Identification............................................................................... 9
Preliminary Information.......................................................................10
About the Control ........................................................................................ 10
Glossary of Terms.........................................................................................10
Power Failure Recovery................................................................................ 10
Communications...........................................................................................10
Infra-red Communications..........................................................................10
Serial Card Reader Communications (Card Models Only)............................. 10
Network Communications..........................................................................10
Control Identification............................................................................11
Select Cycle Pads .........................................................................................11
Select Wash Temp Pads................................................................................. 11
Select Cycle Modifier Pads............................................................................ 11
Display Identification............................................................................12
Light Emitting Diodes (LEDs)....................................................................... 12
CYCLE LED............................................................................................ 12
WASH TEMP LED................................................................................... 12
WASH LED..............................................................................................12
RINSE LED..............................................................................................12
SPIN LED................................................................................................ 12
INSERT COINS/CARD LED..................................................................... 12
LIGHT LED............................................................................................. 12
MEDIUM LED......................................................................................... 12
HEAVY LED............................................................................................12
7-Segment Digits.......................................................................................... 12
Washer Operation.................................................................................13
Power Up .................................................................................................... 13
Ready Mode.................................................................................................13
Partial Vend Mode........................................................................................ 13
Additional Vend Mode.................................................................................. 13
Start Mode................................................................................................... 13
End of Cycle Mode....................................................................................... 13
Cycle Sequence............................................................................................ 13
Signals.........................................................................................................13
Opening the Washer Lid................................................................................ 13
Changing Cycles...........................................................................................13
©
Copyright 2019, Alliance Laundry Systems LLC
All rights reserved. No part of the contents of this book may be reproduced or transmitted in any form or by any means without the expressed
written consent of the publisher.
©
Copyright, Alliance Laundry Systems LLC -
DO NOT COPY or TRANSMIT
4 Part No. 204370ENR1
Delayed Start Setup (OPL Only).................................................................... 14
Delayed Start (OPL Only)..............................................................................14
Overflow Mode............................................................................................ 14
Lockout Mode.............................................................................................. 14
Shutdown Mode............................................................................................14
Power Failure Display Mode..........................................................................15
Special Features ...................................................................................16
Programming Control....................................................................................16
Collecting Audit Information......................................................................... 16
Testing Machine and Control Functions.......................................................... 16
Rapid Advance Feature................................................................................. 16
Clearing the Vend Feature .............................................................................16
Communications Mode..................................................................................16
Coin Drop.................................................................................................... 16
Start Pulse Operation.....................................................................................16
Service Door and Coin Vault Openings........................................................... 16
Break-In Alarm.............................................................................................17
Special Vend.................................................................................................17
OPL Mode................................................................................................... 17
Drop-Off Mode.............................................................................................17
Low Power/Auto-Shutdown Option................................................................17
Out of Order Mode........................................................................................17
Network Node Number Display Mode............................................................ 17
Error Display Mode...................................................................................... 17
Opening the Service Door..................................................................... 18
Coin Models.................................................................................................18
Card Reader Models......................................................................................18
Entering the Manual Mode................................................................... 19
How to Enter the Manual Mode......................................................................19
Manual Mode Navigation.............................................................................. 19
Programming Control...........................................................................21
What Can Be Programmed.............................................................................21
Programmable Options Available................................................................... 21
Vend Price 1 AtS 1........................................................................................36
Vend Price 2 AtS 2........................................................................................37
Vend Price 3 AtS 3........................................................................................37
Vend Price 4 AtS 4........................................................................................37
Vend Price 5 AtS 5........................................................................................38
Vend Price 6 AtS 6........................................................................................38
Vend Price 7 AtS 7........................................................................................38
Vend Price 8 AtS 8........................................................................................38
Vend Price 9 AtS 9........................................................................................39
Cycle Modifier Key 1 MEDIUM Vend Price Adder ACNP 1............................ 39
Cycle Modifier Key 2 HEAVY Vend Price Adder ACNP 2............................... 39
Vend Price Decimal Point Ats dP....................................................................39
©
Copyright, Alliance Laundry Systems LLC -
DO NOT COPY or TRANSMIT
5 Part No. 204370ENR1
Coin 1 Value dEn 1....................................................................................... 40
Coin 2 Value dEn 2....................................................................................... 40
Start Pulse Value PLSE..................................................................................40
Start Pulse Mode PLSNod............................................................................. 40
Programmable Output Type AtyPE.................................................................41
Default Cycle dFtCyC................................................................................... 42
Card Reader Display Control CArd................................................................ 42
Audio Signal AUdio......................................................................................42
How to Program the Audio Signal...............................................................42
How to Read Audio Signal Table................................................................ 43
Network Node Number nodE......................................................................... 44
Error Code Programming Error-..................................................................... 44
Set Real-Time Clock rtC-...............................................................................46
Set Daylight Savings Time dLS-.....................................................................47
Special Vend 1 Days Enable SP1 1................................................................. 47
How to Read the Days Enable Value Table...................................................48
How to Program Special Vend 1 Start Minute SP1 2..................................... 53
How to Program Special Vend 1 Start Hour SP1 3........................................ 53
How to Program Special Vend 1 Start Date SP1 4.........................................53
How to Program Special Vend 1 Start Month SP1 5......................................53
How to Program Special Vend 1 Start Year SP1 6.........................................54
How to Program Special Vend 1 Length in Hours SP1 7................................54
How to Program Special Vend 1 End Date SP1 8..........................................54
How to Program Special Vend 1 End Month SP1 9.......................................54
How to Program Special Vend 1 End Year SP1 10........................................ 54
How to Program Special Vend 1 Vend Price 1 SP1 11................................... 54
How to Program Special Vend 1 Vend Price 2 SP1 12................................... 55
How to Program Special Vend 1 Vend Price 3 SP1 13................................... 55
How to Program Special Vend 1 Vend Price 4 SP1 14................................... 55
How to Program Special Vend 1 Vend Price 5 SP1 15................................... 55
How to Program Special Vend 1 Vend Price 6 SP1 16................................... 55
How to Program Special Vend 1 Vend Price 7 SP1 17................................... 56
How to Program Special Vend 1 Vend Price 8 SP1 18................................... 56
How to Program Special Vend 1 Vend Price 9 SP1 19................................... 56
How to Program Special Vend 1 Wash Status Agitate Steps Added Minutes SP1
20.........................................................................................................56
How to Program Special Vend 1 Wash Status Agitate Steps Subtracted Minutes
SP1 21.................................................................................................. 57
How to Program Special Vend 1 Cycle Modifier Default Value SP1 22.......... 57
How to Program Special Vend 1 Cycle Modifier MEDIUM Key #1 Vend Price
SP1 23.................................................................................................. 57
How to Program Special Vend 1 Cycle Modifier HEAVY Key #2 Vend Price
SP1 24.................................................................................................. 57
How to Program Special Vend 1 Cycle Modifier MEDIUM Key #1 Options SP1
25.........................................................................................................57
How to Program Special Vend 1 Cycle Modifier HEAVY Key #2 Options SP1
26.........................................................................................................57
Special Vend 2 Days Enable SP2.................................................................... 58
Special Vend 3 Days Enable SP3.................................................................... 58
Special Vend 4 Days Enable SP4.................................................................... 58
Cycle Modifier Programming CNP-................................................................58
©
Copyright, Alliance Laundry Systems LLC -
DO NOT COPY or TRANSMIT
6 Part No. 204370ENR1
How to Program Default Cycle Modifier CNP 1...........................................58
How to Program Cycle Modifier MEDIUM Key #1 Options CNP 2...............59
How to Program Cycle Modifier HEAVY Key #2 Options CNP 3..................59
How to Program Cycle Modifier MEDIUM Additional Wash Time CNP 4..... 59
How to Program Cycle Modifier MEDIUM Additional Extra Rinse Time CNP 5
............................................................................................................ 60
How to Program Cycle Modifier HEAVY Additional Wash Time CNP 6........60
How to Program Cycle Modifier HEAVY Additional Extra Rinse Time CNP 7
............................................................................................................ 60
Cycle Parameters CyCP-............................................................................... 61
Low Power-Auto Shutdown 1 Days Enable LPAS 1......................................... 61
Low Power-Auto Shutdown 2 Days Enable LPAS 2......................................... 61
Low Power-Auto Shutdown 3 Days Enable LPAS 3......................................... 62
Low Power-Auto Shutdown 4 Days Enable LPAS 4......................................... 62
Power Fail Reset PF rst................................................................................. 62
How to Read Power Fail Reset Table...........................................................62
IR Access IrA En..........................................................................................63
Manual Rapid Advance rAPdEn.....................................................................63
Manual Diagnostics diAgEn.......................................................................... 63
Factory Test Ft En.........................................................................................63
Lucky Cycle LUC-........................................................................................64
Water Temperature Indicator tP ind.................................................................64
Programmable Close Lid Display PCdL..........................................................64
Programmable Push Start Display PPSt...........................................................65
Programmable Open Lid Display PodL...........................................................65
Vend Price Display Override AtS do............................................................... 65
OPL Parameters oPL-....................................................................................65
OPL Mode Enable oPL 1........................................................................... 65
OPL Delayed Start oPL 2...........................................................................66
OPL Display Power Save oPL 3................................................................. 66
Drop Off Mode droP..................................................................................... 66
Out of Order oUt...........................................................................................67
Collecting Audit Information................................................................ 68
How to Enter Audit Feature........................................................................... 68
Entering the Audit Feature by Manual Mode................................................... 68
Entering the Audit Feature with the Coin Vault Open....................................... 68
How to Read Audit Data................................................................................68
How to Exit Audit Feature............................................................................. 68
Manual Reset........................................................................................69
How to Enter Manual Reset........................................................................... 69
Testing Machine and Electronic Control Functions............................... 70
How to Enter Testing Feature.........................................................................70
How to Start Tests.........................................................................................70
How to Exit Testing Feature ..........................................................................70
Diagnostic (Testing) Mode – Quick Reference Chart........................................ 70
Diagnostic Test Descriptions..........................................................................73
©
Copyright, Alliance Laundry Systems LLC -
DO NOT COPY or TRANSMIT
7 Part No. 204370ENR1
Control Software Version Number Test d 1.................................................. 73
Input/Output Software Version # Test d 2.....................................................73
Service Door Opening Test d 8................................................................... 73
Coin Vault Opening Test d 9.......................................................................73
Coin Drop 1 Input Test d 10....................................................................... 73
Coin Drop 2 Input Test d 11........................................................................73
Vend Connection Header Present Test d 12.................................................. 73
Start Pulse Test d 13.................................................................................. 73
Lid Switch Input Test d 15......................................................................... 73
Show Fill Time Test d 17........................................................................... 74
Show Drain Time Test d 18........................................................................ 74
External Outputs Test d 23......................................................................... 74
Water Purge Test d 24................................................................................ 74
Water Leak Detection Test d 25.................................................................. 74
Water Level Test d 26................................................................................ 74
Configuration 1 Display Test d 29...............................................................75
Configuration 2 Display Test d 30...............................................................78
Configuration 3 Display Test d 31...............................................................78
Configuration 4 Display Test d 32...............................................................78
Configuration 5 Display Test d 33...............................................................78
Factory Test..................................................................................................78
To Enter Factory Test.................................................................................79
To Exit Factory Test...................................................................................79
Error Codes .........................................................................................82
Rapid Advance Feature.........................................................................86
How to Enter Rapid Advance.........................................................................86
How to Exit Rapid Advance Feature............................................................... 86
Clear Vend Feature...............................................................................87
How to Clear Vend........................................................................................87
Power Fail Recovery............................................................................. 88
Communications Mode......................................................................... 89
Infra-red Communications............................................................................. 89
How to Begin Communications with an External Device.............................. 89
Card Reader Communications - Card Models Only.......................................... 89
Network Communications............................................................................. 89
Default Cycle Time .............................................................................. 90
©
Copyright, Alliance Laundry Systems LLC -
DO NOT COPY or TRANSMIT
8 Part No. 204370ENR1

Model Identification
Information in this manual is applicable to these washer models:
HWNNE2HP115CW01 SWNNC2SP115TW01 SWNNX2SP115TW02
HWNNE2SP115CW01 SWNNC2SP115TW02 SWNNY2HP115CW01
HWNNX2HP115CW01 SWNNE2HP115CW02 SWNNY2HP115TW01
HWNNX2SP115CW01 SWNNE2SP115CW02 SWNNY2SP115CW01
HWNNY2SP115CW01 SWNNX2HP115CW02 SWNNY2SP115TW01
SWNNC2HP115TQ01 SWNNX2HP115TW01 SWNWX2HP115TW02
SWNNC2HP115TW01 SWNNX2HP115TW02 SWNWX2SP115TW02
SWNNC2HP115TW02 SWNNX2HP115TW07 SWNWY2HP115TW01
SWNNC2HP115TW07 SWNNX2SP115CW02 SWNWY2SP115TW01
SWNNC2SP115TQ01 SWNNX2SP115TW01
Model Identification
©
Copyright, Alliance Laundry Systems LLC -
DO NOT COPY or TRANSMIT
9 Part No. 204370ENR1

Preliminary Information
About the Control
This control is an advanced, programmable computer that lets the
owner control machine features by pressing a sequence of SE-
LECT CYCLE and SELECT WASH TEMP, soil levels pads.
The control allows the owner to program custom cycles, set vend
prices, retrieve audit information, run diagnostic tests, program
special vend features and other programmable features. Refer to
Programming Control for a list of features. Washers shipped from
the factory have a default cycle and wash temperature setting of
NORMAL, COLD, LIGHT built in. However, the owner can
change the default cycle, or any cycle, as needs permit.
IMPORTANT: In the event of a power failure, the control
will not have to be reprogrammed. It is designed with a
memory system that will remember how it was pro-
grammed (for up to 10 years) until the electrical power
is restored.
IMPORTANT: It is extremely important that the washer
has a positive ground and that all mechanical and elec-
trical connections to the control are made before ap-
plying power to or operating the washer.
Glossary of Terms
The following are a few terms and abbreviations to learn. These
are referred to throughout the instructions.
Display – This term refers to the window area of the control that
displays words and values.
LED (Light Emitting Diode) – This term refers to the lights next
to the keypads and status words of the control.
IrDA – Infra-red External Device
FEC – Front End Control
I/O Board – Input/Output Board
OPL – On Premises Laundry
Power Failure Recovery
If a cycle is in progress and the power fails, the cycle status is
saved in memory. When the power recovers, the washer will re-
sume into the previously active cycle if so programmed by the
owner.
The owner may program a special feature called POWER FAIL
RESET which sets a maximum power failure duration. To pro-
gram this feature, refer to Programming Control.
If the length of the power failure is greater than the POWER
FAIL RESET time, the control will end the cycle and the display
will revert back to the ready mode.
If the wash basket is full of water, the control will prompt to
pump out water on power-up.
Communications
The control may be programmed manually, by infra-red with an
external device or by a network. A limited number of features can
be programmed by a card reader.
Infra-red Communications
An external device, such as a PDA, allows the owner to program
and retrieve information from the control without touching the
keypad. An external device greatly expands the programming op-
tions available to the owner. However, the external device is not
required to program and operate the machine. The operation of an
external device and the advanced features available are covered
separately in the instructions included with the external device
software. Contact Alliance Laundry Systems for a list of ap-
proved PDAs and other external devices.
Serial Card Reader Communications (Card Models
Only)
The control will accept communication with a serial card reader
in order to perform vending transactions when a card is inserted
to pay for cycles. The card reader can also allow the owner to
program a limited number of features and collect audit informa-
tion.
For detailed information on serial card reader communications,
refer to instructions included with card reader.
Network Communications
The control will also accept communication with a network inter-
face board which allows the control to be linked to a personal
computer. This network link allows an owner to program, collect
data and run diagnostics on any machine.
For detailed information on network communications, refer to the
network instructions.
Preliminary Information
©
Copyright, Alliance Laundry Systems LLC -
DO NOT COPY or TRANSMIT
10 Part No. 204370ENR1

Control Identification
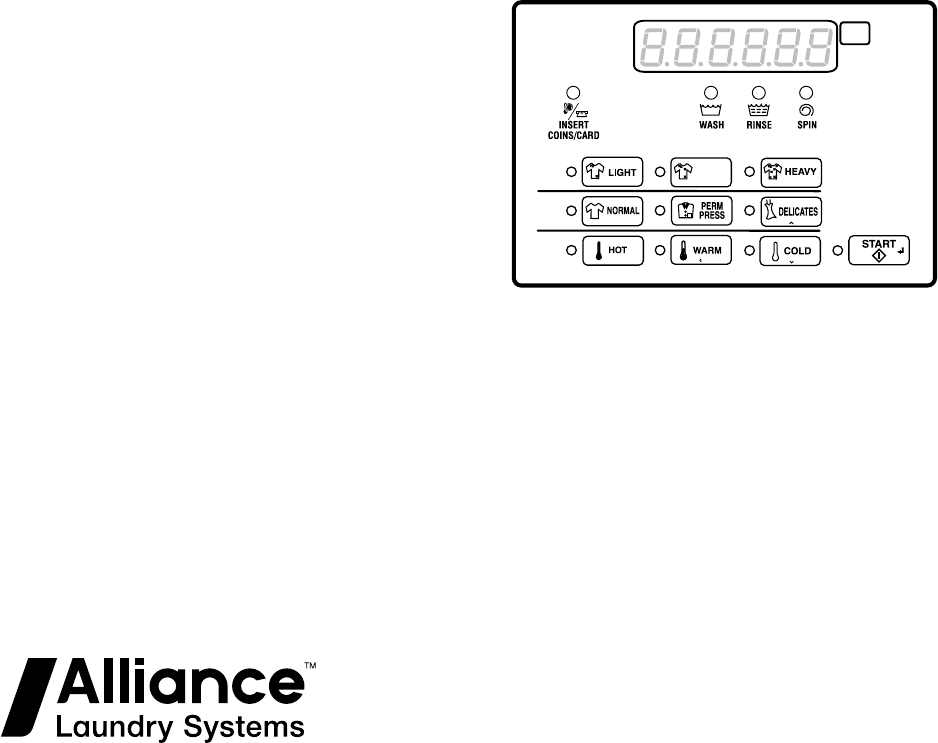
Select Cycle Pads
SELECT CYCLE pads are used to select the specific washer cy-
cle. These pads include NORMAL, PERM PRESS, and DELI-
CATES. These pads allow the user to select a cycle other than the
default cycle (LIGHT NORMAL COLD). The SELECT CYCLE
keypads are not active after the first fill has been completed. The
selected cycle is indicated by the light (LED) on the pad. Pressing
the flashing START pad will confirm the selection and the cycle
will begin.
Select Wash Temp Pads
SELECT WASH TEMP pads are used to select the temperature
of the water used for the wash fill. These pads include HOT,
WARM, and COLD. These pads allow the user to select a water
temperature other than the default setting (COLD).
NOTE: Cycles are picked by selecting a Soil, Cycle and
Temp pad.
Select Cycle Modifier Pads
The Cycle Modifier pad is used to select cycle modifier options.
The LIGHT option is the default and indicates no cycle modifiers
are active. The MEDIUM and HEAVY options can be program-
med to offer extra features for an added vend price.
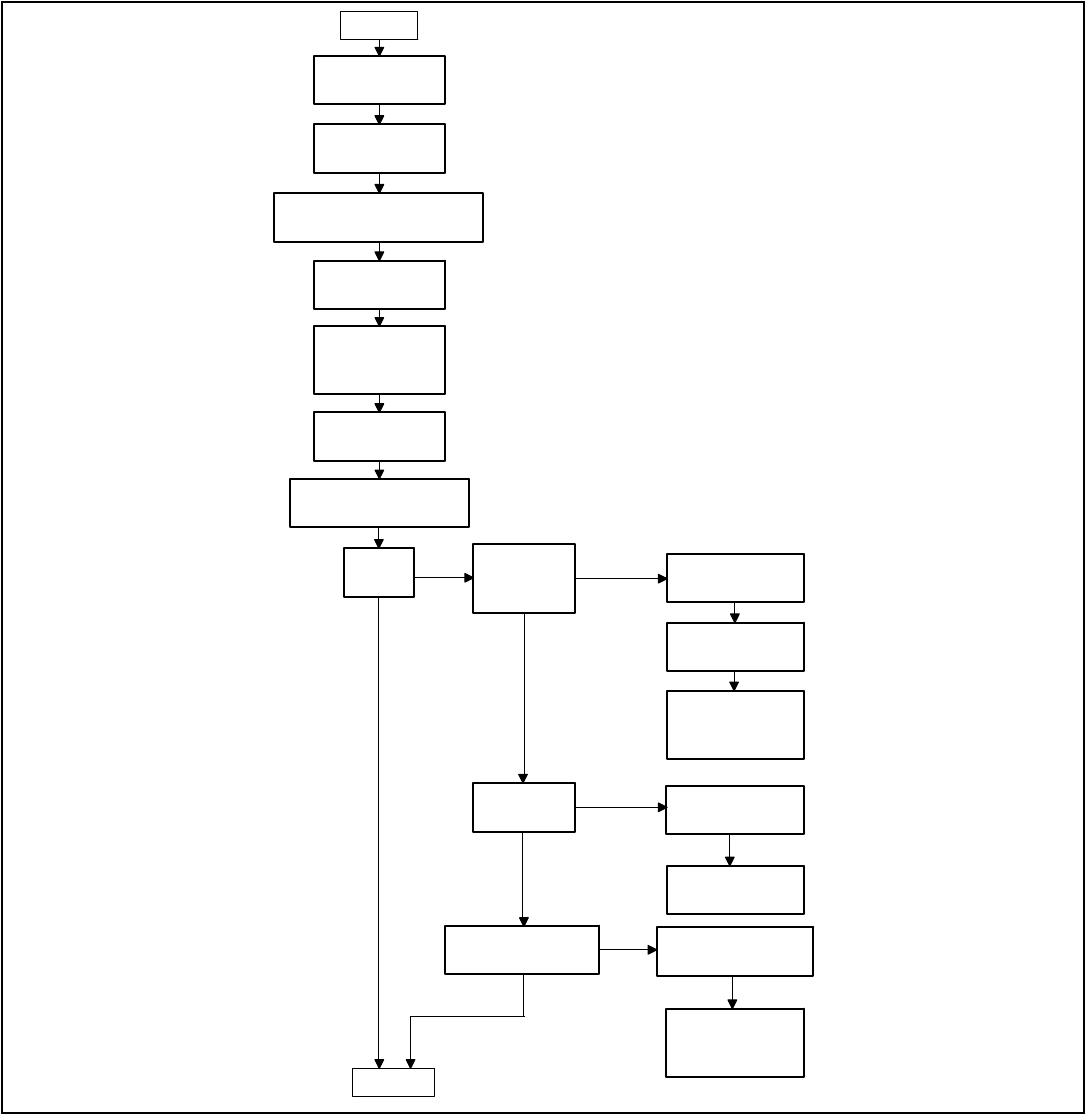
TLW25C_SVG1
Soil
Cycle
Temp
MEDIUM
4
1
3
2
5
6
7
8
1. SELECT WASH TEMP pads
2. SELECT CYCLE pads
3. SELECT Cycle Modifier pads
4. Six 7-Segment Digits
5. Display
6. LED Status Lights
7. LED Light
8. START pad
Figure 1
Control Identification
©
Copyright, Alliance Laundry Systems LLC -
DO NOT COPY or TRANSMIT
11 Part No. 204370ENR1

Display Identification
Light Emitting Diodes (LEDs)
LIGHT EMITTING DIODES (LEDs) are used to indicate the
chosen cycle and cycle status. See below for information on each
LED.
CYCLE LED
CYCLE LED will remain lit the entire cycle.
WASH TEMP LED
WASH TEMP LED will remain on until the end of the cycle or
will change to show the rinse temperature if programmed to do
so.
WASH LED
WASH LED is lit at the beginning of a wash portion of the cycle
and will remain lit until the wash is complete.
RINSE LED
RINSE LED is lit at the beginning of a rinse portion of the cycle
and will remain lit until the rinse is complete.
SPIN LED
SPIN LED is lit during the Final Spin portion of the cycle.
INSERT COINS/CARD LED
INSERT COINS/CARD LED prompts the user for coins or a card
to satisfy the vend price. The six digits show the vend price re-
maining to be satisfied. The vend price displayed will decrease
with each coin inserted. If new options are selected before the
first fill step of the wash cycle completes and it requires addition-
al vend, the INSERT COINS/CARD light will flash one (1) sec-
ond on and one (1) second off, and the display will flash the vend
price remaining to be satisfied one (1) second on/off.
LIGHT LED
LIGHT LED is lit when the Option LIGHT modifier is selected.
MEDIUM LED
MEDIUM LED is lit when the Option MEDIUM modifier is se-
lected.
HEAVY LED
HEAVY LED is lit when the Option HEAVY modifier is selec-
ted.
7-Segment Digits
The 7-SEGMENT DIGITS are used to display the time remain-
ing in a cycle, vend price, error messages and descriptive codes.
During diagnostic testing or manual programming of the control,
these digits will display descriptive codes and values.
Display Identification
©
Copyright, Alliance Laundry Systems LLC -
DO NOT COPY or TRANSMIT
12 Part No. 204370ENR1

Washer Operation
Power Up
When power is applied to the washer, the control will display its
control type as tL, software version as S--- (--- is the version
number) and software subversion as .-- for one (1) second. If the
control was not powered down during a running cycle, it will en-
ter the Ready Mode.
Ready Mode
In this mode of operation, the display shows the current selected
cycle, modifier, temperature and the full current vend price for
that cycle. The INSERT COINS/CARD LED is lit.
To start the cycle, the user must satisfy the vend price and then
press the START keypad.
The user will be able to select a different cycle/wash water tem-
perature or modifier by pressing a cycle pad when the machine is
in the ready mode or before the first fill is complete.
Partial Vend Mode
The control enters this mode when part of the vend price has been
entered, but not enough vend is entered to satisfy the vend price.
The control will display the remaining vend price needed to start
the cycle and the INSERT COINS/CARD LED is lit.
Additional Vend Mode
The control enters this mode if a change is made before the first
fill is complete. If the vend price is not satisfied within one (1)
minute, the washer control will go back to the first selection and
the cycle will continue. Pressing the START keypad will cancel
cycle changes and exit this mode. After the first fill, all key
presses will be ignored, allowing the washer to go through the
complete cycle.
Start Mode
The control enters this mode when the full vend price is satisfied,
the vend price is zero, or the control is in OPL Mode. The
START pad LED will flash one (1) second on and one (1) second
off. If Start Mode is entered because the vend price is satisfied or
the control is in OPL Mode, the display will show PUSH for one
(1) second, StArt for one (1) second and the current cycle time
for one (1) second. If Start Mode is entered because the vend
price is zero (0), the display will show FrEE. When first entering
Start Mode, a signal will sound for one (1) second on and one (1)
second off for 10 seconds if Signal for Start is enabled.
End of Cycle Mode
When a cycle is complete, the control will display 00 until the
washer is opened, a key is pressed, or a coin/card is entered.
When one of these three options occurs, the display will revert
back to the ready mode.
Cycle Sequence
Upon the start of a cycle, the control will display the total cycle
time. The appropriate LEDs will light while the machine passes
through different cycle steps. Any coin entered after the first fill
completes will be added to the total coin counter, but the user will
not be able to change cycles.
Signals
There are five options when a signal can be used during the
washer operation. These five options are listed below:
1. End of Cycle Signal By default, this signal is turned off. If
turned on, the signal sounds for three (3) seconds at the end of
a cycle.
2. Signal On Keypad Depression By default, this signal is
turned on and sounds for a quarter of a second each time a
keypad is pressed.
3. Signal On Coin Input/Card Insertion By default, this signal
is turned on and will sound for a quarter of a second each time
a coin or card is entered.
4. Signal for Serial or Network Vending Command By de-
fault, this signal is turned on for a quarter of a second when
the control receives a valid serial or network vend command.
5. Signal for Start By default, this signal is turned on and will
sound one (1) second on and one (1) second off for 10 sec-
onds after vend price has been satisfied.
NOTE: Refer to Programming Control to program signal
options.
Opening the Washer Lid
If the washer lid is opened anytime except the final spin, the dis-
play will show Lid and the timer will stop. Once the lid is
closed, the cycle will resume from the point of interruption. If the
lid is opened in the final spin step, the timer will continue to
count down to the end of the cycle. The cycle operation will stop
and the display will show Lid. When the timer reaches 0 mi-
nutes, the control will display 00 until a key is pressed, or a coin/
card is entered. When one of these options occur, the display will
revert to the Ready Mode.
Washer Operation
©
Copyright, Alliance Laundry Systems LLC -
DO NOT COPY or TRANSMIT
13 Part No. 204370ENR1

Changing Cycles
Cycles and wash temperature can be changed before the first fill
is complete. After the first fill, all key presses are ignored.
Selecting a higher priced cycle/wash temperature or modifier will
pause the first fill step, and INSERT COINS/CARD LED will
flash one (1) second on and one (1) second off until the vend
price has been satisfied. After the vend price has been satisfied,
the cycle will continue with the new selections. If the vend price
is not satisfied within one (1) minute, the washer control will go
back to the previously set cycle/wash temperature and modifier.
Delayed Start Setup (OPL Only)
Delayed Start Setup Mode is entered by holding any key except
for the START key for 5 seconds while in Start Mode. To prevent
changing the selected cycle and options, the user should press
and hold one of the actively selected keys.
The lid must be closed in order to enter this mode.
This mode is only manually accessible if the Delayed Start Mode
(Enable/Disable) parameter is programmed to Enabled. While in
the Delayed Start Setup Mode, pressing the DELICATES (∧) or
the COLD (∨) keypads will alter the number of hours the cycle is
delayed up to a maximum of 72 hours. The time will loop around
when the maximum or minimum value is reached. The display
will show XX HrS while modifying time or 01 Hr if 1 hour is
set and this display will toggle 1 second on and 1 second off.
If the lid is opened while trying to program the delayed start time,
the control will exit this mode and go back to Start Mode.
Delayed Start (OPL Only)
Delayed Start is entered by pressing the Start keypad while in
Delay Start Setup Mode. This mode is only manually accessible
if the Delayed Start Mode (Enable/Disable) parameter is pro-
grammed to Enabled. The OPL Delay Start programming param-
eter can be programmed through IrDA and Network commands.
The display will show XX HrS toggled with dELAy every 1 sec-
ond while counting down the hours. The display will show XX
Nin toggled with dELAy every 1 second once the time is 1 hour
or less (would transition from 02 HrS to 60 Nin). The display
will count down one hour or minute at a time showing a leading
zero for one digit numbers.
Once the countdown time has expired the cycle will begin. Cycle
selection related LEDs will be lit while in this mode.
This mode can be exited by pressing the Back keypad which will
then place the control into Start Mode.
If the lid is opened at any point while in this mode, Delayed Start
Mode will be exited and the control will enter Start Mode.
Overflow Mode
If the control receives input that the overflow level has been
reached the control will switch to Overflow Mode.
If Overflow Mode Display is disabled and the control will enter
Run Mode when it exits, the display will show the default Run
Mode display, otherwise in all other cases, the display will show
oFLo. If the lid is closed and the overflow level is no longer be-
ing met within five (5) minutes of first detecting the overflow, the
cycle will continue as normal and the control will go back to the
mode it was previously in. If the control continues to see an over-
flow error after five (5) minutes has been reached, the control
will enter Machine Error Mode with an Overflow Error.
Lockout Mode
If enabled in the Control Configuration, Lockout Mode is entered
to prevent the machine from being used except by a particular
user who has reserved the machine in advance. This mode is en-
tered when the current time (in Hours and Minutes) falls within
the time period set by the Lockout Mode Start Time Hour, Lock-
out Mode Start Time Minute, Lockout Duration, and when the
control is in Ready Mode. The display will show rES. User ac-
cess is ignored until Lockout Mode is exited. The control will be
able to communicate with the Network, IR, or the Serial Payment
System.
When entering the sequence of keypresses to exit Lockout Mode,
pressing the START keypad signals the end of the keypress se-
quence. As each keypad is pressed the corresponding LED is lit.
Anytime the START keypad is pressed the correct number of
keys entered is verified and if not equal to four (4) the keypad se-
quence will be reset, all LED’s will be turned off, and keypresses
will be ignored for five (5) seconds while remaining in Lockout
Mode. In addition, if five (5) keypads are pressed before the
START keypad is pressed, the sequence will be reset, all LED’s
will be turned off, and keypresses will be ignored for five (5) sec-
onds while remaining in Lockout Mode.
When the correct sequence of keypresses has been entered the
control will enter Ready Mode. If the network programs the dura-
tion to zero, Lockout Mode will be exited.
Shutdown Mode
Shutdown Mode is entered if a Low Power/Shutdown Option (1,
2, 3, or 4) becomes active with the Shutdown option enabled. To
become active, the Low Power/Shutdown Option must be ena-
bled in the Control Configuration and the current time, day-of-
week, date, month, and year must match the programmed start re-
quirements for the triggering Low Power/Shutdown Option.
If the control is in ready mode, drop-off mode, lockout mode, or
start mode when no vend has been entered, shutdown mode can
be entered. Shutdown Mode will automatically exit if the current
time, day-of-week, date, month, and year satisfy an exit condition
for the active Low Power/Shutdown Option. While in Shutdown
Mode, the control will show oFF and all LEDs will be turned off.
Washer Operation
©
Copyright, Alliance Laundry Systems LLC -
DO NOT COPY or TRANSMIT
14 Part No. 204370ENR1

Shutdown Mode can be exited by disabling the triggering Low
Power/Shutdown Option (1, 2, 3, or 4) through Network and Ir-
DA commands. In addition, the Low Power/Shutdown Option (1,
2, 3, or 4) can be disabled using manual programming.
Power Failure Display Mode
In Power Failure Display Mode the control will show PrFAiL.
This informs the user that a cycle was interrupted and did not
complete normally. This mode is entered from Power-Up Mode if
a power failure occurred during an OPL cycle and the cycle is not
able to automatically resume. If the user presses any key, Start
Mode is entered.
Washer Operation
©
Copyright, Alliance Laundry Systems LLC -
DO NOT COPY or TRANSMIT
15 Part No. 204370ENR1

Special Features
Programming Control
The control allows the owner to program the control with the use
of the keypad. Cycle and vend information may be programmed,
audit information may be viewed and diagnostic tests may be run
by pressing keypad combinations.
Collecting Audit Information
The control stores audit information in its memory that can be re-
trieved by pressing various combinations of Select Cycle pads.
For more information on the audit features, refer to Collecting
Audit Information.
NOTE: Additional audit information is retrievable with
an external device, the card reader and the network.
Refer to the appropriate instruction manual.
Testing Machine and Control Functions
Special diagnostic features built into the control allow the owner
to run specific diagnostic tests. By opening and closing the serv-
ice door and then pressing various sequences of Select Cycle
pads, the owner may perform the following tests:
• Control Software Version # Test
• Input/Output Board Software Version # Test
• Service Door Switch Input Test
• Coin Vault Switch Input Test
• Coin Drop #1 Input Test
• Coin Drop #2 Input Test
• Vend Connection Header Present Input Test
• Start Pulse Input Test
• Lid Switch Input Test*
• Show Fill Time Test
• Show Drain Time Test
• External Output Test*
• Water Purge Test*
• Water Leak Detection Test*
• Water Level Test
• Machine Configuration #1 Display Test
• Machine Configuration #2 Display Test
• Machine Configuration #3 Display Test
• Machine Configuration #4 Display Test
• Machine Configuration #5 Display Test
* Tests can only be entered when in Start or Ready Mode.
For detailed information on running diagnostic tests, refer to Test-
ing Machine and Electronic Control Functions.
Rapid Advance Feature
This feature allows the user to quickly advance through an active
cycle or advance into a cycle from the Ready Mode. This feature
is useful when tests must be performed immediately on a ma-
chine currently in an active cycle. In this case, the user can quick-
ly advance through the cycle to the Ready Mode. At this point,
the user can perform the required tests and then return the ma-
chine to the active cycle.
Clearing the Vend Feature
This feature allows the user to return the control back to the
Ready Mode if coins have been entered but the full vend price
has not yet been satisfied, while in Partial Vend Mode.
For more information on using the Clear Vend feature, refer to
Clear Vend Feature.
Communications Mode
This feature allows the machine control to communicate with an
external device, the card reader, or the network. This allows the
washer control to be programmed and have its data read without
using the keypad.
For more detailed information on using the Communications
Mode feature, refer to Communications.
Coin Drop
The control will accept pulses from a single or dual coin drop to
satisfy vend price. Each coin drop will have the ability to satisfy
the vend.
Start Pulse Operation
The control will accept pulses from optional payment systems.
The machine can be programmed to receive a single start pulse or
multiple start pulses, or the Start Pulse Option can be turned off.
The Start Pulse Mode allows the machine to go from the Ready
Mode to the Start Mode after a single or multiple pulses are re-
ceived.
Service Door and Coin Vault Openings
The control will capture the times and dates of the last seven
openings of the Coin Vault and the Service Door. The informa-
tion is saved in memory. An open service door and a closed coin
vault combined with various keypad presses allows the control to
enter manual modes of operation if the Break-In Alarm is not on.
These modes include Manual Programming, Audit Collection,
Diagnostics, Rapid Advance, and Reset to Factory Defaults.
Special Features
©
Copyright, Alliance Laundry Systems LLC -
DO NOT COPY or TRANSMIT
16 Part No. 204370ENR1

Break-In Alarm
This feature allows the owner to program the machine to signal a
network alarm, cause a machine alarm or shut down the machine
if the service door or coin vault is opened without disabling the
alarm first. The date and time of the break-in is recorded. To
avoid the alarm during coin collections, the alarm must be turned
off or temporarily disabled by pressing the two programmed
keys.
The alarm is turned off by default. The alarm can be turned on by
programming the control with an external device or network.
Special Vend
This feature allows the owner to program the control to allow
programmable vend prices for specific hours and dates.
For details on programming Special Vend, refer to Programming
Control.
OPL Mode
This feature allows the user to start a cycle without satisfying the
vend price.
For details on enabling OPL Mode, refer to Programming Con-
trol.
Drop-Off Mode
This feature allows the owner to limit machine use to an attend-
ant without requiring vend. Starting the machine will require the
correct sequence of four keypad presses followed by the START
key as programmed by an external device. These keys can be pro-
grammed by an external device and are defaulted as modifier
LIGHT, modifier MEDIUM, modifier HEAVY and NORMAL.
For details on enabling Drop-Off Mode, refer to Programming
Control.
Low Power/Auto-Shutdown Option
This feature allows the owner to program the control to shut
down or enter a low power consumption mode based on program-
mable times and dates if either of these options are enabled.
For details on programming the Low Power/Auto-Shutdown op-
tion, refer to Programming Control.
Out of Order Mode
This feature allows the owner to program Out of Order Mode
which can be used to show the owner that the machine is not
available to use. The control will accept coins and increment the
appropriate audit counters but the vend entered will not count to-
wards a cycle purchase, the coin audio will not work, and no cy-
cle will run while Out of Order Mode is active.
Refer to Out of Order oUt.
Network Node Number Display Mode
This feature allows the owner to program a command via IrDA or
network that requests the control to display the network node
number. The control will displays nXXX where XXX is the net-
work node number.
Error Display Mode
This feature is used to display a machine error. Only one error
will be displayed at the time if there are multiple errors. Once the
highest priority error is cleared, the next highest priority error
will be displayed if multiple errors exist. Refer to Error Codes
for more details on errors, their displays, and their priorities.
Special Features
©
Copyright, Alliance Laundry Systems LLC -
DO NOT COPY or TRANSMIT
17 Part No. 204370ENR1
Opening the Service Door
Coin Models
Models through Serial No. 1810000001
Manual programming requires the user to open and close the
service door. Opening and closing the service door trips a switch
allowing access to various programming options, diagnostics, and
audit capabilities. On coin models, the coin vault switch must be
closed to enter Manual Mode.
Models starting Serial No. 1810000001
Manual programming requires the user to unplug the bullet con-
nector located between the “white/black” and “red/blue” wires.
Reconnect the connector for normal operation.
After opening and closing the service door or unplugging the bul-
let connector, the programmer has 4.25 minutes to begin pro-
gramming.
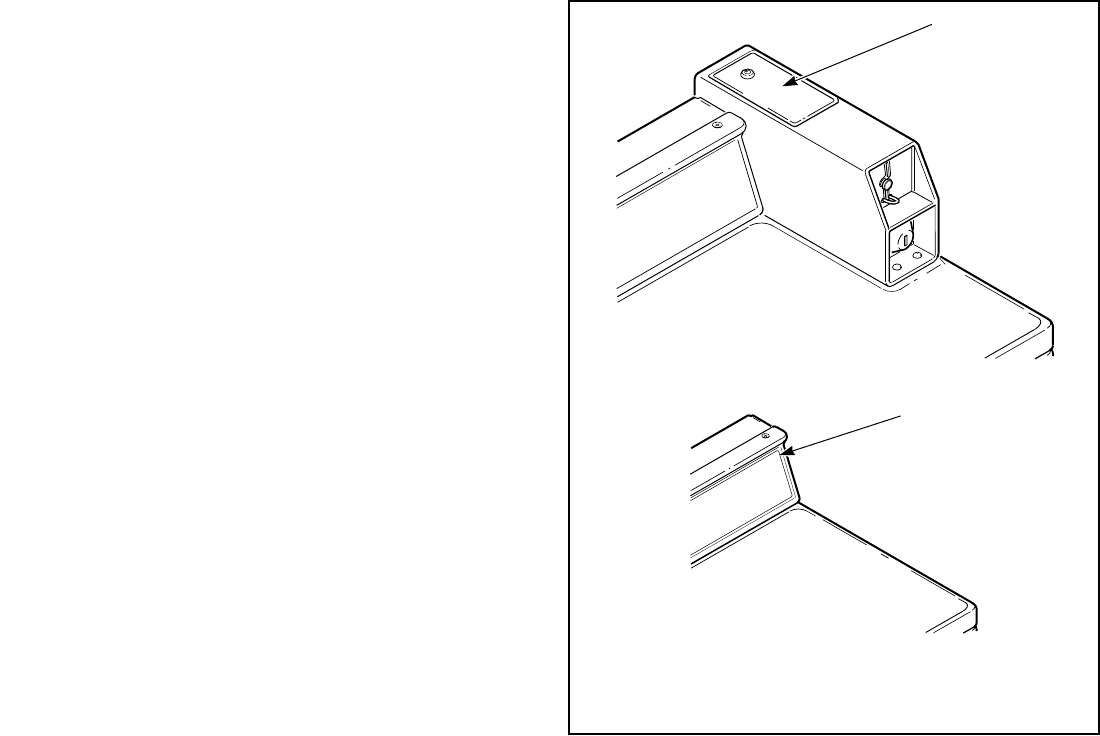
The service door is located on the top of the meter case. Refer to
Figure 2 .
Card Reader Models
Manual programming requires the user to remove the control
panel and unplug the bullet connector located between the
“white/black” and “red/blue” wires. This will allow the user to
access various programming options, diagnostics, and audit capa-
bilities. Refer to Figure 2 .
W521I_SVG
1
FLW6R_SVG1
2
1. Service Door
2. Control Panel
Figure 2
Opening the Service Door
©
Copyright, Alliance Laundry Systems LLC -
DO NOT COPY or TRANSMIT
18 Part No. 204370ENR1

Entering the Manual Mode
How to Enter the Manual Mode
For programming, testing, and retrieving information from the
control, it is often necessary to enter the Manual Mode by follow-
ing the four simple steps below. For an overview of entering the
Manual Mode, refer to the flowchart on the following page.
1. If accessing Diagnostic Tests that take control of machine op-
eration, be sure the washer is in the Start or Ready Mode be-
fore continuing to step 2. If the washer is in an active cycle,
rapid advance through the cycle. Refer to Rapid Advance
Feature.
2. Coin Models through Serial No. 1810000001: Open the serv-
ice door. The coin vault switch must be closed.
3. All Other Models: Open the service door, if necessary, and
unplug bullet connector.
4. While pressing and holding the LIGHT keypad with one
hand, press the NORMAL keypad with the other hand.
5.
The display will show rAPid .
6. Press the DELICATES (∧) or the COLD (∨) keypad to scroll
through the options until the desired option appears in the dis-
play.
7. Press the START (enter) keypad.
NOTE: After entering Manual Mode, if no keypads
are pressed for 4.25 minutes, the control will return
to the previous mode of operation.
8. To exit, press the WARM ( < ) keypad. The control will revert
back to Ready Mode.
Manual Mode Navigation
Manual Mode is broken into five groups: Manual Programming,
Manual Read Audit, Manual Reset, Manual Rapid Advance and
Manual Diagnostics.
Manual Programming can only be turned on or off with an exter-
nal device or the network. Refer to the appropriate instruction
manual. Manual Rapid Advance and Manual Diagnostics can be
turned on and off using an external device, by manual program-
ming, or with the network.
By default, all groups are turned on.
The manual features available in each group are as follows (the
menu shown on the display in this mode is in parentheses).
•
Manual Programming (Prog)
•
Manual Read Audit (AUdit)
•
Manual Reset (rESEt)
•
Rapid Advance (rAPid)
•
Manual Diagnostic Tests (diAg)
If a group is turned off, the display will change from the selected
feature to oFF when the START (enter) pad is pressed. An audio
signal will then sound for one (1) second and the display will re-
turn to the selected feature. The features in the group cannot be
entered.
Entering the Manual Mode
©
Copyright, Alliance Laundry Systems LLC -
DO NOT COPY or TRANSMIT
19 Part No. 204370ENR1
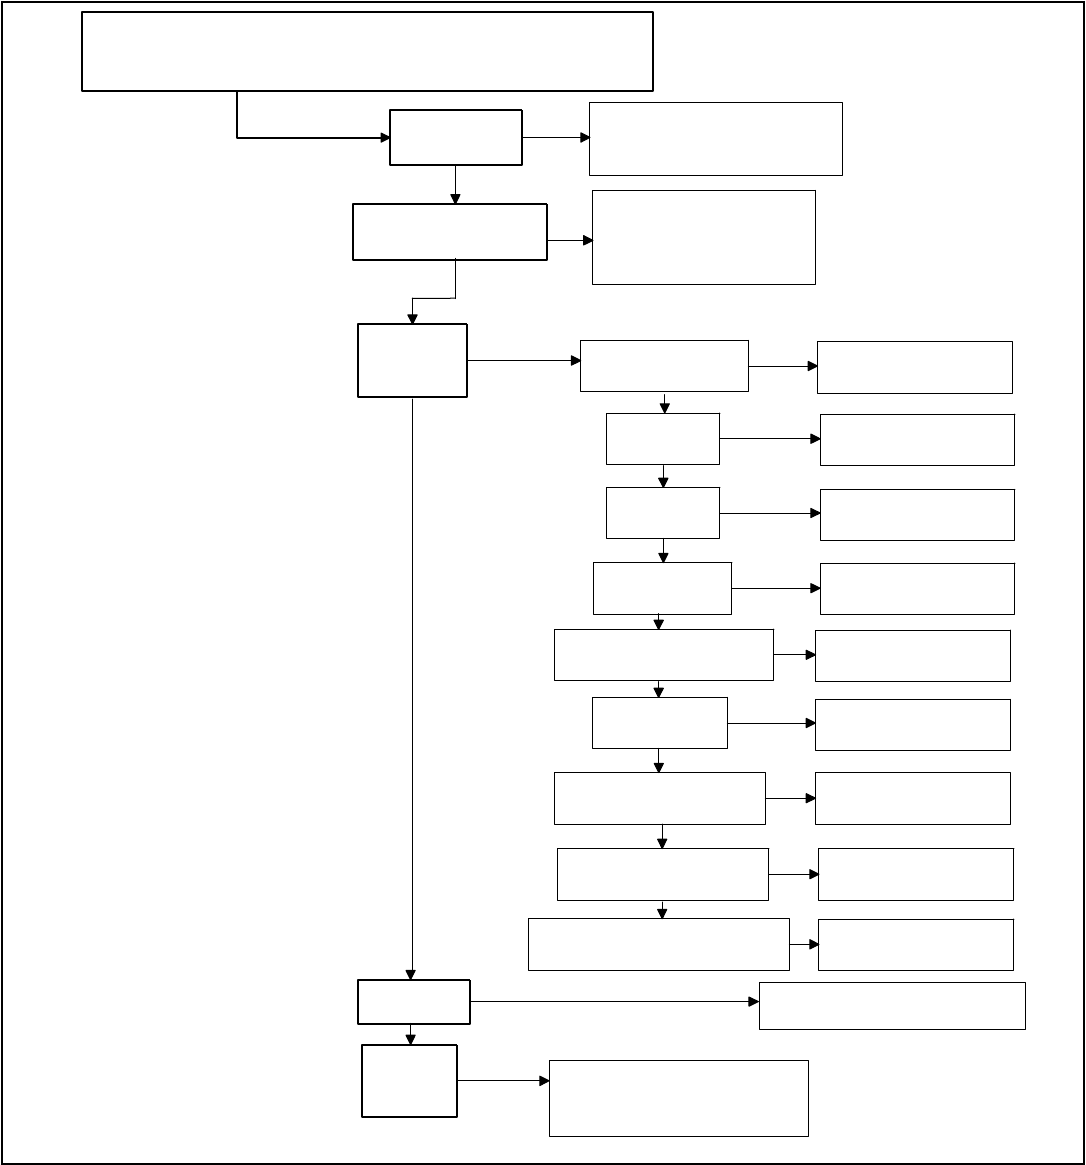
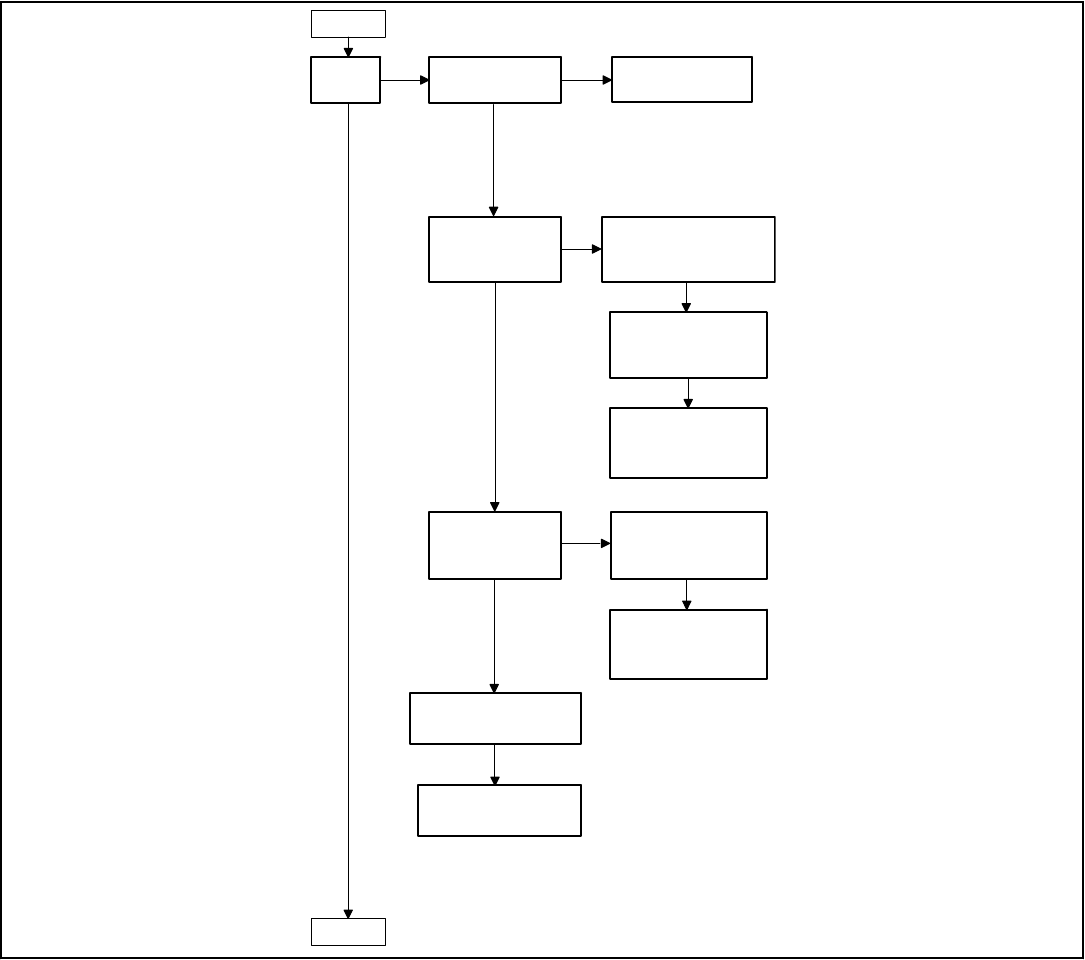
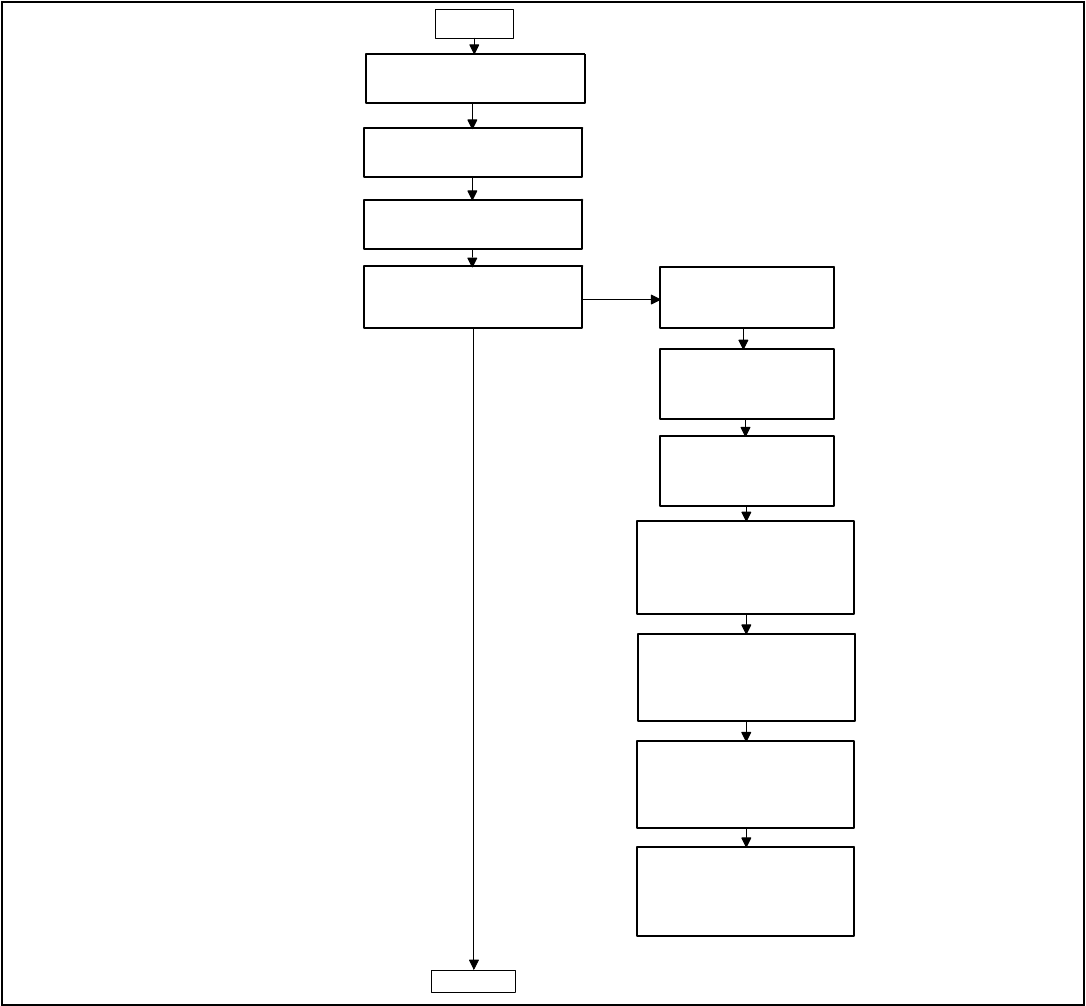
TLW17R_SVG
Manual Mode: Enter by opening the service door for at least 1 second
and then closing service door. Then press LIGHT and NORMAL keypads
at same time.
"rAPid"
Rapid Advance
"Prog "
Manual Programming
"AUdit"
Manual Read
Audit
"rESEt"
Manual Reset
"diAg"
Diagnostic
Tests
Press the
DELICATES or
the COLD keypad to
scroll through the
Manual Mode options.
Press the START keypad to
begin Rapid Advance cycle and
to advance through cycle steps.
Press the START keypad to
enter Manual Programming.
Refer to Manual
Programming flowchart.
"CyCLES"
Total machine cycles
"Coin 1"
Total coins #1
"PULSE"
Total start pulses
"Coin 2"
Total coins #2
Press the
DELICATES
or the
COLD
keypad to
scroll through
the Audit
options.
Press the
START keypad.
Press the START keypad to enter
Manual Reset Mode.
Press the START keypad to
enter Diagnostic Tests. Refer to
Diagnostic Tests flowchart.
Press the START (enter)
keypad to read audit.
Press the START (enter)
keypad to read audit.
Press the START (enter)
keypad to read audit.
Press the START (enter)
keypad to read audit.
"rAPCyC"
Total Rapid Advance Cycles
"rCoin1"
Resettable Coin #1 count
"rUnHrs"
Total run hours
Press the START (enter)
keypad to read audit.
Press the START (enter)
keypad to read audit.
Press the START (enter)
keypad to read audit.
"rCoin2"
Resettable Coin #2 count
Press the START (enter)
keypad to read audit.
"rCyCLE"
Resettable Machine Cycle count
Press the START (enter)
keypad to read audit.
Figure 3
Entering the Manual Mode
©
Copyright, Alliance Laundry Systems LLC -
DO NOT COPY or TRANSMIT
20 Part No. 204370ENR1

Programming Control
What Can Be Programmed
This feature allows the owner to program cycle information,
standard vend pricing, special vends and other features by using
the keypads. The control must have the Manual Programming
Mode enabled, which is the factory default.
This mode can only be turned “OFF” and “ON” by using an ex-
ternal device or the network.
Refer to this section when programming the control. This section
offers a detailed description of all options available to program.
Each description includes instructions on when and why the op-
tion might be used and, more importantly, how to program the
option.
For an overview of the programming organization, refer to the
flowcharts on the following pages.
For more advanced users, a quick reference list of the options
available through the programming mode is located on this page.
NOTE: The letters and numbers in the Option Display
column of the Programmable Options List are what will
be shown in the display when that option is selected.
Programmable Options Available
Option Number Option Display Description Factory Default Value Range
1
AtS 1
Vend Price #1 200 0 - 65,535
2
AtS 2
Vend Price #2 200 0 - 65,535
3
AtS 3
Vend Price #3 200 0 - 65,535
4
AtS 4
Vend Price #4 200 0 - 65,535
5
AtS 5
Vend Price #5 200 0 - 65,535
6
AtS 6
Vend Price #6 200 0 - 65,535
7
AtS 7
Vend Price #7 200 0 - 65,535
8
AtS 8
Vend Price #8 200 0 - 65,535
9
AtS 9
Vend Price #9 200 0 - 65,535
10
AtS SL
Unused - -
11
ACNP 1
Cycle Modifier Key 1
Medium Vend Price
Adder
25 0 - 65,535
12
ACNP 2
Cycle Modifier Key 2
Heavy Vend Price Add-
er
50 0 - 65,535
13
Ats dP
Vend Price Decimal
Point
2 oFF, 2, 3
14
dEn 1
Coin #1 Value 25 1 - 65,535
15
dEn 2
Coin #2 Value 100 1 - 65,535
16
PLSE
Start Pulse Value 25 1 - 65,535
Table continues...
Programming Control
©
Copyright, Alliance Laundry Systems LLC -
DO NOT COPY or TRANSMIT
21 Part No. 204370ENR1

Option Number Option Display Description Factory Default Value Range
17
PLSNod
Start Pulse Mode 128 0, 128, 192
18
AtyPE
Programmable Output
Type
0 0 - 13
19
dFtCyC
Default Cycle 3 1 - 9
20
CArd
Card Reader Display
Control
oFF on/oFF
21
AUdio
Audio Signal 29 0 - 31
22
nodE
Network Node Number 250 1 - 250
23
Error-
Errors Menu — —
a
CErr-
Coin Error Parameters
Menu
— —
1
CErr 1
Coin Error on on/oFF
2
CErr 2
Coin Error Penalty oFF on/oFF
3
CErr 3
Vend Header Present
Error
on on/oFF
b
E FL-
Fill Error Menu — —
1
E FL 1
Fill Error on on/oFF
2
E FL 2
Fill Error Time 30 2 - 90
c
E nF-
No Water Flow Error
Menu
— —
1
E nF 1
No Water Flow Error on on/oFF
2
E nF 2
No Water Flow Error
Time
5 1 - 59
e
E dr-
Drain Error Menu — —
1
E dr 1
Drain Error on on/oFF
f
E Ld-
Water Leak Detection
Error Menu
— —
1
E Ld 1
Water Leak Detection
Day of Week
oFF oFF, 3 - 255
2
E Ld 2
Water Leak Detection
Number of Cycles
10 oFF, 0 - 127
Table continues...
Programming Control
©
Copyright, Alliance Laundry Systems LLC -
DO NOT COPY or TRANSMIT
22 Part No. 204370ENR1

Option Number Option Display Description Factory Default Value Range
3
E Ld 3
Water Leak Detection
Display Sequence
on on/oFF
g
E Sd-
Slow Drain Detection
Error Menu
— —
1
E Sd 1
Slow Drain Detection oFF on/oFF
2
E Sd 2
Slow Drain Detection
Adjust
0 0 - 255
h
ovrFLd
Overflow Mode Dis-
play
on on/oFF
i
CLrErr
Allow error Cleaning oFF on/oFF
24
rtC-
Real Time Clock Menu — —
a
rtC 1
Set Real Time Clock
Minutes
— 0 - 59
b
rtC 2
Set Real Time Clock
Hours
— 0 - 23
c
rtC 3
Set Real Time Clock
Day of Week
— 1 - 7
d
rtC 4
Set Real Time Clock
Date of Month
— 1 - 31
e
rtC 5
Set Real Time Clock
Month
— 1 - 12
f
rtC 6
Set Real Time Clock
Year
— 0 - 99
25
dLS-
Daylight Savings Op-
tion Menu
— —
a
dLS 1
Daylight Saving on on/oFF
b
dLS 2
Start Month 3 1 - 12
c
dLS 3
Start Day of Week 7 1 - 7
d
dLS 4
Start Week of Month 2 1 - 4
e
dLS 5
Start Hour 2 0 - 23
f
dLS 6
End Month 11 1 - 12
g
dLS 7
End Day of Week 7 1 - 7
h
dLS 8
End Week of Month 1 1 - 4
Table continues...
Programming Control
©
Copyright, Alliance Laundry Systems LLC -
DO NOT COPY or TRANSMIT
23 Part No. 204370ENR1

Option Number Option Display Description Factory Default Value Range
i
dLS 9
End Hour 2 0 - 23
26
SP1-
Special Vend 1 Param-
eters Menu
— —
a
SP1 1
Special Vend 1 Days
Enable
oFF Refer to Table 8
b
SP1 2
Special Vend 1 Start
Minute
0 0 - 59
c
SP1 3
Special Vend 1 Start
Hour
0 0 - 23
d
SP1 4
Special Vend 1 Start
Date
oFF oFF, 1 - 31
e
SP1 5
Special Vend 1 Start
Month
oFF oFF, 1 - 12
f
SP1 6
Special Vend 1 Start
Year
0 0 - 99
g
SP1 7
Special Vend 1 Length
in Hours
0 0 - 24
h
SP1 8
Special Vend 1 End
Date
oFF oFF, 1 - 31
i
SP1 9
Special Vend 1 End
Month
oFF oFF, 1 - 12
j
SP1 10
Special Vend 1 End
Year
0 0 - 99
k
SP1 11
Special Vend 1 Price
#1
0 0 - 65,535
l
SP1 12
Special Vend 1 Price
#2
0 0 - 65,535
m
SP1 13
Special Vend 1 Price
#3
0 0 - 65,535
n
SP1 14
Special Vend 1 Price
#4
0 0 - 65,535
o
SP1 15
Special Vend 1 Price
#5
0 0 - 65,535
p
SP1 16
Special Vend 1 Price
#6
0 0 - 65,535
Table continues...
Programming Control
©
Copyright, Alliance Laundry Systems LLC -
DO NOT COPY or TRANSMIT
24 Part No. 204370ENR1

Option Number Option Display Description Factory Default Value Range
q
SP1 17
Special Vend 1 Price
#7
0 0 - 65,535
r
SP1 18
Special Vend 1 Price
#8
0 0 - 65,535
s
SP1 19
Special Vend 1 Price
#9
0 0 - 65,535
t
SP1 20
Special Vend 1 Added
Wash Status Agitate
Steps Added Minutes
0 0 - 10
u
SP1 21
Special Vend 1 Sub-
tracted Wash Status
Agitate Steps Subtrac-
ted Minutes
0 0 - 10
v
SP1 22
Special Vend 1 Cycle
Modifier Default Value
0 0 - 2
w
SP1 23
Special Vend 1 Cycle
Modifier Key #1 Medi-
um Vend Price
0 0 - 65,535
x
SP1 24
Special Vend 1 Cycle
Modifier Key #2
Heavy Vend Price
0 0 - 65,535
y
SP1 25
Special Vend 1 Cycle
Modifier Key #1 Medi-
um Options
0 0 - 1
z
SP1 26
Special Vend 1 Cycle
Modifier Key #2
Heavy Options
0 0 - 1
27
SP2
Special Vend 2 Days
Enable
oFF on/oFF
28
SP3
Special Vend 3 Days
Enable
oFF on/oFF
29
SP4
Special Vend 4 Days
Enable
oFF on/oFF
30
CNP-
Cycle Modifier Pro-
gramming Menu
— —
a
CNP 1
Default Cycle Modifier 0 0 - 2
b
CNP 2
Cycle Modifier Key #
1 Medium Options
0 0 - 1
Table continues...
Programming Control
©
Copyright, Alliance Laundry Systems LLC -
DO NOT COPY or TRANSMIT
25 Part No. 204370ENR1

Option Number Option Display Description Factory Default Value Range
c
CNP 3
Cycle Modifier Key #
2 Heavy Options
0 0 - 1
d
CNP 4
Cycle Modifier Medi-
um Additional Wash
Time
2 0 - 10
e
CNP 5
Cycle Modifier Medi-
um Additional Extra
Rinse Time
0 0 - 10
f
CNP 6
Cycle Modifier Heavy
Additional Wash Time
2 0 - 10
g
CNP 7
Cycle Modifier Heavy
Additional Extra Rinse
Time
0 0 - 10
31
CyCP-
Cycle Parameters — —
a
CyCP 1
Normal Wash Agitate
Time
10 0 - 10
b
CyCP 2
Normal Rinse Agitate
Time
4 0 - 10
c
CyCP 3
Normal Extra Rinse
Agitate Time
0 0 - 10
d
CyCP 4
Normal Final Spin
Time
7 0 - 10
e
CyCP 5
Perm Press Wash Agi-
tate Time
10 0 - 10
f
CyCP 6
Perm Press Rinse Agi-
tate Time
4 0 - 10
g
CyCP 7
Perm Press Extra Rinse
Agitate Time
0 0 - 10
h
CyCP 8
Perm Press Final Spin
Time
6 0 - 10
i
CyCP 9
Delicate Wash Agitate
Time
10 0 - 10
j
CyCP10
Delicate Rinse Agitate
Time
4 0 - 10
k
CyCP11
Delicate Extra Rinse
Agitate Time
0 0 - 10
Table continues...
Programming Control
©
Copyright, Alliance Laundry Systems LLC -
DO NOT COPY or TRANSMIT
26 Part No. 204370ENR1

Option Number Option Display Description Factory Default Value Range
l
CyCP12
Delicate Final Spin
Time
5 0 - 10
m
CyCP13
Warm Rinse Option 0 0 - 1
n
CyCP14
Timed Hot Fill/Spray
Rinse
0 = All Disabled
1 = Timed Hot Fill En-
abled
2 = Spray Rinse Ena-
bled
3 = All Enabled
3 0 - 7
32
LPAS 1
Low Power/Auto Shut-
down 1 Days Enable
oFF on/oFF
33
LPAS 2
Low Power/Auto Shut-
down 2 Days Enable
oFF on/oFF
34
LPAS 3
Low Power/Auto Shut-
down 3 Days Enable
oFF on/oFF
35
LPAS 4
Low Power/Auto Shut-
down 4 Days Enable
oFF on/oFF
36
PF rSt
Power Fail Reset oFF oFF, 0 - 120
37
irA En
IR Access on on/oFF
38
rAPdEn
Manual Rapid Advance
Access
on on/oFF
39
diAgEn
Manual Diagnostics
Access
on on/oFF
40
Ft En
Factory Test Access on on/oFF
41
LUC-
Lucky Cycle Menu — —
a
LUC 1
Lucky Cycle oFF oFF, 3 - 255
b
LUC 2
Lucky Cycle Number 50 1 - 255
c
LUC 3
Lucky Cycle Display
Option
oFF on/oFF
42
tP ind
Water Temperature In-
dicator
— on/oFF
43
PCdL d
Programmable Close
Lid Display
on on/oFF
Table continues...
Programming Control
©
Copyright, Alliance Laundry Systems LLC -
DO NOT COPY or TRANSMIT
27 Part No. 204370ENR1

Option Number Option Display Description Factory Default Value Range
44
PPSt d
Programmable Push
Start Display
on on/oFF
45
PodL d
Programmable Open
Lid Display
on on/oFF
46
AtS do
Vend Price Display
Override
oFF on/oFF
47
oPL-
OPL Parameters — —
a
oPL 1
OPL Mode Enable oFF on/oFF
b
oPL 2
OPL Delayed Start oFF on/oFF
c
oPL 3
OPL Display Power
Save
on on/oFF
48
droP
Drop Off Mode oFF on/oFF
49
oUt
Out of Order oFF on/oFF
Programming Control
©
Copyright, Alliance Laundry Systems LLC -
DO NOT COPY or TRANSMIT
28 Part No. 204370ENR1
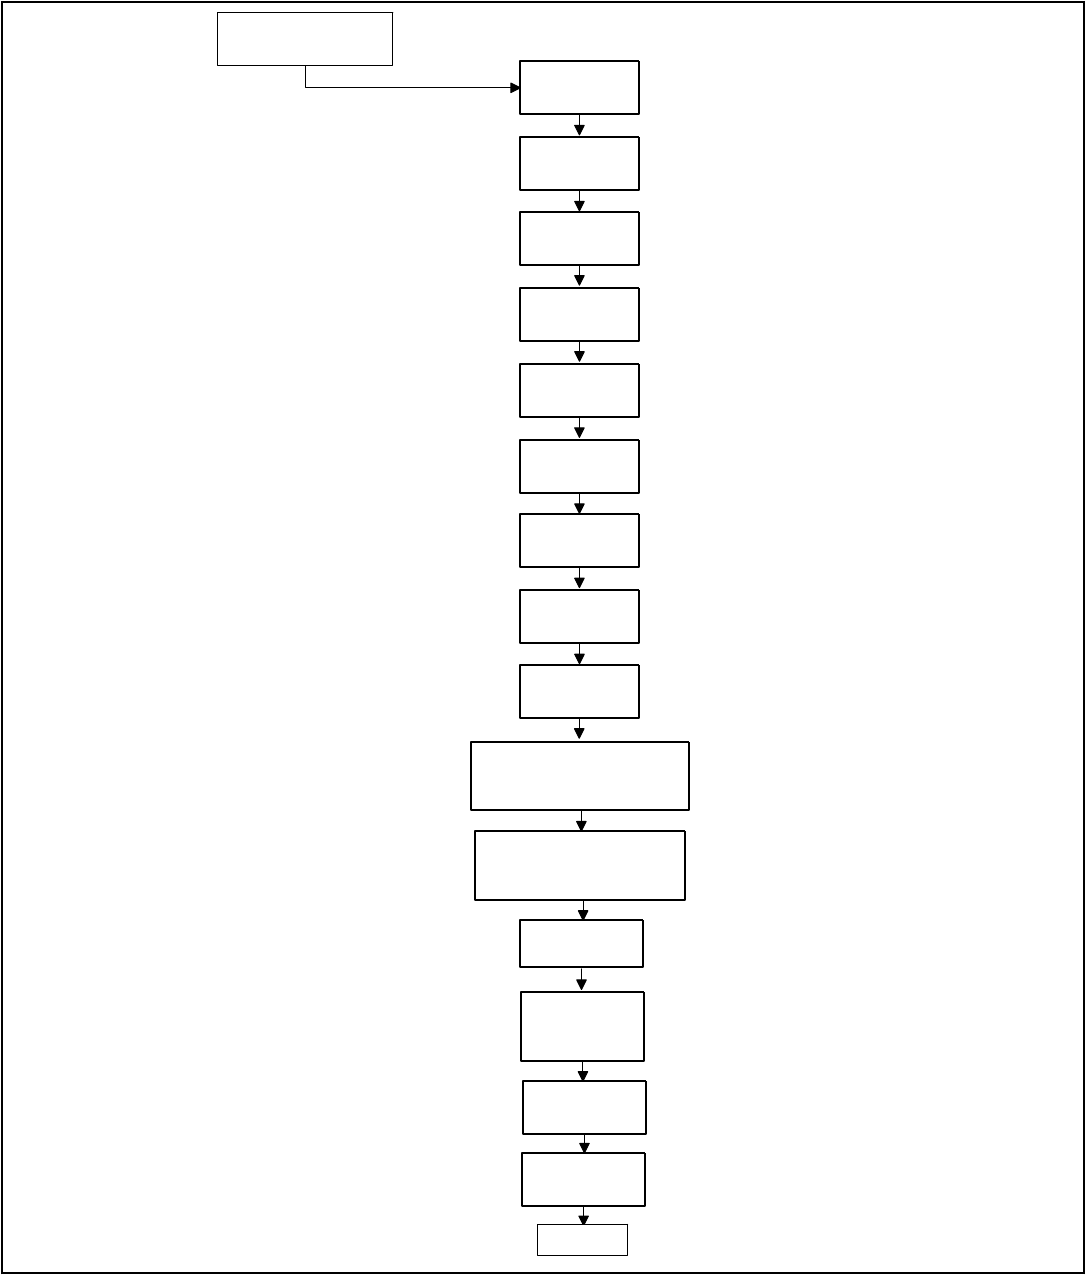
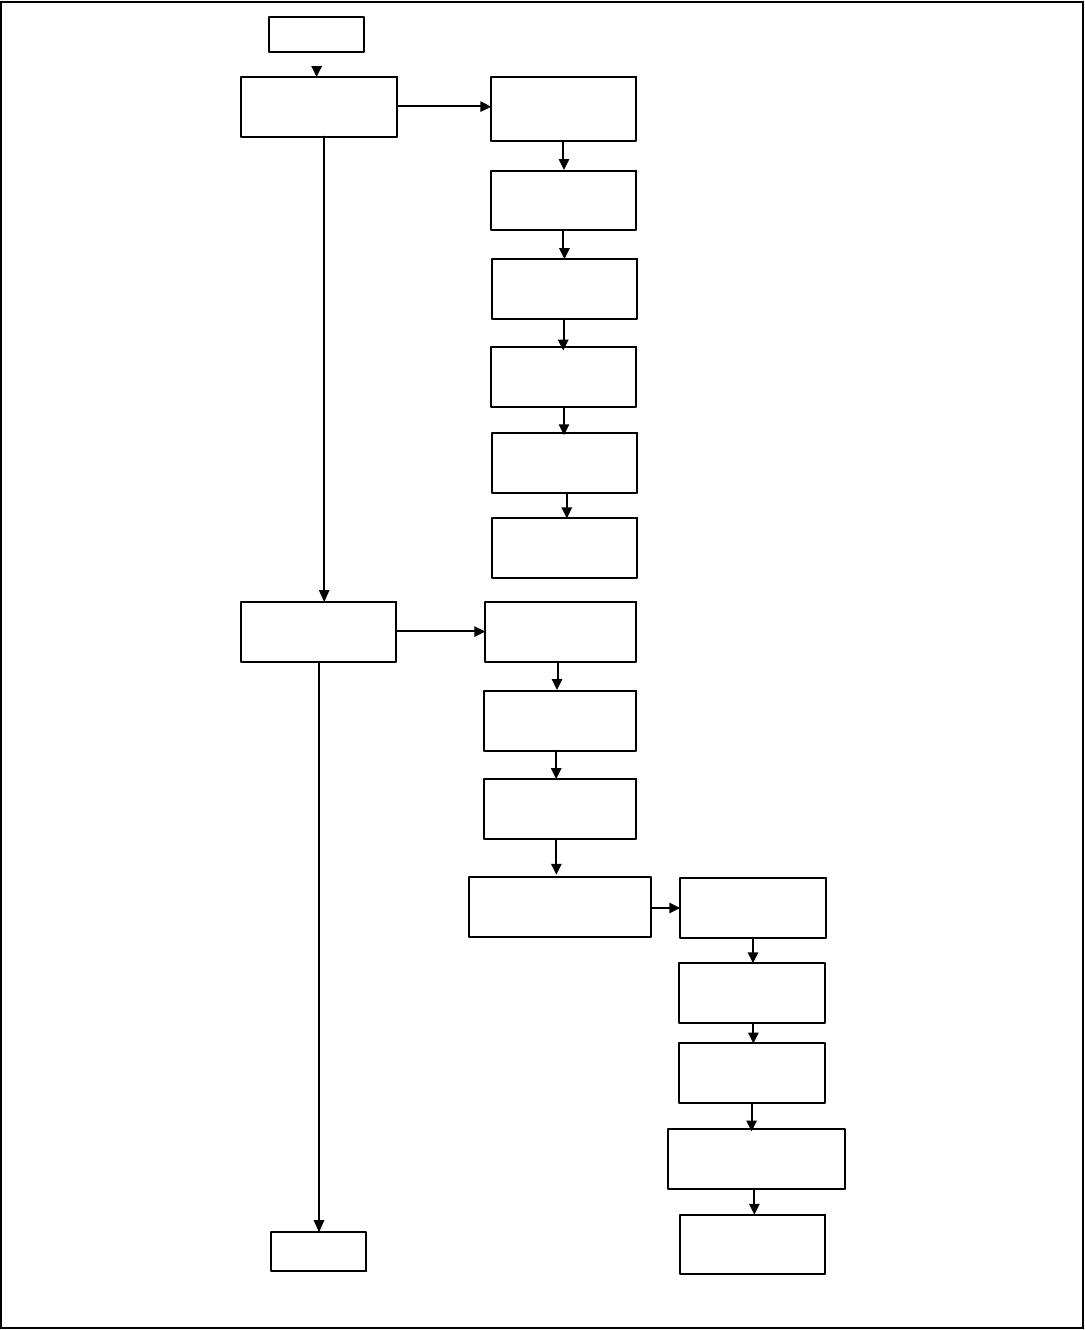
TLW46R_SVG
"AtS 1"
Vend Price #1
"dEn 1"
Coin #1 Value
"dEn 2"
Coin #2 Value
Press the
START keypad.
"AtS 2"
Vend Price #2
"AtS 3"
Vend Price #3
"AtS 4"
Vend Price #4
"AtS 5"
Vend Price #5
"AtS 6"
Vend Price #6
"AtS 7"
Vend Price #7
"AtS 8"
Vend Price #8
"AtS 9"
Vend Price #9
Press the
DELICATES or the
COLD keypad to
scroll through the
programmable
options.
"Prog "
Manual Programming
To enter a programming
option, press the START
keypad. To exit, press
the WARM keypad.
continued
"ACMP 1"
Cycle Modifier Key 1
Medium Vend Price Adder
"ACMP 2"
Cycle Modifier Key 2
Heavy Vend Price Adder
"AtS dP"
Vend Price
Decimal Point
"AtS SL"
Unused
Figure 4
Programming Control
©
Copyright, Alliance Laundry Systems LLC -
DO NOT COPY or TRANSMIT
29 Part No. 204370ENR1
"CArd"
Card Reader
Display Control
"Error-"
Errors
"CErr 1"
Coin Error
"CErr 2"
Coin Error Penalty
"CErr 3"
Vend Header
Present Error
"CErr-"
Coin Error
Parameters
"E FL-"
Fill Error
continued
"E FL 1"
Fill Error
"E FL 2"
Fill Error Time
"E nF-"
No Water Flow Error
"E nF 1"
No Water Flow Error
"E nF 2"
No Water Flow
Error Time
FLW100R-b_SVG
continued
"PLSE"
Start Pulse Value
"PLSMod"
Start Pulse Mode
"AtyPE"
Programmable Output Type
"dFtCyC"
Default Cycle
"AUdio"
Audio Signal
"nodE "
Network Node Number
Figure 5
Programming Control
©
Copyright, Alliance Laundry Systems LLC -
DO NOT COPY or TRANSMIT
30 Part No. 204370ENR1
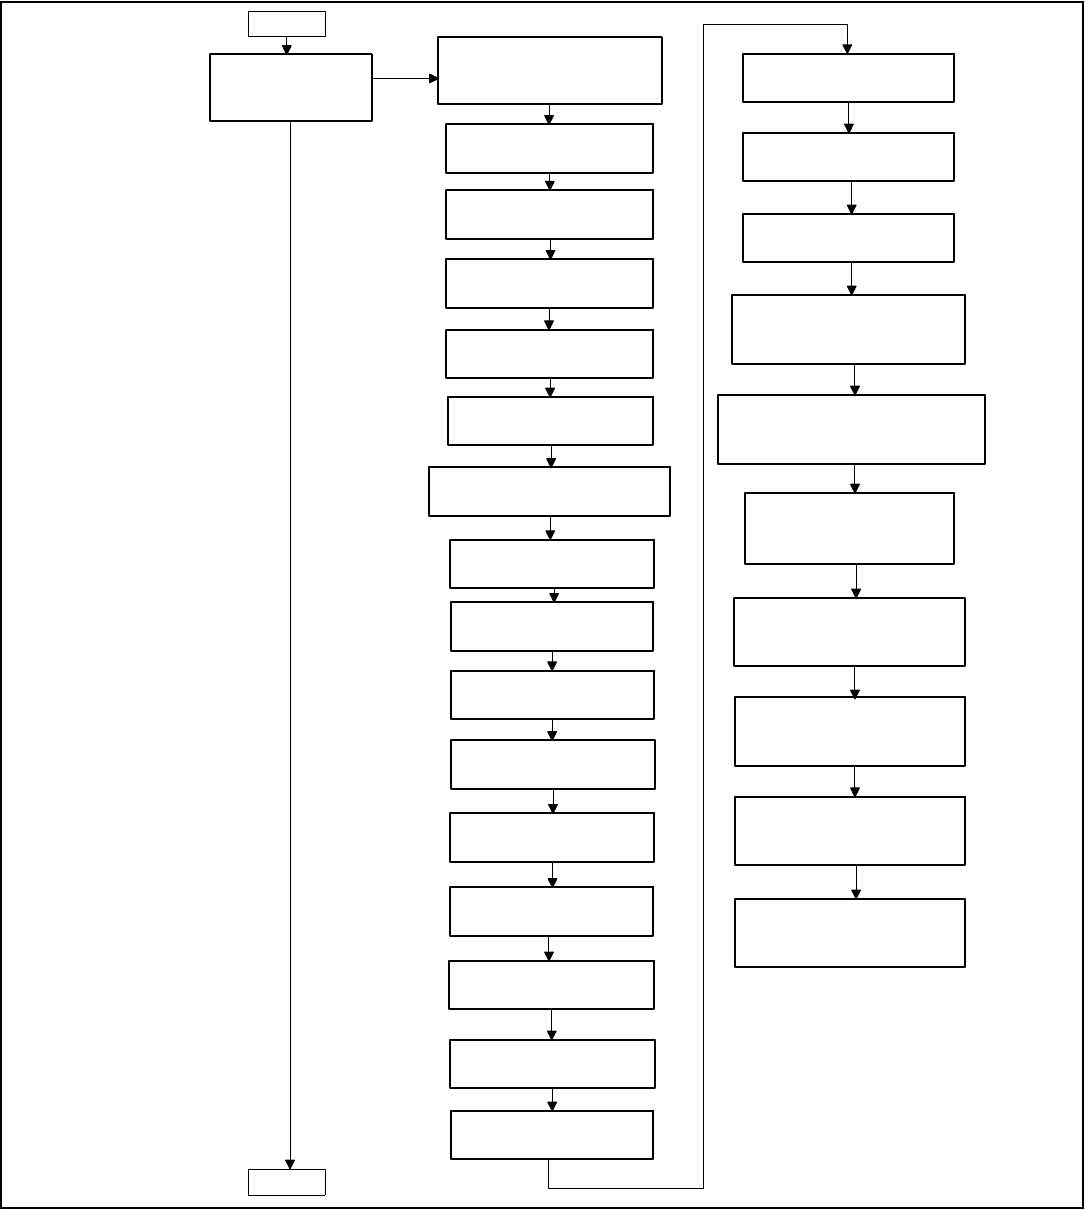
TLW18R_SVG
"Error-"
Errors
"E Sd-"
Slow Drain
Detection Error
"ovrFLd"
Overflow Mode Display
"E Sd 1"
Slow Drain
Detection Error
"E Sd 2"
Slow Drain
Detection Adjust
continued
continued
"E Ld-"
Water Leak
Detection Error
"E Ld 1"
Water Leak Detection
Day(s) of Week Enable
"E Ld 2"
Water Leak Detection
Number of Cycles
"E Ld 3"
Water Leak Detection
Display Sequence
"E dr-"
Drain Error
"E dr 1"
Drain Error
"CLrErr"
Clear Error
Figure 6
Programming Control
©
Copyright, Alliance Laundry Systems LLC -
DO NOT COPY or TRANSMIT
31 Part No. 204370ENR1
TLW20R_SVG
continued
"rtC- "
Real Time Clock
"rtC 1"
Minutes
"rtC 2"
Hours
"rtC 3"
Day
"rtC 4"
Date
"rtC 5"
Month
"rtC 6"
Year
continued
"dLS- "
Daylight Savings
"dLS 1"
Daylight Savings
"dLS 2"
Start Month
"dLS 3"
Start Day of Week
"dLS 4"
Start Week of Month
"dLS 5"
Start Hour
"dLS 6"
End Month
"dLS 7"
End Day of Week
"dLS 8"
End Week of Month
"dLS 9"
End Hour
Figure 7
Programming Control
©
Copyright, Alliance Laundry Systems LLC -
DO NOT COPY or TRANSMIT
32 Part No. 204370ENR1
TLW15R-e_SVG
Press the
DELICATES or the
COLD keypad to
scroll through the
Special Vend options.
"SP1- "
Special Vend 1
Parameters
To enter a
special vend
option, press the
START keypad.
To exit, press
the WARM
keypad.
"SP1 1"
Special Vend 1 Days
of Week Enable
continued
continued
"SP1 2"
Special Vend 1 Start Minute
"SP1 3"
Special Vend 1 Start Hour
"SP1 4"
Special Vend 1 Start Date
"SP1 5"
Special Vend 1 Start Month
"SP1 6"
Special Vend 1 Start Year
"SP1 7"
Special Vend 1 Length in Hours
"SP1 8"
Special Vend 1 End Date
"SP1 9"
Special Vend 1 End Month
"SP1 10"
Special Vend 1 End Year
"SP1 11"
Special Vend 1 Price #1
"SP1 12"
Special Vend 1 Price #2
"SP1 13"
Special Vend 1 Price #3
"SP1 14"
Special Vend 1 Price #4
"SP1 15"
Special Vend 1 Price #5
"SP1 16"
Special Vend 1 Price #6
"SP1 17"
Special Vend 1 Price #7
"SP1 18"
Special Vend 1 Price #8
"SP1 19"
Special Vend 1 Price #9
"SP1 20"
Special Vend 1 Wash Status
Agitate Step(s) Added Minutes
"SP1 21"
Special Vend 1 Wash Status
Agitate Step(s) Subtracted Minutes
"SP1 22"
Special Vend 1 Cycle
Modifier Default Value
"SP1 23"
Special Vend 1 Cycle Modifier
Key #1 Medium Vend Price
"SP1 24"
Special Vend 1 Cycle Modifier
Key #2 Heavy Vend Price
"SP1 25"
Special Vend 1 Cycle Modifier
Key #1 Medium Options
"SP1 26"
Special Vend 1 Cycle Modifier
Key #2 Heavy Options
Figure 8
Programming Control
©
Copyright, Alliance Laundry Systems LLC -
DO NOT COPY or TRANSMIT
33 Part No. 204370ENR1
TLW15R-f_SVG
"SP2"
Special Vend 2 Days Enable
Press the
DELICATES or the
COLD keypad to
scroll through the
programmable
options.
"CMP- "
Cycle Modifier Programming
To enter a programming
option, press the START
keypad. To exit, press
the WARM keypad.
"CMP 1"
Default Cycle Modifier
"CMP 2"
Cycle Modifier Key #1
Medium Options
"CMP 3"
Cycle Modifier Key #2
Heavy Option
"CMP 4"
Cycle Modifier Key #1
Added Agitate Time to Wash
Status Agitate Steps
"CMP 5"
Cylce Modifier Key #1
Added Agitate Time to Rinse
Status Agitate Steps
continued
"CMP 6"
Cycle Modifier Key #2
Added Agitate Time to Wash
Status Agitate Steps
"CMP 7"
Cycle Modifier Key #2
Added Agitate Time to Rinse
Status Agitate Steps
continued
"SP3"
Special Vend 3 Days Enable
"SP4"
Special Vend 4 Days Enable
Figure 9
Programming Control
©
Copyright, Alliance Laundry Systems LLC -
DO NOT COPY or TRANSMIT
34 Part No. 204370ENR1
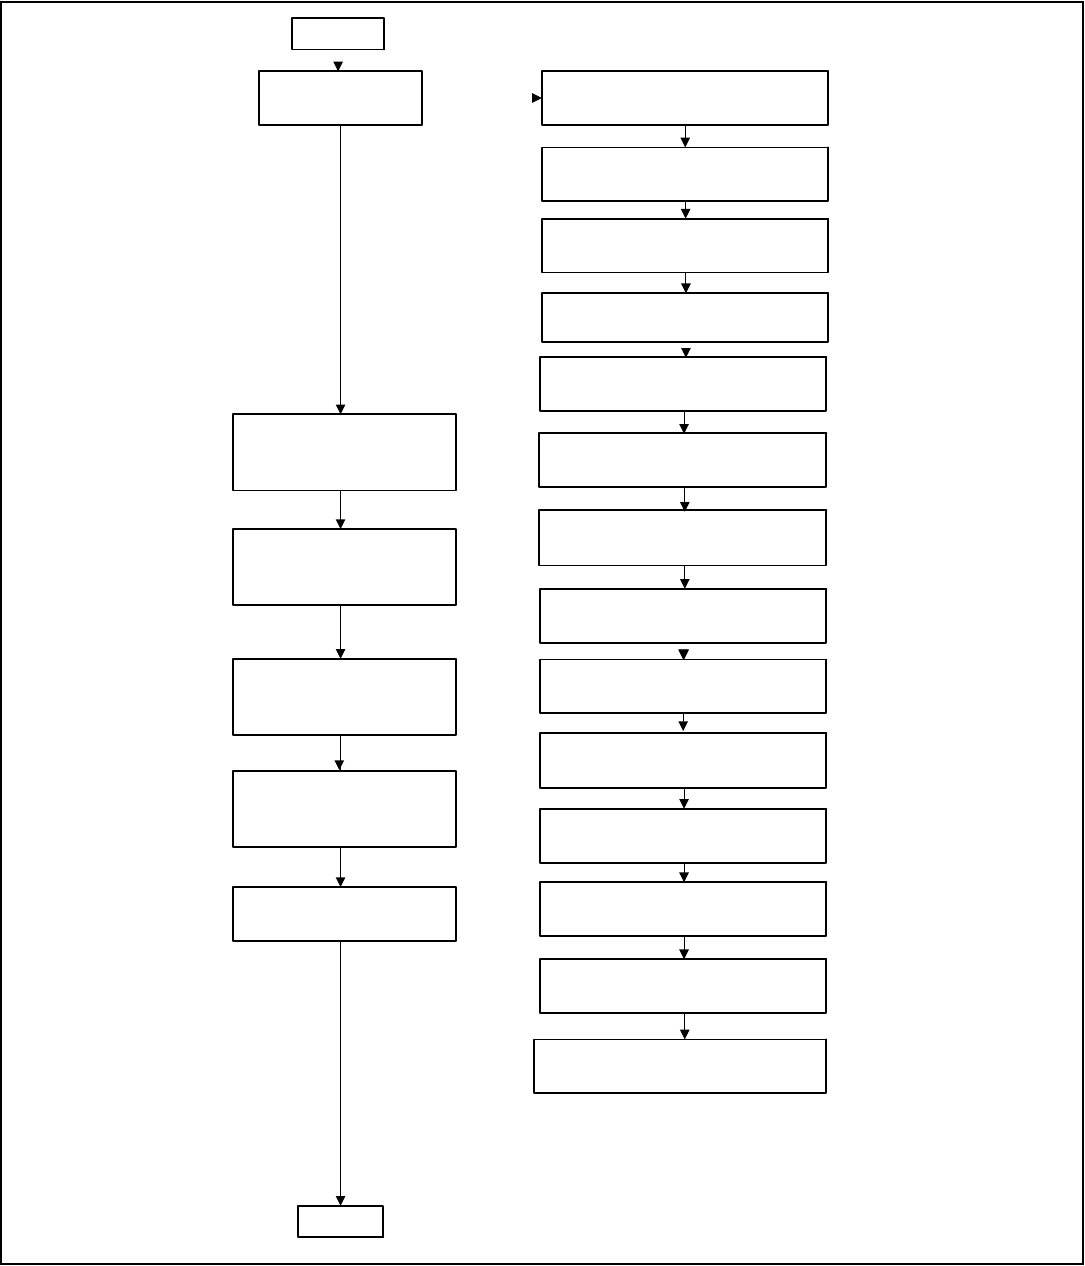
TLW47R
Press the
DELICATES or the
COLD keypad to
scroll through the
programmable
options.
To enter a programming
option, press the START
keypad. To exit, press
the WARM keypad.
continued
"CyCP 5"
Perm Press WASH Agitate Time
"CyCP 6"
Perm Press RINSE Agitate Time
"CyCP 7"
Perm Press EXTRA RINSE Agitate Time
"CyCP 8"
Perm Press FINAL SPIN Time
"CyCP 9"
"CyCP10"
Delicate WASH Agitate Time
"CyCP11"
Delicate EXTRA RINSE Agitate Time
"CyCP12"
Delicate FINAL SPIN Time
"CyCP13"
Warm Rinse Option
"CyCP14"
Timed Hot Fill/Spray Rinse
continued
"LPAS 1"
Low Power/Auto Shutdown
1 Days Enable
"LPAS 2"
Low Power/Auto Shutdown
2 Days Enable
"LPAS 3"
Low Power/Auto Shutdown
3 Days Enable
"LPAS 4”
Low Power/Auto Shutdown
4 Days Enable
"PF rst"
Power Fail Reset
"CyCP-"
Cycle Programming
"CyCP 1"
Normal WASH Agitate Time
"CyCP 2"
Normal RINSE Agitate Time
"CyCP 3"
Normal EXTRA RINSE Agitate Time
"CyCP 4"
Normal FINAL SPIN Time
Delicate RINSE Agitate Time
Figure 10
Programming Control
©
Copyright, Alliance Laundry Systems LLC -
DO NOT COPY or TRANSMIT
35 Part No. 204370ENR1
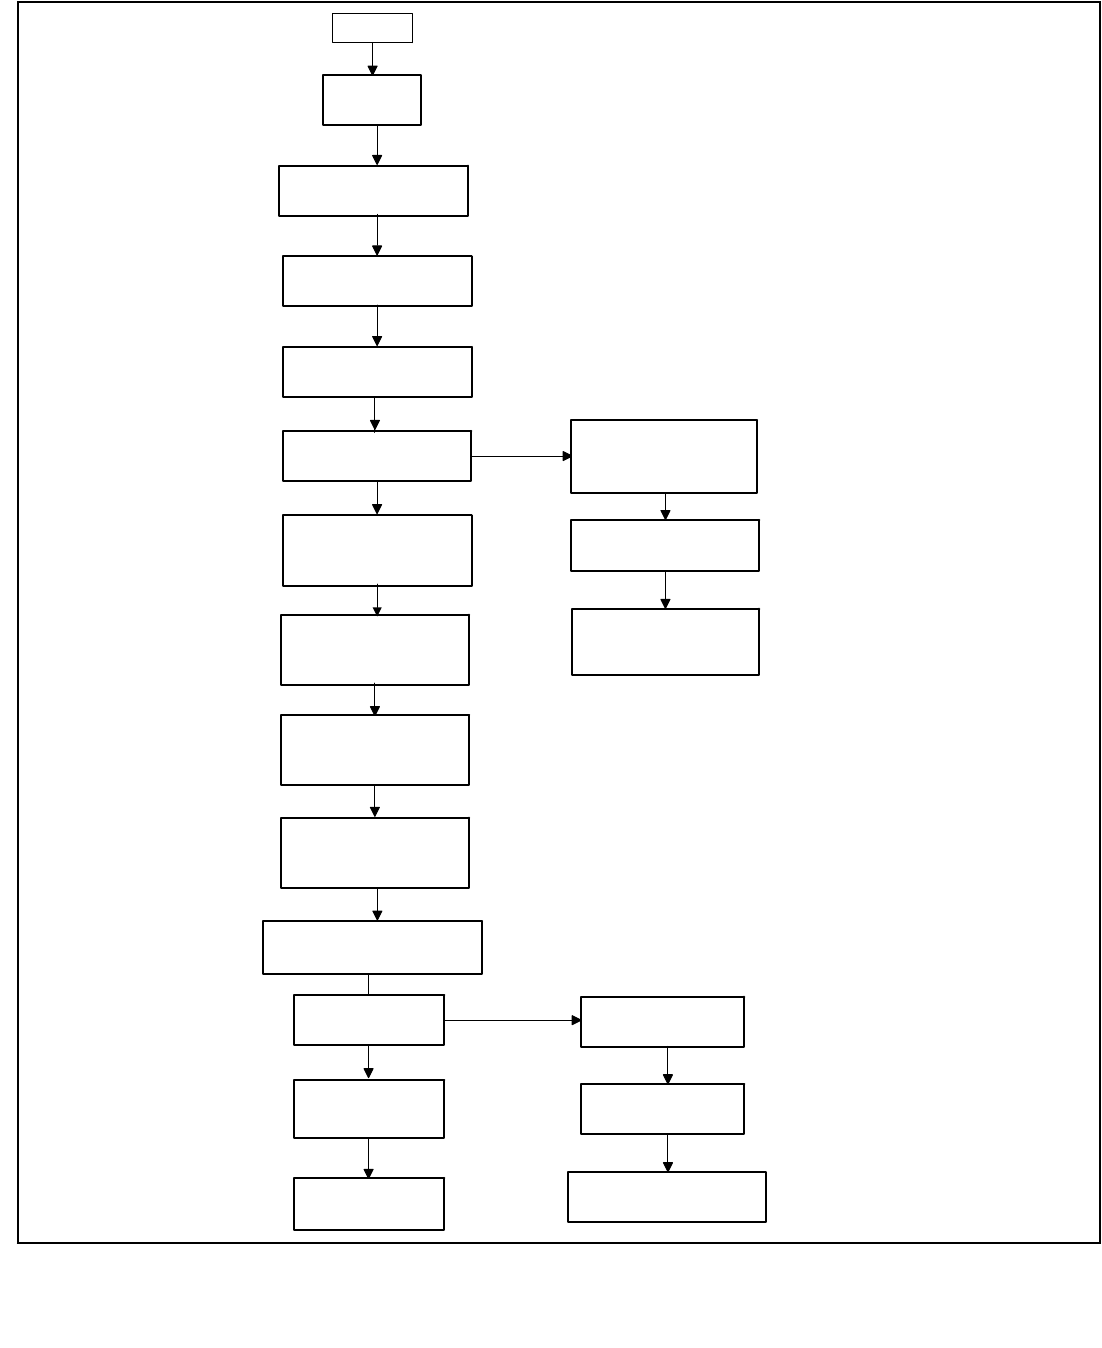
TLW15R-h_SVG
Press the
DELICATES or the
COLD keypad to
scroll through the
programmable
options.
To enter a programming
option, press the START
keypad. To exit, press
the WARM keypad.
continued
"LUC- "
Lucky Cycle
"PCdL d"
Programmable
Close Door/Lid Display
"PPSt d"
Programmable
Push Start Display
"PodL d"
Programmable
Open Door/Lid Display
"LUC 1"
Lucky Cycle
Day(s) of Week Enable
"LUC 2"
Lucky Cycle Number
"LUC 3"
Lucky Cycle
Display Option
"IrA En"
IR Access
"rAPdEn"
Manual Rapid Advance
"diAgEn"
Manual Diagnostics
"Ft En"
Factory Test Cycle
"tP ind"
Water Temperature
Indicator
"Ats do"
Vend Price Display Override
"oPL"
OPL Parameters
"droP "
Drop Off Mode
"oUt "
Out of Order
"oPL 1"
OPL Mode Enable
"oPL 2"
OPL Delayed Start
"oPL 3"
OPL Display Power Save
Figure 11
Programming Control
©
Copyright, Alliance Laundry Systems LLC -
DO NOT COPY or TRANSMIT
36 Part No. 204370ENR1

Vend Price 1 AtS 1
This option allows the owner to set the vend price for all cycles,
but otherwise specifically for NORMAL HOT. This price should
be set before all other prices. This vend price will be shown in the
display when NORMAL HOT is selected.
1. Control must be in Manual Mode. Refer to How to Enter the
Manual Mode.
2. Press the DELICATES (∧) or the COLD (∨) keypad until
Prog appears in the display. Press the START (enter) keypad,
and AtS 1 will appear in the display.
3. Press the START (enter) keypad. All cycle LEDs will be lit to
show all cycle prices are being programmed.
NOTE: To go back to the current programmable op-
tion without changing the value, press the WARM (<)
keypad.
4. Press the DELICATES (∧) or the COLD (∨) keypad to in-
crease or decrease the value of the active digit and the START
(enter) keypad to enter the value of the digit and advance to
the next digit.
5. Press the START (enter) keypad when the correct value ap-
pears in the display. The new value is saved and the next op-
tion will appear in the display.
Vend Price 2 AtS 2
This option allows the owner to set the vend price for NORMAL
WARM. This vend price will be shown in the display when
NORMAL WARM is selected.
1. Control must be in Manual Mode. Refer to How to Enter the
Manual Mode.
2. Press the DELICATES (∧) or the COLD (∨) keypad until
Prog appears in the display. Press the START (enter) keypad,
and AtS 1 will appear in the display.
3. The keypad LEDs will be lit to show which cycle price is be-
ing programmed.
4.
When AtS 2 appears in the display, press the START (enter)
keypad.
NOTE: To go back to the current programmable op-
tion without changing the value, press the WARM (<)
keypad.
5. Press the DELICATES (∧) or the COLD (∨) keypad to in-
crease or decrease the value of the active digit and the START
(enter) keypad to enter the value of the digit and advance to
the next digit.
6. Press the START (enter) keypad when the correct value ap-
pears in the display. The new value is saved and the next op-
tion will appear in the display.
Vend Price 3 AtS 3
This option allows the owner to set the vend price for a NOR-
MAL COLD. This vend price will be shown in the display when
NORMAL COLD is selected.
1. Control must be in Manual Mode. Refer to How to Enter the
Manual Mode.
2. Press the DELICATES (∧) or the COLD (∨) keypad until
Prog appears in the display. Press the START (enter) keypad,
and AtS 1 will appear in the display.
3. The keypad LEDs will be lit to show which cycle price is be-
ing programmed.
4.
When AtS 3 appears in the display, press the START (enter)
keypad.
NOTE: To go back to the current programmable op-
tion without changing the value, press the WARM (<)
keypad.
5. Press the DELICATES (∧) or the COLD (∨) keypad to in-
crease or decrease the value of the active digit and the START
(enter) keypad to enter the value of the digit and advance to
the next digit.
6. Press the START (enter) keypad when the correct value ap-
pears in the display. The new value is saved and the next op-
tion will appear in the display.
Vend Price 4 AtS 4
This option allows the owner to set the vend price for a PERM
PRESS HOT. This vend price will be shown in the display when
PERM PRESS HOT is selected.
1. Control must be in Manual Mode. Refer to How to Enter the
Manual Mode.
2. Press the DELICATES (∧) or the COLD (∨) keypad until
Prog appears in the display. Press the START (enter) keypad,
and AtS 1 will appear in the display.
3. Press the DELICATES (∧) or the COLD (∨) keypad to scroll
through the programmable options until AtS 4 appears in the
display.
4. The keypad LEDs will be lit to show which cycle price is be-
ing programmed.
5.
When AtS 4 appears in the display, press the START (enter)
keypad.
NOTE: To go back to the current programmable op-
tion without changing the value, press the WARM (<)
keypad.
6. Press the DELICATES (∧) or the COLD (∨) keypad to in-
crease or decrease the value of the active digit and the START
(enter) keypad to enter the value of the digit and advance to
the next digit.
7. Press the START (enter) keypad when the correct value ap-
pears in the display. The new value is saved and the next op-
tion will appear in the display.
Programming Control
©
Copyright, Alliance Laundry Systems LLC -
DO NOT COPY or TRANSMIT
37 Part No. 204370ENR1

Vend Price 5 AtS 5
This option allows the owner to set the vend price for PERM
PRESS WARM. This vend price will be shown in the display
when PERM PRESS WARM is selected.
1. Control must be in Manual Mode. Refer to How to Enter the
Manual Mode.
2. Press the DELICATES (∧) or the COLD (∨) keypad until
Prog appears in the display. Press the START (enter) keypad,
and AtS 1 will appear in the display.
3. Press the DELICATES (∧) or the COLD (∨) keypad to scroll
through the programmable options until AtS 5 appears in the
display.
4. The keypad LEDs will be lit to show which cycle price is be-
ing programmed.
5.
When AtS 5 appears in the display, press the START (enter)
keypad.
NOTE: To go back to the current programmable op-
tion without changing the value, press the WARM (<)
keypad.
6. Press the DELICATES (∧) or the COLD (∨) keypad to in-
crease or decrease the value of the active digit and the START
(enter) keypad to enter the value of the digit and advance to
the next digit.
7. Press the START (enter) keypad when the correct value ap-
pears in the display. The new value is saved and the next op-
tion will appear in the display.
Vend Price 6 AtS 6
This option allows the owner to set the vend price for PERM
PRESS COLD. This vend price will be shown in the display
when PERM PRESS COLD is selected.
1. Control must be in Manual Mode. Refer to How to Enter the
Manual Mode.
2. Press the DELICATES (∧) or the COLD (∨) keypad until
Prog appears in the display. Press the START (enter) keypad,
and AtS 1 will appear in the display.
3. Press the DELICATES (∧) or the COLD (∨) keypad to scroll
through the programmable options until AtS 6 appears in the
display.
4. The keypad LEDs will be lit to show which cycle price is be-
ing programmed.
5.
When AtS 6 appears in the display, press the START (enter)
keypad.
NOTE: To go back to the current programmable op-
tion without changing the value, press the WARM (<)
keypad.
6. Press the DELICATES (∧) or the COLD (∨) keypad to in-
crease or decrease the value of the active digit and the START
(enter) keypad to enter the value of the digit and advance to
the next digit.
7. Press the START (enter) keypad when the correct value ap-
pears in the display. The new value is saved and the next op-
tion will appear in the display.
Vend Price 7 AtS 7
This option allows the owner to set the vend price for DELI-
CATES HOT. This vend price will be shown in the display when
DELICATES HOT is selected.
1. Control must be in Manual Mode. Refer to How to Enter the
Manual Mode.
2. Press the DELICATES (∧) or the COLD (∨) keypad until
Prog appears in the display. Press the START (enter) keypad,
and AtS 1 will appear in the display.
3. Press the DELICATES (∧) or the COLD (∨) keypad to scroll
through the programmable options until AtS 7 appears in the
display.
4. The DELICATES and HOT LEDs will be lit to show which
cycle/temperature price is being programmed.
5.
When AtS 7 appears in the display, press the START (enter)
keypad.
NOTE: To go back to the current programmable op-
tion without changing the value, press the WARM (<)
keypad.
6. Press the DELICATES (∧) or the COLD (∨) keypad to in-
crease or decrease the value of the active digit and the START
(enter) keypad to enter the value of the digit and advance to
the next digit.
7. Press the START (enter) keypad with the last active digit. The
next option, AtS 8, will appear in the display.
Vend Price 8 AtS 8
This option allows the owner to set the vend price for DELI-
CATES WARM. This vend price will be shown in the display
when DELICATES WARM is selected.
1. Control must be in Manual Mode. Refer to How to Enter the
Manual Mode.
2. Press the DELICATES (∧) or the COLD (∨) keypad until
Prog appears in the display. Press the START (enter) keypad,
and AtS 1 will appear in the display.
3. Press the DELICATES (∧) or the COLD (∨) keypad to scroll
through the programmable options until AtS 8 appears in the
display.
4. The DELICATES and WARM LEDs will be lit to show which
cycle/temperature price is being programmed.
5.
When AtS 8 appears in the display, press the START (enter)
keypad.
NOTE: To go back to the current programmable op-
tion without changing the value, press the WARM (<)
keypad.
6. Press the DELICATES (∧) or the COLD (∨) keypad to in-
crease or decrease the value of the active digit and the START
Programming Control
©
Copyright, Alliance Laundry Systems LLC -
DO NOT COPY or TRANSMIT
38 Part No. 204370ENR1

(enter) keypad to enter the value of the digit and advance to
the next digit.
7. Press the START (enter) keypad with the last active digit. The
next option, AtS 9, will appear in the display.
Vend Price 9 AtS 9
This option allows the owner to set the vend price for DELI-
CATES COLD. This vend price will be shown in the display
when DELICATES COLD is selected.
1. Control must be in Manual Mode. Refer to How to Enter the
Manual Mode.
2. Press the DELICATES (∧) or the COLD (∨) keypad until
Prog appears in the display. Press the START (enter) keypad,
and AtS 1 will appear in the display.
3. Press the DELICATES (∧) or the COLD (∨) keypad to scroll
through the programmable options until AtS 9 appears in the
display.
4. The DELICATES and COLD LEDs will be lit to show which
cycle/temperature price is being programmed.
5.
When AtS 9 appears in the display, press the START (enter)
keypad.
NOTE: To go back to the current programmable op-
tion without changing the value, press the WARM (<)
keypad.
6. Press the DELICATES (∧) or the COLD (∨) keypad to in-
crease or decrease the value of the active digit and the START
(enter) keypad to enter the value of the digit and advance to
the next digit.
7. Press the START (enter) keypad with the last active digit. The
next option, dEn 1, will appear in the display.
Cycle Modifier Key 1 MEDIUM Vend
Price Adder ACNP 1
This option allows the owner to add to the vend price for the ME-
DIUM modifier key. This price is added onto the cycle price.
1. Control must be in Manual Mode. Refer to How to Enter the
Manual Mode.
2. Press the DELICATES (∧) or the COLD (∨) keypad until
Prog appears in the display. Press the START (enter) keypad,
and AtS 1 will appear in the display.
3. Press the DELICATES (∧) or the DELICATES COLD (∨)
keypad to scroll through the programmable options until
ACNP 1 appears in the display.
4. TheMEDIUM modifier LED will be lit to show which price is
being programmed.
5.
When ACNP 1 appears in the display, press the START (en-
ter) keypad.
NOTE: To go back to the current programmable op-
tion without changing the value, press the WARM (<)
keypad.
6. Press the DELICATES (∧) or the COLD (∨) keypad to in-
crease or decrease the value of the active digit and the START
(enter) keypad to enter the value of the digit and advance to
the next digit.
7. Press the START (enter) keypad when the correct value ap-
pears in the display. The new value is saved and the next op-
tion will appear in the display.
Cycle Modifier Key 2 HEAVY Vend Price
Adder ACNP 2
This option allows the owner to add to the vend price for the
HEAVY modifier key. This price is added onto the cycle price.
1. Control must be in Manual Mode. Refer to How to Enter the
Manual Mode.
2. Press the DELICATES (∧) or the COLD (∨) keypad until
Prog appears in the display. Press the START (enter) keypad,
and AtS 1 will appear in the display.
3. Press the DELICATES (∧) or the COLD (∨) keypad to scroll
through the programmable options until ACNP 2 appears in
the display.
4. The HEAVY modifier LED will be lit to show which price is
being programmed.
5.
When ACNP 2 appears in the display, press the START (en-
ter) keypad.
NOTE: To go back to the current programmable op-
tion without changing the value, press the WARM (<)
keypad.
6. Press the DELICATES (∧) or the COLD (∨) keypad to in-
crease or decrease the value of the active digit and the START
(enter) keypad to enter the value of the digit and advance to
the next digit.
7. Press the START (enter) keypad when the correct value ap-
pears in the display. The new value is saved and the next op-
tion will appear in the display.
Vend Price Decimal Point Ats dP
This option allows the owner to enable a decimal point to show
up in the vend price at one of two locations. For example, a vend
price of 200 can be display with a decimal point as 2.00 or
0.200.
1. Control must be in Manual Mode. Refer to How to Enter the
Manual Mode.
2. Press the DELICATES (∧) or the COLD (∨) keypad until
Prog appears in the display. Press the START (enter) keypad,
and AtS 1 will appear in the display.
3. Press the DELICATES (∧) or the COLD (∨) keypad to scroll
through the programmable options until Ats dP appears in
the display.
4.
When Ats dP appears in the display, press the START (en-
ter) keypad.
Programming Control
©
Copyright, Alliance Laundry Systems LLC -
DO NOT COPY or TRANSMIT
39 Part No. 204370ENR1

NOTE: To go back to the current programmable op-
tion without changing the value, press the WARM (<)
keypad.
5. Press the DELICATES (∧) or the COLD (∨) keypad to in-
crease or decrease the value of the parameter.
6. Press the START (enter) keypad when the correct value ap-
pears in the display. The new value is saved and the next op-
tion will appear in the display.
Coin 1 Value dEn 1
This option allows the owner to set a specific numerical value for
a coin entered. For example, in the United States the coin value
for one quarter would be measured in cents (25). Therefore, the
coin value entered for one quarter would be 00025.
If the Vend Price 1 is set for “.75”, and the Coin Value is set for
“00025”, the vend price displayed will decrease by 0.25 for each
coin entered and 3 coins will need to be entered to satisfy the
vend price.
1. Control must be in Manual Mode. Refer to How to Enter the
Manual Mode.
2. Press the DELICATES (∧) or the COLD (∨) keypad until
Prog appears in the display. Press the START (enter) keypad,
and AtS 1 will appear in the display.
3. Press the DELICATES (∧) or the COLD (∨) keypad to scroll
through the programmable options until dEn 1 appears in the
display.
4.
When dEn 1 appears in the display, press the START (enter)
keypad.
NOTE: To go back to the current programmable op-
tion without changing the value, press the WARM (<)
keypad.
5. Press the DELICATES (∧) or the COLD (∨) keypad to in-
crease or decrease the value of the active digit and the START
(enter) keypad to enter the value of the digit and advance to
the next digit.
6. Press the START (enter) keypad when the correct value ap-
pears in the display. The new value is saved and the next op-
tion will appear in the display.
Coin 2 Value dEn 2
This option allows the owner to set a specific numerical value for
a coin entered when using the dual coin drop. For example, the
coin value for a dollar coin would be measured in cents (1.00).
Therefore, the coin value entered for one dollar coin would be
00100.
If the Vend Price #1 (option 1) is set for 2.00, and the Coin Value
is set for 00100, the vend price displayed will decrease by 1.00
for each dollar coin entered and 2 coins will need to be entered to
satisfy the vend price.
1. Control must be in Manual Mode. Refer to How to Enter the
Manual Mode.
2. Press the DELICATES (∧) or the COLD (∨) keypad until
Prog appears in the display. Press the START (enter) keypad,
and AtS 1 will appear in the display.
3. Press the DELICATES (∧) or the COLD (∨) keypad to scroll
through the programmable options until dEn 2 appears in the
display.
4.
When dEn 2 appears in the display, press the START (enter)
keypad.
NOTE: To go back to the current programmable op-
tion without changing the value, press the WARM (<)
keypad.
5. Press the DELICATES (∧) or the COLD (∨) keypad to in-
crease or decrease the value of the active digit and the START
(enter) keypad to enter the value of the digit and advance to
the next digit.
6. Press the START (enter) keypad when the correct value ap-
pears in the display. The new value is saved and the next op-
tion will appear in the display.
Start Pulse Value PLSE
This option allows the owner to program the value of the Start
Pulse if used for multiple pulses with an after-market central card
reader or pay system.
1. Control must be in Manual Mode. Refer to How to Enter the
Manual Mode.
2. Press the DELICATES (∧) or the COLD (∨) keypad until
Prog appears in the display. Press the START (enter) keypad,
and AtS 1 will appear in the display.
3. Press the DELICATES (∧) or the COLD (∨) keypad to scroll
through the programmable options until PLSE appears in the
display.
4.
When PLSE appears in the display, press the START (enter)
keypad.
NOTE: To go back to the current programmable op-
tion without changing the value, press the WARM (<)
keypad.
5. Press the DELICATES (∧) or the COLD (∨) keypad to in-
crease or decrease the value of the active digit and the START
(enter) keypad to enter the value of the digit and advance to
the next digit.
6. Press the START (enter) keypad when the correct value ap-
pears in the display. The new value is saved and the next op-
tion will appear in the display.
Start Pulse Mode PLSNod
This option allows the owner to program the Start Pulse Input.
The Start Pulse Mode can be used for after-market central pay or
card systems. The central system sends the start pulse to the Start
Pulse Input of the control to start the cycle. If set for single pulse,
one start pulse from the central system will start the cycle. If set
for multiple pulses, each pulse will deduct from the vend price
value set up in Start Pulse Value until the vend is satisfied.
Programming Control
©
Copyright, Alliance Laundry Systems LLC -
DO NOT COPY or TRANSMIT
40 Part No. 204370ENR1

1. Control must be in Manual Mode. Refer to How to Enter the
Manual Mode.
2. Press the DELICATES (∧) or the COLD (∨) keypad until
Prog appears in the display. Press the START (enter) keypad,
and AtS 1 will appear in the display.
3. Press the DELICATES (∧) or the COLD (∨) keypad to scroll
through the programmable options until PLSNod appears in
the display.
4.
When PLSNod appears in the display, press the START (en-
ter) keypad. oFF or a number will appear in the display. This
number corresponds to the current Start Pulse Mode Program-
ming Value.
5. Locate the desired number in the first column of Table 1 be-
low.
PLSNod
Start Pulse
Mode Value
Start Pulse
ON/OFF
Single Pulse/
Multiple Pulses
0 OFF OFF
128 * ON Single Pulse
192 ON Multiple Pulses
* Factory default setting.
Table 1
6. Press the DELICATES (∧) or the COLD (∨) keypad to in-
crease or decrease the current number until correct.
NOTE: To go back to the current programmable op-
tion without changing the current value, press the
WARM (<) keypad.
7. Press the START (enter) keypad when the correct value ap-
pears in the display. The new value is saved and the next op-
tion will appear in the display.
Programmable Output Type AtyPE
This option allows the owner to program when the control pro-
vides an output that can be used for variety of reasons.
1. Control must be in Manual Mode. Refer to How to Enter the
Manual Mode.
2. Press the DELICATES (∧) or the COLD (∨) keypad until
Prog appears in the display. Press the START (enter) keypad,
and AtS 1 will appear in the display.
3. Press the DELICATES (∧) or the COLD (∨) keypad to scroll
through the programmable options until AtyPE appears in the
display.
4.
When AtyPE appears in the display, press the START (enter)
keypad. A number will appear in the display. This number
corresponds to the current Output Type Value.
5. Press the DELICATES (∧) or the COLD (∨) keypad to in-
crease or decrease the current number to the desired number
selected from Table 2 .
Programmable Out-
put Type Value
Mode(s) in Which
Available Signal is
Active
0* - Available Ready Mode only
1 - Available with Start Ready Mode, Start Mode
2 - Available with End of
Cycle
Ready Mode, End of Cy-
cle Mode
3 - Available with Start
and End of Cycle
Ready Mode, End of Cy-
cle Mode, Start Mode
4 - Vend is Not Satisfied Ready Mode, Partial
Vend Mode
5 - Vend is Not Satisfied
with End of Cycle
Ready Mode, Partial
Vend Mode, End of Cycle
Mode
6 - Available with Vend Ready Mode, Partial
Vend Mode, Start Mode
7 - Available with Vend
and End of Cycle
Ready Mode, End of Cy-
cle Mode, Partial Vend
Mode, Start Mode
8 - Machine is In Use Door Locking, Door/Lid
Unlocking, Overflow
Mode, Pause Mode, Run
Mode
9 - Cycle is Complete End of Cycle
10 - Lucky Cycle For 10 seconds when
Start Mode is entered
11 - Break in Alarm For 15 seconds when
Break in Alarm is trig-
gered at same time as au-
dio output tone
12 - End of Cycle is En-
tered
For 3 seconds when End
of Cycle Mode is entered
13 - Motor Running Whenever Motor is run-
ning
*Factory default setting.
Table 2
Programming Control
©
Copyright, Alliance Laundry Systems LLC -
DO NOT COPY or TRANSMIT
41 Part No. 204370ENR1

6. Press the START (enter) keypad when the correct value ap-
pears in the display. The new value is saved and the next op-
tion will appear in the display.
Default Cycle dFtCyC
This option allows the owner to set the default cycle that the ma-
chine will enter when in the Ready Mode.
1. Control must be in Manual Mode. Refer to How to Enter the
Manual Mode.
2. Press the DELICATES (∧) or the COLD (∨) keypad until
Prog appears in the display. Press the START (enter) keypad,
and AtS 1 will appear in the display.
3. Press the DELICATES (∧) or the COLD (∨) keypad to scroll
through the programmable options until dFtCyC appears in
the display.
4.
When dFtCyC appears in the display, press the START (en-
ter) keypad. A number will appear in the display. Refer to ta-
ble below. This number corresponds to the current default cy-
cle value. The corresponding LEDs will also be lit.
Cycle Number on Display
NORMAL/ HOT 1
NORMAL/ WARM 2
NORMAL/ COLD 3
PERM PRESS/ HOT 4
PERM PRESS/ WARM 5
PERM PRESS/ COLD 6
DELICATES/ HOT 7
DELICATES/ WARM 8
DELICATES/ COLD 9
Table 3
5. Press the DELICATES (∧) or the COLD (∨) keypad to in-
crease or decrease the current number to the desired number.
6. Press the START (enter) keypad when the correct value ap-
pears in the display. The new value is saved and the next op-
tion will appear in the display.
Card Reader Display Control CArd
This option allows the owner to program whether the display is
controlled by the machine’s electronic control or an external pay-
ment system such as a card reader.
NOTE: This feature does not need to be programmed
manually. The card reader itself makes this determina-
tion.
1. Control must be in Manual Mode. Refer to How to Enter the
Manual Mode.
2. Press the DELICATES (∧) or the COLD (∨) keypad until
Prog appears in the display. Press the START (enter) keypad,
and AtS 1 will appear in the display.
3. Press the DELICATES (∧) or the COLD (∨) keypad to scroll
through the programmable options until CArd appears in the
display.
4.
When CArd appears in the display, press the START (enter)
keypad. The current Card Reader Display Control Status will
appear in the display.
on = Card Reader/External Payment System controls display
oFF = Machine Electronic Control controls display (factory de-
fault setting)
5. Press the DELICATES (∧) or the COLD (∨) keypad to change
the current status.
6. Press the START (enter) keypad when the correct value ap-
pears in the display. The new value is saved and the next op-
tion will appear in the display.
Audio Signal AUdio
This option allows the owner to program when the signal will
sound.
There are five occasions when a signal may sound during the
washer operation. These five occasions are listed below:
1. End of Cycle Signal By default, the signal is turned off. If
turned on, the signal will sound for three seconds at the end of
a cycle.
2. Keypad Depression Signal By default, this signal is turned
on and will sound for a quarter of a second. This signal will
sound each time a keypad is pressed.
3. Coin Input/Card Insertion Signal By default, this signal is
turned on and will sound for a quarter of a second each time a
coin or card is entered.
4. Remove Card Signal (Card Models Only) By default, this
signal is turned on and will sound one second on and one sec-
ond off when the control is prompting for card removal.
5. Signal for Start By default, this signal is turned on and will
sound one second on and one second off for 10 seconds after
vend price has been satisfied.
How to Program the Audio Signal
1. Control must be in Manual Mode. Refer to How to Enter the
Manual Mode.
2. Press the DELICATES (∧) or the COLD (∨) keypad until
Prog appears in the display. Press the START (enter) keypad,
and AtS 1 will appear in the display.
3. Press the DELICATES (∧) or the COLD (∨) keypad to scroll
through the programmable options until AUdio appears in the
display.
4.
When AUdio appears in the display press the START (enter)
keypad. A number will appear in the display. This number
corresponds to the current Audio Signal Programming Value.
Programming Control
©
Copyright, Alliance Laundry Systems LLC -
DO NOT COPY or TRANSMIT
42 Part No. 204370ENR1

5. Locate the desired number in the first column of Table 4 on
the following page.
6. Press the DELICATES (∧) or the COLD (∨) keypad to in-
crease or decrease the current number until correct.
For Example: A user might wish to have the signal sound only
when a keypad is pressed. Entering the number “1” in step 5
would turn off all the options except KEYPAD. In this instance,
the signal would sound only when a keypad is pressed.
7. Press the START (enter) keypad when the correct number ap-
pears in the display. The next option will appear in the dis-
play.
How to Read Audio Signal Table
To determine the correct number required to program the Audio
Signal, use the following chart. The Signal Value column con-
tains the number displayed on the control. The other columns cor-
respond to individual options.
Each column of options contains a unique combination of the
words “ON” and “OFF” that indicates if that column’s option is
turned on or off when the Signal Value is entered. Select the de-
sired combination of options and enter the number found in the
Signal Value column.
The default value programmed at the factory is 29.
Signal Value Start Mode
Serial or Net-
work Vending
Command
Signal
Coin/Card In-
put End of Cycle Key Pressed
0 OFF OFF OFF OFF OFF
1 OFF OFF OFF OFF ON
2 OFF OFF OFF ON OFF
3 OFF OFF OFF ON ON
4 OFF OFF ON OFF OFF
5 OFF OFF ON OFF ON
6 OFF OFF ON ON OFF
7 OFF OFF ON ON ON
8 OFF ON OFF OFF OFF
9 OFF ON OFF OFF ON
10 OFF ON OFF ON OFF
11 OFF ON OFF ON ON
12 OFF ON ON OFF OFF
13 OFF ON ON OFF ON
14 OFF ON ON ON OFF
15 OFF ON ON ON ON
16 ON OFF OFF OFF OFF
Table 4 continues...
Programming Control
©
Copyright, Alliance Laundry Systems LLC -
DO NOT COPY or TRANSMIT
43 Part No. 204370ENR1

Signal Value Start Mode
Serial or Net-
work Vending
Command
Signal
Coin/Card In-
put End of Cycle Key Pressed
17 ON OFF OFF OFF ON
18 ON OFF OFF ON OFF
19 ON OFF OFF ON ON
20 ON OFF ON OFF OFF
21 ON OFF ON OFF ON
22 ON OFF ON ON OFF
23 ON OFF ON ON ON
24 ON ON OFF OFF OFF
25 ON ON OFF OFF ON
26 ON ON OFF ON OFF
27 ON ON OFF ON ON
28 ON ON ON OFF OFF
29* ON ON ON OFF ON
30 ON ON ON ON OFF
31 ON ON ON ON ON
* Factory default setting.
Table 4
Network Node Number nodE
This option allows the owner to program a unique number used
for wired or wireless communication. Every machine on the same
network much have a different node number to work correctly.
1. Control must be in Manual Mode. Refer to How to Enter the
Manual Mode.
2. Press the DELICATES (∧) or the COLD (∨) keypad until
Prog appears in the display. Press the START (enter) keypad,
and AtS 1 will appear in the display.
3. Press the DELICATES (∧) or the COLD (∨) keypad to scroll
through the programmable options until nodE appears in the
display.
4.
When nodE appears in the display, press the START (enter)
keypad. The current Network Node Number status will appear
in the display.
5. Press the DELICATES (∧) or the COLD (∨) keypad to change
the current status.
6. Press the START (enter) keypad when the correct value ap-
pears in the display. The new value is saved and the next op-
tion will appear in the display.
Error Code Programming Error-
This option allows the owner to turn on or turn off certain errors
in the control.
1. Control must be in Manual Mode. Refer to How to Enter the
Manual Mode.
2. Press the DELICATES (∧) or the COLD (∨) keypad until
Prog appears in the display. Press the START (enter) keypad,
and AtS 1 will appear in the display.
3. Press the DELICATES (∧) or the COLD (∨) keypad to scroll
through the programmable options until Error- appears in
the display.
Programming Control
©
Copyright, Alliance Laundry Systems LLC -
DO NOT COPY or TRANSMIT
44 Part No. 204370ENR1

4.
When Error- appears in the display, press the START (en-
ter) keypad. There are multiple programmable error code pa-
rameters. Refer to Table 5 .
5. Press the DELICATES (∧) or the COLD (∨) keypad to select
the desired option.
6. Press the DELICATES (∧) or the COLD (∨) keypad to select
error code.
7. Press the START (enter) keypad when the correct code ap-
pears in the display. The current status will appear in the dis-
play.
NOTE: Press the DELICATES (∧) or the COLD (∨)
keypad and then the START (enter) keypad again to
choose a specific coin error parameter. Refer to Ta-
ble 5 .
8. Press the DELICATES (∧ ) or the COLD (∨) keypad to
change the status.
9. Press the START (enter) keypad when the correct status ap-
pears in the display. The next Error Code Programming op-
tion will appear in the display.
Error Code Programming Error-
CErr-
Coin Error Parameters Menu
CEr 1
Coin Error - Determines if display will
show error.
CEr 2
Coin Error Penalty - If enabled, coin er-
ror will erase previous coins entered and
reset the vend price.
CEr 3
Vend Header Present Error - If enabled
and coin drop header is unplugged, con-
trol ignores coin inputs.
E FL-
Fill Error Menu
E FL 1
Fill Error (On/Off) - If Enabled, will set
error after fill error alarm time if fill level
isn't reached, if disabled will allow filling
forever if fill level never reached.
E FL 2
Fill Error Time - Time allowed in mi-
nutes to reach target fill level before set-
ting a fill error.
E nF-
No Water Flow Error Menu
E nF 1
No Water Flow Error (On/Off) - If Ena-
bled, will set error after no water flow er-
ror time if level isn't reached.
E nF 2
No Water Flow Error Time - Time al-
lowed in minutes to reach a no flow 0.5
level.
E dr-
Drain Error Menu
E dr 1
Drain Error (On/Off) - If Enabled, will
set error if empty water level isn't
reached by the end of the cycle. If disa-
bled will allow no alarm.
Table 5 continues...
Programming Control
©
Copyright, Alliance Laundry Systems LLC -
DO NOT COPY or TRANSMIT
45 Part No. 204370ENR1

Error Code Programming Error-
E Ld- E Ld-
Water Leak Detection Error Menu - This
error checks for whether the machine is
leaking water by adding 1 minute to the
cycle to check for water leaks.
E Ld 1
Water Leak Detection Day(s) of Week
Enable - Allows owner to pick which
days to check for water leaks.
Refer to Table 8 for the value definitions.
E Ld 2
Water Leak Detection Number of Cycles
Between - Sets how many cycles must
run before water leaks are checked again.
E Ld 3
Water Leak Detection Display Sequence
(On/Off) - Will show a moving dash "-"
across the 7-segment display while the
water leak detection is being performed.
E Sd-
Slow Drain Detection Error Menu
E Sd 1
Slow Drain Detection (On/Off) - Ena-
bles/Disables the error
E Sd 2
Slow Drain Detection Adjust - Allows
the owner to add time in seconds to the
machine's default draining time used to
detect for slow draining conditions.
Helps allow for locations with poor
draining conditions.
ovrFLd ovrFLd
Overflow Mode Display - Can be used to
disable "oFLo" on the display while in an
Overflow Condition during a running cy-
cle if set to Off. In all other modes, it will
always show "oFLo" if an overflow con-
dition exists.
CLrErr CLrErr
Allow Error Clearing (On/Off) - Allows
the ability for the owner to clear most er-
rors by pressing NORMAL PERM
PRESS keypads. Some errors will still
require power to be cycled to clear the er-
ror and some errors will continually set
themselves until the condition for the er-
ror being set is fixed. Call for service if
an error will not clear.
Table 5
Programming Control
©
Copyright, Alliance Laundry Systems LLC -
DO NOT COPY or TRANSMIT
46 Part No. 204370ENR1

Set Real-Time Clock rtC-
This option allows the owner to set the controls internal clock to
the correct time and date.
1. Control must be in Manual Mode. Refer to How to Enter the
Manual Mode.
2. Press the DELICATES (∧) or the COLD (∨) keypad until
Prog appears in the display. Press the START (enter) keypad,
and AtS 1 will appear in the display.
3. Press the DELICATES (∧) or the COLD (∨) keypad to scroll
through the programmable options until rtC- appears in the
display.
4.
Press the START keypad and rtC 1 will appear in the dis-
play.
5. Press the DELICATES (∧) or the COLD (∨) keypad to scroll
through the programmable options. Refer to Table 6 .
rtC 1
Programs Minutes
rtC 2
Programs Hours
rtC 3
Programs Day of Week
rtC 4
Programs Date of Month
rtC 5
Programs Month
rtC 6
Programs Year
Table 6
6. When the desired option appears in the display, press the
START (enter) keypad. The current value will appear in the
display.
7. Press the DELICATES (∧) or the COLD (∨) keypad to in-
crease or decrease the minutes, hours, day of week, date of
month, month or year to the correct time or date.
NOTE: The hours will be displayed in military time.
For day of week, Sunday is considered day one (1),
Monday is day two (2) and so on. For year, the year
2000 is “ 0 ”, the year 2001 is “ 1 ” and so on.
8. Press the START (enter) keypad when the correct value ap-
pears in the display. The new value is saved and the next op-
tion will appear in the display.
Set Daylight Savings Time dLS-
This option allows the owner to set the controls internal clock to
the daylight savings time and date.
1. Control must be in Manual Mode. Refer to How to Enter the
Manual Mode.
2. Press the DELICATES (∧) or the COLD (∨) keypad until
Prog appears in the display. Press the START (enter) keypad,
and AtS 1 will appear in the display.
3. Press the DELICATES (∧) or the COLD (∨) keypad to scroll
through the programmable options until dLS- appears in the
display. Press the START keypad and dLS 1 will appear in
the display.
4. Press the DELICATES (∧) or the COLD (∨) keypad to scroll
through the programmable options. Refer to Table 7 .
dLS 1
Daylight Savings (On/
Off)
dLS 2
Programs Start Month
dLS 3
Programs Start Day of
Week
dLS 4
Programs Start Week of
Month
dLS 5
Programs Start Hour
dLS 6
Programs End Month
dLS 7
Programs End Day of
Week
dLS 8
Programs End Week of
Month
dLS 9
Programs End Hour
Table 7
5. When the desired option appears in the display, press the
START (enter) keypad. The current value will appear in the
display.
6. Press the DELICATES (∧) or the COLD (∨) keypad to in-
crease or decrease the minutes, hours, day of week, date of
month, month or year to the correct time or date.
NOTE: The hours will be displayed in military time.
For day of week, Sunday is considered day one (1),
Monday is day two (2) and so on. For year, the year
2000 is “ 0 ”, the year 2001 is “ 1 ” and so on. For
week of month, first week is "1", second week is
"2", third week is "3", and last week is "4".
7. Press the START (enter) keypad when the correct value ap-
pears in the display. The new value is saved and the next op-
tion will appear in the display.
Special Vend 1 Days Enable SP1 1
This option allows the owner to set the day or days of a special
vend.
Special Vend 1 is used to change the standard vend prices for spe-
cial occasions. The special vend can be programmed to start and
end on a specific day or days of the week.
The owner may also turn the Special Vend 1 option on or off if
desired.
Programming Control
©
Copyright, Alliance Laundry Systems LLC -
DO NOT COPY or TRANSMIT
47 Part No. 204370ENR1

1. Control must be in Manual Mode. Refer to How to Enter the
Manual Mode.
2. Press the DELICATES (∧) or the COLD (∨) keypad until
Prog appears in the display. Press the START (enter) keypad,
and AtS 1 will appear in the display.
3. Press the DELICATES (∧) or the COLD (∨) keypad to scroll
through the programmable options until SP1- appears in the
display. Press the START (enter) keypad and SP1 1 will ap-
pear in the display.
4.
When SP1 1 appears in the display, press the START (enter)
keypad. A number will appear in the display that corresponds
to the current Special Vend 1 Days Enable Programming Val-
ue.
5. Locate the desired number in the first column of Table 8 .
6. Press the DELICATES (∧) or the COLD (∨) keypad to in-
crease or decrease the current number until correct.
7. Press the START (enter) keypad when the correct value ap-
pears in the display. The new value is saved and the next op-
tion will appear in the display.
How to Read the Days Enable Value Table
To determine the correct number required to program the Special
Vend Days Enable, Water Leak Detection Days of Week Enable
or the Lucky Cycle Day(s) of Week / Enable, use the following
table.
The Value column contains the number required in step 6. The
other columns correspond to individual days.
Each column of days contains a unique combination of the words
“ON” and “OFF” that indicates if that column’s day is turned on
or off when the value is entered. Select the desired combination
of days and enter the number found in the value column.
* The default value programmed at the factory is 0.
SP1 1, E Ld 1 and LUC 1
VALUE SAT FRI THUR WED TUE MON SUN ON/OFF
0* OFF OFF OFF OFF OFF OFF OFF OFF
3 OFF OFF OFF OFF OFF OFF ON ON
5 OFF OFF OFF OFF OFF ON OFF ON
7 OFF OFF OFF OFF OFF ON ON ON
9 OFF OFF OFF OFF ON OFF OFF ON
11 OFF OFF OFF OFF ON OFF ON ON
13 OFF OFF OFF OFF ON ON OFF ON
15 OFF OFF OFF OFF ON ON ON ON
17 OFF OFF OFF ON OFF OFF OFF ON
19 OFF OFF OFF ON OFF OFF ON ON
21 OFF OFF OFF ON OFF ON OFF ON
23 OFF OFF OFF ON OFF ON ON ON
25 OFF OFF OFF ON ON OFF OFF ON
27 OFF OFF OFF ON ON OFF ON ON
29 OFF OFF OFF ON ON ON OFF ON
31 OFF OFF OFF ON ON ON ON ON
33 OFF OFF ON OFF OFF OFF OFF ON
Table 8 continues...
Programming Control
©
Copyright, Alliance Laundry Systems LLC -
DO NOT COPY or TRANSMIT
48 Part No. 204370ENR1

SP1 1, E Ld 1 and LUC 1
VALUE SAT FRI THUR WED TUE MON SUN ON/OFF
35 OFF OFF ON OFF OFF OFF ON ON
37 OFF OFF ON OFF OFF ON OFF ON
39 OFF OFF ON OFF OFF ON ON ON
41 OFF OFF ON OFF ON OFF OFF ON
43 OFF OFF ON OFF ON OFF ON ON
45 OFF OFF ON OFF ON ON OFF ON
47 OFF OFF ON OFF ON ON ON ON
49 OFF OFF ON ON OFF OFF OFF ON
51 OFF OFF ON ON OFF OFF ON ON
53 OFF OFF ON ON OFF ON OFF ON
55 OFF OFF ON ON OFF ON ON ON
57 OFF OFF ON ON ON OFF OFF ON
59 OFF OFF ON ON ON OFF ON ON
61 OFF OFF ON ON ON ON OFF ON
63 OFF OFF ON ON ON ON ON ON
65 OFF ON OFF OFF OFF OFF OFF ON
67 OFF ON OFF OFF OFF OFF ON ON
69 OFF ON OFF OFF OFF ON OFF ON
71 OFF ON OFF OFF OFF ON ON ON
73 OFF ON OFF OFF ON OFF OFF ON
75 OFF ON OFF OFF ON OFF ON ON
77 OFF ON OFF OFF ON ON OFF ON
79 OFF ON OFF OFF ON ON ON ON
81 OFF ON OFF ON OFF OFF OFF ON
83 OFF ON OFF ON OFF OFF ON ON
85 OFF ON OFF ON OFF ON OFF ON
Table 8 continues...
Programming Control
©
Copyright, Alliance Laundry Systems LLC -
DO NOT COPY or TRANSMIT
49 Part No. 204370ENR1

SP1 1, E Ld 1 and LUC 1
VALUE SAT FRI THUR WED TUE MON SUN ON/OFF
87 OFF ON OFF ON OFF ON ON ON
89 OFF ON OFF ON ON OFF OFF ON
91 OFF ON OFF ON ON OFF ON ON
93 OFF ON OFF ON ON ON OFF ON
95 OFF ON OFF ON ON ON ON ON
97 OFF ON ON OFF OFF OFF OFF ON
99 OFF ON ON OFF OFF OFF ON ON
101 OFF ON ON OFF OFF ON OFF ON
103 OFF ON ON OFF OFF ON ON ON
105 OFF ON ON OFF ON OFF OFF ON
107 OFF ON ON OFF ON OFF ON ON
109 OFF ON ON OFF ON ON OFF ON
111 OFF ON ON OFF ON ON ON ON
113 OFF ON ON ON OFF OFF OFF ON
115 OFF ON ON ON OFF OFF ON ON
117 OFF ON ON ON OFF ON OFF ON
119 OFF ON ON ON OFF ON ON ON
121 OFF ON ON ON ON OFF OFF ON
123 OFF ON ON ON ON OFF ON ON
125 OFF ON ON ON ON ON OFF ON
127 OFF ON ON ON ON ON ON ON
129 ON OFF OFF OFF OFF OFF OFF ON
131 ON OFF OFF OFF OFF OFF ON ON
133 ON OFF OFF OFF OFF ON OFF ON
135 ON OFF OFF OFF OFF ON ON ON
137 ON OFF OFF OFF ON OFF OFF ON
Table 8 continues...
Programming Control
©
Copyright, Alliance Laundry Systems LLC -
DO NOT COPY or TRANSMIT
50 Part No. 204370ENR1

SP1 1, E Ld 1 and LUC 1
VALUE SAT FRI THUR WED TUE MON SUN ON/OFF
139 ON OFF OFF OFF ON OFF ON ON
141 ON OFF OFF OFF ON ON OFF ON
143 ON OFF OFF OFF ON ON ON ON
145 ON OFF OFF ON OFF OFF OFF ON
147 ON OFF OFF ON OFF OFF ON ON
149 ON OFF OFF ON OFF ON OFF ON
151 ON OFF OFF ON OFF ON ON ON
153 ON OFF OFF ON ON OFF OFF ON
155 ON OFF OFF ON ON OFF ON ON
157 ON OFF OFF ON ON ON OFF ON
159 ON OFF OFF ON ON ON ON ON
161 ON OFF ON OFF OFF OFF OFF ON
163 ON OFF ON OFF OFF OFF ON ON
165 ON OFF ON OFF OFF ON OFF ON
167 ON OFF ON OFF OFF ON ON ON
169 ON OFF ON OFF ON OFF OFF ON
171 ON OFF ON OFF ON OFF ON ON
173 ON OFF ON OFF ON ON OFF ON
175 ON OFF ON OFF ON ON ON ON
177 ON OFF ON ON OFF OFF OFF ON
179 ON OFF ON ON OFF OFF ON ON
181 ON OFF ON ON OFF ON OFF ON
183 ON OFF ON ON OFF ON ON ON
185 ON OFF ON ON ON OFF OFF ON
187 ON OFF ON ON ON OFF ON ON
189 ON OFF ON ON ON ON OFF ON
Table 8 continues...
Programming Control
©
Copyright, Alliance Laundry Systems LLC -
DO NOT COPY or TRANSMIT
51 Part No. 204370ENR1

SP1 1, E Ld 1 and LUC 1
VALUE SAT FRI THUR WED TUE MON SUN ON/OFF
191 ON OFF ON ON ON ON ON ON
193 ON ON OFF OFF OFF OFF OFF ON
195 ON ON OFF OFF OFF OFF ON ON
197 ON ON OFF OFF OFF ON OFF ON
199 ON ON OFF OFF OFF ON ON ON
201 ON ON OFF OFF ON OFF OFF ON
203 ON ON OFF OFF ON OFF ON ON
205 ON ON OFF OFF ON ON OFF ON
207 ON ON OFF OFF ON ON ON ON
209 ON ON OFF ON OFF OFF OFF ON
211 ON ON OFF ON OFF OFF ON ON
213 ON ON OFF ON OFF ON OFF ON
215 ON ON OFF ON OFF ON ON ON
217 ON ON OFF ON ON OFF OFF ON
219 ON ON OFF ON ON OFF ON ON
221 ON ON OFF ON ON ON OFF ON
223 ON ON OFF ON ON ON ON ON
225 ON ON ON OFF OFF OFF OFF ON
227 ON ON ON OFF OFF OFF ON ON
229 ON ON ON OFF OFF ON OFF ON
231 ON ON ON OFF OFF ON ON ON
233 ON ON ON OFF ON OFF OFF ON
235 ON ON ON OFF ON OFF ON ON
237 ON ON ON OFF ON ON OFF ON
239 ON ON ON OFF ON ON ON ON
241 ON ON ON ON OFF OFF OFF ON
Table 8 continues...
Programming Control
©
Copyright, Alliance Laundry Systems LLC -
DO NOT COPY or TRANSMIT
52 Part No. 204370ENR1

SP1 1, E Ld 1 and LUC 1
VALUE SAT FRI THUR WED TUE MON SUN ON/OFF
243 ON ON ON ON OFF OFF ON ON
245 ON ON ON ON OFF ON OFF ON
247 ON ON ON ON OFF ON ON ON
249 ON ON ON ON ON OFF OFF ON
251 ON ON ON ON ON OFF ON ON
253 ON ON ON ON ON ON OFF ON
255 ON ON ON ON ON ON ON ON
* Factory default setting.
Table 8
How to Program Special Vend 1 Start Minute
SP1 2
This option allows the owner to set the minute that Special Vend
1 will begin.
1. Press the DELICATES (∧) or the COLD (∨) keypad to scroll
through the programmable Special Vend 1 options until SP1
2 appears in the display.
2.
When SP1 2 appears in the display, press the START (enter)
keypad. The current start minute will appear in the display.
3. Press the DELICATES (∧) or the COLD (∨) keypad to in-
crease or decrease the value to the desired minute.
4. Press the START (enter) keypad when the correct value ap-
pears in the display. The new value is saved and the next op-
tion will appear in the display.
How to Program Special Vend 1 Start Hour SP1 3
This option allows the owner to set the hour that Special Vend 1
will begin.
1. Press the DELICATES (∧) or the COLD (∨) keypad to scroll
through the programmable Special Vend 1 options until SP1
3 appears in the display.
2.
When SP1 3 appears in the display, press the START (enter)
keypad. The current start time (in military time) will appear in
the display.
NOTE: The hours will be displayed in military time.
3. Press the DELICATES (∧) or the COLD (∨) keypad to in-
crease or decrease the start value to the desired hour.
4. Press the START (enter) keypad when the correct value ap-
pears in the display. The new value is saved and the next op-
tion will appear in the display.
How to Program Special Vend 1 Start Date SP1 4
This option allows the owner to set the date of the month that
Special Vend 1 will begin.
1. Press the DELICATES (∧) or the COLDD (∨) keypad to
scroll through the programmable Special Vend 1 options until
SP1 4 appears in the display.
2.
When SP1 4 appears in the display, press the START (enter)
keypad. The current start date will appear in the display.
3. Press the DELICATES (∧) or the COLD (∨) keypad to in-
crease or decrease the start date to the desired date.
NOTE: If “off” is selected and Special Vend 1 is on,
Special Vend 1 will occur at the time and days of
week selected, regardless of the date.
4. Press the START (enter) keypad when the correct value ap-
pears in the display. The new value is saved and the next op-
tion will appear in the display.
How to Program Special Vend 1 Start Month
SP1 5
This option allows the owner to set the month that Special Vend 1
will begin.
NOTE: If Special Vend 1 Start Month, Start Date, End
Month, or End Date are programmed to zero (default is
zero), the Special Vend 1 will be active every week on
the days programmed in Table 8 .
1. Press the DELICATES (∧) or the COLD (∨) keypad to scroll
through the programmable Special Vend 1 options until SP1
5 appears in the display.
2.
When SP1 5 appears in the display, press the START (enter)
keypad. The current start month will appear in the display.
Programming Control
©
Copyright, Alliance Laundry Systems LLC -
DO NOT COPY or TRANSMIT
53 Part No. 204370ENR1

3. Press the DELICATES (∧) or the COLD (∨) keypad to in-
crease or decrease the start month to the desired month.
NOTE: If “off” is selected and Special Vend 1 is on,
Special Vend 1 will occur at the time and days of
week selected, regardless of the month.
4. Press the START (enter) keypad when the correct value ap-
pears in the display. The new value is saved and the next op-
tion will appear in the display.
How to Program Special Vend 1 Start Year SP1 6
This option allows the owner to set the year that Special Vend 1
will begin.
1. Press the DELICATES (∧) or the COLD (∨) keypad to scroll
through the programmable Special Vend 1 options until SP1
6 appears in the display.
2.
When SP1 6 appears in the display, press the START (enter)
keypad. The current start year will appear in the display.
3. Press the DELICATES (∧) or the COLD (∨) keypad to in-
crease or decrease the start value to the desired year.
NOTE: If “off” is selected and Special Vend 1 is on,
Special Vend 1 will occur at the time or days of week
selected, regardless of the year. “1” is year 2001,
“2” is year 2002, and so on.
4. Press the START (enter) keypad when the correct value ap-
pears in the display. The new value is saved and the next op-
tion will appear in the display.
How to Program Special Vend 1 Length in Hours
SP1 7
This option allows the owner to set the length in hours for Special
Vend 1.
1. Press the DELICATES (∧) or the COLD (∨) keypad to scroll
through the programmable Special Vend 1 options until SP1
7 appears in the display.
2.
When SP1 7 appears in the display, press the START (enter)
keypad. The current length in hours will appear in the display.
3. Press the DELICATES (∧) or the COLD (∨) keypad to in-
crease or decrease the current value to the desired number of
hours.
4. Press the START (enter) keypad when the correct value ap-
pears in the display. The new value is saved and the next op-
tion will appear in the display.
How to Program Special Vend 1 End Date SP1 8
This option allows the owner to set the date of the month that
Special Vend 1 will end.
1. Press the DELICATES (∧) or the COLD (∨) keypad to scroll
through the programmable Special Vend 1 options until SP1
8 appears in the display.
2.
When SP1 8 appears in the display, press the START (enter)
keypad. The current end date will appear in the display.
3. Press the DELICATES (∧) or the COLD (∨) keypad to in-
crease or decrease the value to the desired date.
NOTE: If “off” is selected and Special Vend 1 is on,
Special Vend 1 will occur at the time or days of week
selected, regardless of the date.
4. Press the START (enter) keypad when the correct value ap-
pears in the display. The new value is saved and the next op-
tion will appear in the display.
How to Program Special Vend 1 End Month SP1 9
This option allows the owner to set the month that Special Vend 1
will end.
1. Press the DELICATES (∧) or the COLD (∨) keypad to scroll
through the programmable Special Vend 1 options until SP1
9 appears in the display.
2.
When SP1 9 appears in the display, press the START (enter)
keypad. The current end month will appear in the display.
3. Press the DELICATES (∧) or the COLD (∨) keypad to in-
crease or decrease the value to the desired month.
NOTE: If “off” is selected and Special Vend 1 is on,
Special Vend 1 will occur at the time and day of
week selected, regardless of the month.
4. Press the START (enter) keypad when the correct value ap-
pears in the display. The new value is saved and the next op-
tion will appear in the display.
How to Program Special Vend 1 End Year SP1 10
This option allows the owner to set the year that Special Vend 1
will end.
1. Press the DELICATES (∧) or the COLD (∨) keypad to scroll
through the programmable Special Vend 1 options until SP1
10 appears in the display.
2.
When SP1 10 appears in the display, press the START (en-
ter) keypad. The current end year will appear in the display.
3. Press the DELICATES (∧) or the COLD (∨) keypad to in-
crease or decrease the value to the desired year.
NOTE: If “off” is selected and Special Vend 1 is on,
Special Vend 1 will occur at the time or days of week
selected, regardless of the year. “1” is year 2001,
“2” is year 2002 and so on.
4. Press the START (enter) keypad when the correct value ap-
pears in the display. The new value is saved and the next op-
tion will appear in the display.
How to Program Special Vend 1 Vend Price 1
SP1 11
This option allows the owner to set the vend price for all cycles,
but otherwise specifically for NORMAL HOT. This price should
be set before all other prices. The corresponding LEDs will be lit
while programming.
Programming Control
©
Copyright, Alliance Laundry Systems LLC -
DO NOT COPY or TRANSMIT
54 Part No. 204370ENR1

1. Press the DELICATES (∧) or the COLD (∨) keypad to scroll
through the programmable Special Vend 1 options until SP1
11 appears in the display.
2.
When SP1 11 appears in the display, press the START (en-
ter) keypad. The current value will appear in the display.
NOTE: To go back to the current programmable
Special Vend 1 option without changing the value,
press the WARM (<) keypad.
3. Press the DELICATES (∧) or the COLD (∨) keypad to in-
crease or decrease the value of the active digit and the START
keypad to enter the value of the digit and advance to the next
digit.
4. Press the START (enter) keypad when the correct value ap-
pears in the display. The new value is saved and the next op-
tion will appear in the display.
How to Program Special Vend 1 Vend Price 2
SP1 12
This option allows the owner to set the vend price for a NOR-
MAL WARM wash in Special Vend 1. The corresponding LEDs
will be lit while programming.
1. Press the DELICATES (∧) or the COLD (∨) keypad to scroll
through the programmable Special Vend 1 options until SP1
12 appears in the display.
2.
When SP1 12 appears in the display, press the START (en-
ter) keypad. The current value will appear in the display.
NOTE: To go back to the current programmable
Special Vend 1 option without changing the value,
press the WARM (<) keypad.
3. Press the DELICATES (∧) or the COLD (∨) keypad to in-
crease or decrease the value of the active digit and the START
keypad to enter the value of the digit and advance to the next
digit.
4. Press the START (enter) keypad when the correct value ap-
pears in the display. The new value is saved and the next op-
tion will appear in the display.
How to Program Special Vend 1 Vend Price 3
SP1 13
This option allows the owner to set the vend price for a NOR-
MAL COLD wash in Special Vend 1. The corresponding LEDs
will be lit while programming.
1. Press the DELICATES (∧) or the COLD (∨) keypad to scroll
through the programmable Special Vend 1 options until SP1
13 appears in the display.
2.
When SP1 13 appears in the display, press the START (en-
ter) keypad. The current value will appear in the display.
NOTE: To go back to the current programmable
Special Vend 1 option without changing the value,
press the WARM (<) keypad.
3. Press the DELICATES (∧) or the COLD (∨) keypad to in-
crease or decrease the value of the active digit and the START
keypad to enter the value of the digit and advance to the next
digit.
4. Press the START (enter) keypad when the correct value ap-
pears in the display. The new value is saved and the next op-
tion will appear in the display.
How to Program Special Vend 1 Vend Price 4
SP1 14
This option allows the owner to set the vend price for a PERM
PRESS HOT wash in Special Vend 1. The corresponding LEDs
will be lit while programming.
1. Press the DELICATES (∧) or the COLD (∨) keypad to scroll
through the programmable Special Vend 1 options until SP1
14 appears in the display.
2.
When SP1 14 appears in the display, press the START (en-
ter) keypad. The current value will appear in the display.
NOTE: To go back to the current programmable
Special Vend 1 option without changing the value,
press the WARM (<) keypad.
3. Press the DELICATES (∧) or the COLD (∨) keypad to in-
crease or decrease the value of the active digit and the START
keypad to enter the value of the digit and advance to the next
digit.
4. Press the START (enter) keypad when the correct value ap-
pears in the display. The new value is saved and the next op-
tion will appear in the display.
How to Program Special Vend 1 Vend Price 5
SP1 15
This option allows the owner to set the vend price for a PERM
PRESS WARM wash in Special Vend 1. The corresponding
LEDs will be lit while programming.
1. Press the DELICATES (∧) or the COLD (∨) keypad to scroll
through the programmable Special Vend 1 options until SP1
15 appears in the display.
2.
When SP1 15 appears in the display, press the START (en-
ter) keypad. The current value will appear in the display.
NOTE: To go back to the current programmable
Special Vend 1 option without changing the value,
press the WARM (<) keypad.
3. Press the DELICATES (∧) or the COLD (∨) keypad to in-
crease or decrease the value of the active digit and the START
keypad to enter the value of the digit and advance to the next
digit.
4. Press the START (enter) keypad when the correct value ap-
pears in the display. The new value is saved and the next op-
tion will appear in the display.
Programming Control
©
Copyright, Alliance Laundry Systems LLC -
DO NOT COPY or TRANSMIT
55 Part No. 204370ENR1

How to Program Special Vend 1 Vend Price 6
SP1 16
This option allows the owner to set the vend price for a PERM
PRESS COLD wash in Special Vend 1. The corresponding LEDs
will be lit while programming.
1. Press the DELICATES (∧) or the COLD (∨) keypad to scroll
through the programmable Special Vend 1 options until SP1
16 appears in the display.
2.
When SP1 16 appears in the display, press the START (en-
ter) keypad. The current valuee will appear in the display.
NOTE: To go back to the current programmable
Special Vend 1 option without changing the value,
press the WARM (<) keypad.
3. Press the DELICATES (∧) or the COLD (∨) keypad to in-
crease or decrease the value of the active digit and the START
keypad to enter the value of the digit and advance to the next
digit.
4. Press the START (enter) keypad when the correct value ap-
pears in the display. The new value is saved and the next op-
tion will appear in the display.
How to Program Special Vend 1 Vend Price 7
SP1 17
This option allows the owner to set the vend price for a DELI-
CATES HOT wash in Special Vend 1. The corresponding LEDs
will be lit while programming.
1. Press the DELICATES (∧) or the COLD (∨) keypad to scroll
through the programmable Special Vend 1 options until SP1
17 appears in the display.
2.
When SP1 17 appears in the display, press the START (en-
ter) keypad. The current value will appear in the display.
NOTE: To go back to the current programmable
Special Vend 1 option without changing the value,
press the WARM (<) keypad.
3. Press the DELICATES (∧) or the COLD (∨) keypad to in-
crease or decrease the value of the active digit and the START
keypad to enter the value of the digit and advance to the next
digit.
4. Press the START (enter) keypad with the last active digit. The
next Special Vend 1 option, SP1 18, will appear in the dis-
play.
How to Program Special Vend 1 Vend Price 8
SP1 18
This option allows the owner to set the vend price for a DELI-
CATES WARM wash in Special Vend 1. The corresponding
LEDs will be lit while programming.
1. Press the DELICATES (∧) or the COLD (∨) keypad to scroll
through the programmable Special Vend 1 options until SP1
18 appears in the display.
2.
When SP1 18 appears in the display, press the START (en-
ter) keypad. The current value will appear in the display.
NOTE: To go back to the current programmable
Special Vend 1 option without changing the value,
press the WARM (<) keypad.
3. Press the DELICATES (∧) or the COLD (∨) keypad to in-
crease or decrease the value of the active digit and the START
keypad to enter the value of the digit and advance to the next
digit.
4. Press the START (enter) keypad with the last active digit. The
next Special Vend 1 option, SP1 19, will appear in the dis-
play.
How to Program Special Vend 1 Vend Price 9
SP1 19
This option allows the owner to set the vend price for a DELI-
CATES COLD wash in Special Vend 1. The corresponding LEDs
will be lit while programming.
1. Press the DELICATES (∧) or the COLD (∨) keypad to scroll
through the programmable Special Vend 1 options until SP1
19 appears in the display.
2.
When SP1 19 appears in the display, press the START (en-
ter) keypad. The current value will appear in the display.
NOTE: To go back to the current programmable
Special Vend 1 option without changing the value,
press the WARM (<) keypad.
3. Press the DELICATES (∧) or the COLD (∨) keypad to in-
crease or decrease the value of the active digit and the START
keypad to enter the value of the digit and advance to the next
digit.
4. Press the START (enter) keypad with the last active digit. The
next Special Vend 1 option, SP1 20, will appear in the dis-
play.
How to Program Special Vend 1 Wash Status
Agitate Steps Added Minutes SP1 20
This option allows the owner to add time to any agitate steps that
have their status set to Wash in Special Vend 1.
1. Press the DELICATES (∧) or the COLD (∨) keypad to scroll
through the programmable Special Vend 1 options until SP1
20 appears in the display.
2.
When SP1 20 appears in the display, press the START (en-
ter) keypad. The current value will appear in the display.
NOTE: To go back to the current programmable
Special Vend 1 option without changing the value,
press the WARM (<) keypad.
3. Press the DELICATES (∧) or the COLD (∨) keypad to in-
crease or decrease the number of minutes displayed to the de-
sired number of added minutes.
4. Press the START (enter) keypad when the correct value ap-
pears in the display. The new value is saved and the next op-
tion will appear in the display.
Programming Control
©
Copyright, Alliance Laundry Systems LLC -
DO NOT COPY or TRANSMIT
56 Part No. 204370ENR1

How to Program Special Vend 1 Wash Status
Agitate Steps Subtracted Minutes SP1 21
This option allows the owner to subtract time from any agitate
steps that have their status set to Wash in Special Vend 1.
1. Press the DELICATES (∧) or the COLD (∨) keypad to scroll
through the programmable Special Vend 1 options until SP1
21 appears in the display.
2.
When SP1 21 appears in the display, press the START (en-
ter) keypad. The current value will appear in the display.
NOTE: To go back to the current programmable
Special Vend 1 option without changing the value,
press the WARM (<) keypad.
3. Press the DELICATES (∧) or the COLD (∨) keypad to in-
crease or decrease the value of the active digit and the START
keypad to enter the value of the digit and advance to the next
digit.
4. Press the START (enter) keypad when the correct value ap-
pears in the display. The new value is saved and the next op-
tion will appear in the display.
How to Program Special Vend 1 Cycle Modifier
Default Value SP1 22
This option allows the owner to set the default cycle modifier that
should be selected any time that Ready Mode is entered.
0 = Modifier LIGHT, 1 = Modifier MEDIUM, 2 = Modifier
HEAVY.
1. Press the DELICATES (∧) or the COLD (∨) keypad to scroll
through the programmable Special Vend 1 options until SP1
22 appears in the display.
2.
When SP1 22 appears in the display, press the START (en-
ter) keypad. The current value will appear in the display.
NOTE: To go back to the current programmable
Special Vend 1 option without changing the value,
press the WARM (<) keypad.
3. Press the DELICATES (∧) or the COLD (∨) keypad to in-
crease or decrease the value of the active digit and the START
keypad to enter the value of the digit and advance to the next
digit.
4. Press the START (enter) keypad when the correct value ap-
pears in the display. The new value is saved and the next op-
tion will appear in the display.
How to Program Special Vend 1 Cycle Modifier
MEDIUM Key #1 Vend Price SP1 23
1. Press the DELICATES (∧) or the COLD (∨) keypad to scroll
through the programmable Special Vend 1 options until SP1
23 appears in the display.
2.
When SP1 23 appears in the display, press the START (en-
ter) keypad. The current value will appear in the display.
NOTE: To go back to the current programmable
Special Vend 1 option without changing the value,
press the WARM (<) keypad.
3. Press the DELICATES (∧) or the COLD (∨) keypad to in-
crease or decrease the value of the active digit and the START
keypad to enter the value of the digit and advance to the next
digit.
4. Press the START (enter) keypad when the correct value ap-
pears in the display. The new value is saved and the next op-
tion will appear in the display.
How to Program Special Vend 1 Cycle Modifier
HEAVY Key #2 Vend Price SP1 24
1. Press the DELICATES (∧) or the COLD (∨) keypad to scroll
through the programmable Special Vend 1 options until SP1
24 appears in the display.
2.
When SP1 24 appears in the display, press the START (en-
ter) keypad. The current value will appear in the display.
NOTE: To go back to the current programmable
Special Vend 1 option without changing the value,
press the WARM (<) keypad.
3. Press the DELICATES (∧) or the COLD (∨) keypad to in-
crease or decrease the value of the active digit and the START
keypad to enter the value of the digit and advance to the next
digit.
4. Press the START (enter) keypad when the correct value ap-
pears in the display. The new value is saved and the next op-
tion will appear in the display.
How to Program Special Vend 1 Cycle Modifier
MEDIUM Key #1 Options SP1 25
1. Press the DELICATES (∧) or the COLD (∨) keypad to scroll
through the programmable Special Vend 1 options until SP1
25 appears in the display.
2.
When SP1 25 appears in the display, press the START (en-
ter) keypad. The current value will appear in the display.
NOTE: To go back to the current programmable
Special Vend 1 option without changing the value,
press the WARM (<) keypad.
3. Press the DELICATES (∧) or the COLD (∨) keypad to in-
crease or decrease the value to enable the desired options to
be active when the MEDIUM keypad is active. Refer to Table
1.
4. Press the START (enter) keypad when the correct value ap-
pears in the display. The new value is saved and the next op-
tion will appear in the display.
How to Program Special Vend 1 Cycle Modifier
HEAVY Key #2 Options SP1 26
1. Press the DELICATES (∧) or the COLD (∨) keypad to scroll
through the programmable Special Vend 1 options until SP1
26 appears in the display.
Programming Control
©
Copyright, Alliance Laundry Systems LLC -
DO NOT COPY or TRANSMIT
57 Part No. 204370ENR1

2.
When SP1 26 appears in the display, press the START (en-
ter) keypad. The current value will appear in the display.
NOTE: To go back to the current programmable
Special Vend 1 option without changing the value,
press the WARM (<) keypad.
3. Press the DELICATES (∧) or the COLD (∨) keypad to in-
crease or decrease to enable the desired options to be active
when the HEAVY keypad is active. Refer to Table 1.
4. Press the START (enter) keypad when the correct value ap-
pears in the display. The new value is saved and the next op-
tion will appear in the display.
Special Vend 2 Days Enable SP2
This option allows the owner to enable or disable a second spe-
cial vend. Special Vend 2 can be programmed using an external
device or network. The owner may also turn the Special Vend 2
option on or off.
1. Control must be in Manual Mode. Refer to How to Enter the
Manual Mode.
2. Press the DELICATES (∧) or the COLD (∨) keypad until
Prog appears in the display. Press the START (enter) keypad,
and AtS 1 will appear in the display.
3. Press the DELICATES (∧) or the COLD (∨) keypad to scroll
through the programmable options until SP2 appears in the
display.
4.
When SP2 appears in the display, press the START (enter)
keypad. The current Special Vend 2 Days Enable status will
appear in the display.
on = Option Enabled
oFF = Option Disabled (factory default setting)
5. Press the DELICATES (∧) or the COLD (∨) keypad to change
the current status.
6. Press the START (enter) keypad when the correct value ap-
pears in the display. The new value is saved and the next op-
tion will appear in the display.
Special Vend 3 Days Enable SP3
This option allows the owner to enable or disable third special
vend. Special Vend 3 can be programmed using an external de-
vice or network. The owner may also turn the Special Vend 3 op-
tion on or off.
1. Control must be in Manual Mode. Refer to How to Enter the
Manual Mode.
2. Press the DELICATES (∧) or the COLD (∨) keypad until
Prog appears in the display. Press the START (enter) keypad,
and AtS 1 will appear in the display.
3. Press the DELICATES (∧) or the COLD (∨) keypad to scroll
through the programmable options until SP3 appears in the
display.
4.
When SP3 appears in the display, press the START (enter)
keypad. The current Special Vend 3 Days Enable status will
appear in the display.
on = Option Enabled
oFF = Option Disabled (factory default setting)
5. Press the DELICATES (∧) or the COLD (∨) keypad to change
the current status.
6. Press the START (enter) keypad when the correct value ap-
pears in the display. The new value is saved and the next op-
tion will appear in the display.
Special Vend 4 Days Enable SP4
This option allows the owner to enable or disable a fourth special
vend. Special Vend 4 can be programmed using an external de-
vice or network. The owner may also turn the Special Vend 4 op-
tion on or off if desired.
1. Control must be in Manual Mode. Refer to How to Enter the
Manual Mode.
2. Press the DELICATES (∧) or the COLD (∨) keypad until
Prog appears in the display. Press the START (enter) keypad,
and AtS 1 will appear in the display.
3. Press the DELICATES (∧) or the COLD (∨) keypad to scroll
through the programmable options until SP4 appears in the
display.
4.
When SP4 appears in the display, press the START (enter)
keypad. The current Special Vend 4 Days Enable status will
appear in the display.
on = Option Enabled
oFF = Option Disabled (factory default setting)
5. Press the DELICATES (∧) or the COLD (∨) keypad to change
the current status.
6. Press the START (enter) keypad when the correct value ap-
pears in the display. The new value is saved and the next op-
tion will appear in the display.
Cycle Modifier Programming CNP-
This option allows the owner to program the machine to offer ex-
tra wash time, extra rinse time, a warm rinse, or any combination
of the above to the customers for an added vend price. This op-
tion is used when MEDIUM or HEAVY is selected using the
Modifier keypad.
How to Program Default Cycle Modifier CNP 1
This option allows the owner to set the Default Cycle Modifier.
1. Control must be in Manual Mode. Refer to How to Enter the
Manual Mode.
2. Press the DELICATES (∧) or the COLD (∨) keypad until
Prog appears in the display. Press the START (enter) keypad,
and AtS 1 will appear in the display.
Programming Control
©
Copyright, Alliance Laundry Systems LLC -
DO NOT COPY or TRANSMIT
58 Part No. 204370ENR1

3. Press the DELICATES (∧) or the DELICATES (∨) keypad to
scroll through the programmable options until CNP- appears
in the display.
4.
When CNP- appears in the display, press the START (enter)
keypad.
5. Press the DELICATES (∧) or the COLD (∨) keypad to scroll
through the programmable Cycle Modifier options until CNP
1 appears in the display.
6.
When CNP 1 appears in the display, press the START (enter)
keypad. A number will appear in the display. This number
corresponds to the current default cycle modifier. Refer to ta-
ble below.
CNP 1
Default Value Cycle Modifier
0* LIGHT
1 MEDIUM
2 HEAVY
*Factory default setting.
Table 9
7. Press the DELICATES (∧) or the COLD (∨) keypad to in-
crease or decrease the current number to the desired number
selected from the table.
8. Press the START (enter) keypad when the correct value ap-
pears in the display. The new value is saved and the next op-
tion will appear in the display.
How to Program Cycle Modifier MEDIUM Key #1
Options CNP 2
This option allows the owner to select the options that are ena-
bled when the MEDIUM modifier keypad is active.
1. Control must be in Manual Mode. Refer to How to Enter the
Manual Mode.
2. Press the DELICATES (∧) or the COLD (∨) keypad until
Prog appears in the display. Press the START (enter) keypad,
and AtS 1 will appear in the display.
3. Press the DELICATES (∧) or the COLD (∨) keypad to scroll
through the programmable options until CNP- appears in the
display.
4.
When CNP- appears in the display, press the START (enter)
keypad.
5. Press the DELICATES (∧) or the COLD (∨) keypad to scroll
through the programmable options until CNP 2 appears in the
display.
6.
When CNP 2 appears in the display, press the START (enter)
keypad.
NOTE: To go back to the current programmable op-
tion without changing the value, press the WARM (<)
keypad.
7. Press the DELICATES (∧) or the COLD (∨) keypad to change
the configuration value. Refer to the table below for the value
definitions.
8. Press the START (enter) keypad when the correct value ap-
pears in the display. The new value is saved and the next op-
tion will appear in the display.
Cycle Modifier Value Warm Rinse
0 * OFF
1 ON
* Factory default setting
Table 10
How to Program Cycle Modifier HEAVY Key #2
Options CNP 3
This option allows the owner to select the options that are ena-
bled when the HEAVY modifier keypad is active.
1. Control must be in Manual Mode. Refer to How to Enter the
Manual Mode.
2. Press the DELICATES (∧) or the COLD (∨) keypad until
Prog appears in the display. Press the START (enter) keypad,
and AtS 1 will appear in the display.
3. Press the DELICATES (∧) or the COLD (∨) keypad to scroll
through the programmable options until CNP- appears in the
display.
4.
When CNP- appears in the display, press the START (enter)
keypad.
5. Press the DELICATES (∧) or the COLD (∨) keypad to scroll
through the programmable options until CNP 3 appears in the
display.
6.
When CNP 3 appears in the display, press the START (enter)
keypad.
NOTE: To go back to the current programmable op-
tion without changing the value, press the WARM (<)
keypad.
7. Press the DELICATES (∧) or the COLD (∨) keypad to change
the configuration value.
8. Press the START (enter) keypad when the correct value ap-
pears in the display. The new value is saved and the next op-
tion will appear in the display.
How to Program Cycle Modifier MEDIUM
Additional Wash Time CNP 4
This option allows the owner to add additional time to agitate
steps that have wash selected as their status. The additional wash
time option needs to be turned on for the Cycle Modifier MEDI-
UM Additional Wash Time to take effect.
Programming Control
©
Copyright, Alliance Laundry Systems LLC -
DO NOT COPY or TRANSMIT
59 Part No. 204370ENR1

1. Control must be in Manual Mode. Refer to How to Enter the
Manual Mode.
2. Press the DELICATES (∧) or the COLD (∨) keypad until
Prog appears in the display. Press the START (enter) keypad,
and AtS 1 will appear in the display.
3. Press the DELICATES (∧) or the COLD (∨) keypad to scroll
through the programmable options until CNP- appears in the
display.
4.
When CNP- appears in the display, press the START (enter)
keypad.
5. Press the DELICATES (∧) or the COLD (∨) keypad to scroll
through the programmable options until CNP 4 appears in the
display.
6.
When CNP 4 appears in the display, press the START (enter)
keypad. A number will appear in the display corresponding to
the number of minutes to be added to agitate steps that have
wash selected as their status.
7. Press the DELICATES (∧) or the COLD (∨) keypad to in-
crease or decrease the current number minutes.
8. Press the START (enter) keypad when the correct value ap-
pears in the display. The new value is saved and the next op-
tion will appear in the display.
How to Program Cycle Modifier MEDIUM
Additional Extra Rinse Time CNP 5
This option allows the owner to add additional agitate time to ex-
tra rinse steps. The additional rinse time option needs to be turned
on for the Cycle Modifier MEDIUM Additional Extra Rinse
Time to take effect.
1. Control must be in Manual Mode. Refer to How to Enter the
Manual Mode.
2. Press the DELICATES (∧) or the COLD (∨) keypad until
Prog appears in the display. Press the START (enter) keypad,
and AtS 1 will appear in the display.
3. Press the DELICATES (∧) or the COLD (∨) keypad to scroll
through the programmable options until CNP- appears in the
display.
4.
When CNP- appears in the display, press the START (enter)
keypad.
5.
When CNP 5 appears in the display, press the START (enter)
keypad. A number will appear in the display corresponding to
the number of minutes to be added to steps that have Rinse 1
selected as their status.
6. Press the DELICATES (∧) or the COLD (∨) keypad to in-
crease or decrease the current number of minutes.
NOTE: To go back to the current programmable op-
tion without changing the value, press the WARM (<)
keypad.
7. Press the START (enter) keypad when the correct value ap-
pears in the display. The new value is saved and the next op-
tion will appear in the display.
How to Program Cycle Modifier HEAVY Additional
Wash Time CNP 6
This option allows the owner to add additional time to agitate
steps that have wash selected as their status. The additional wash
time option needs to be turned on for the Cycle Modifier HEAVY
Additional Wash Time to take effect.
1. Control must be in Manual Mode. Refer to How to Enter the
Manual Mode.
2. Press the DELICATES (∧) or the COLD (∨) keypad until
Prog appears in the display. Press the START (enter) keypad,
and AtS 1 will appear in the display.
3. Press the DELICATES (∧) or the COLD (∨) keypad to scroll
through the programmable options until CNP- appears in the
display.
4.
When CNP- appears in the display, press the START (enter)
keypad.
5. Press the DELICATES (∧) or the COLD (∨) keypad to scroll
through the programmable options until CNP 6 appears in the
display.
6.
When CNP 6 appears in the display, press the START (enter)
keypad. A number will appear in the display corresponding to
the number of minutes to be added to steps that have Wash se-
lected as their status.
7. Press the DELICATES (∧) or the COLD (∨) keypad to in-
crease or decrease the current number of minutes.
8. Press the START (enter) keypad when the correct value ap-
pears in the display. The new value is saved and the next op-
tion will appear in the display.
How to Program Cycle Modifier HEAVY Additional
Extra Rinse Time CNP 7
This option allows the owner to add additional agitate time to ex-
tra rinse steps. The additional rinse time option needs to be turned
on for the Cycle Modifier HEAVY Additional Extra Rinse Time
to take effect.
1. Control must be in Manual Mode. Refer to How to Enter the
Manual Mode.
2. Press the DELICATES (∧) or the COLD (∨) keypad until
Prog appears in the display. Press the START (enter) keypad,
and AtS 1 will appear in the display.
3. Press the DELICATES (∧) or the COLD (∨) keypad to scroll
through the programmable options until CNP- appears in the
display.
4.
When CNP- appears in the display, press the START (enter)
keypad.
5. Press the DELICATES (∧) or the COLD (∨) keypad to scroll
through the programmable options until CNP 7 appears in the
display.
6.
When CNP 7 appears in the display, press the START (enter)
keypad. A number will appear in the display corresponding to
Programming Control
©
Copyright, Alliance Laundry Systems LLC -
DO NOT COPY or TRANSMIT
60 Part No. 204370ENR1

the number of minutes to be added to steps that have Rinse 1
selected as their status.
7. Press the DELICATES (∧) or the COLD (∨) keypad to in-
crease or decrease the current number of minutes
8. Press the START (enter) keypad when the correct value ap-
pears in the display. The new value is saved and the next op-
tion will appear in the display.
Cycle Parameters CyCP-
This option allows the owner to set the amount of time for vari-
ous steps in each type of cycle. For programmable options refer
to table below.
1. Control must be in Manual Mode. Refer to How to Enter the
Manual Mode.
2. Press the DELICATES (∧) or the COLD (∨) keypad until
Prog appears in the display. Press the START (enter) keypad,
and AtS 1 will appear in the display.
3. Press the DELICATES (∧) or the COLD (∨) keypad to scroll
through the programmable options until CyCP- appears in the
display. Press the START (enter) keypad and CyCP 1 will
appear in the display.
4.
When CyCP 1 appears in the display, press the START (en-
ter) keypad. The current number of minutes set will appear in
the display.
5. Press the DELICATES (∧) or the COLD (∨) keypad to in-
crease or decrease the current number of minutes shown in
the display to the desired number of minutes.
6. Press the START (enter) keypad when the correct value ap-
pears in the display. The new value is saved and the next op-
tion will appear in the display.
Programmable Options
Option Display Description
CyCP 1
Normal Wash Agitate Time
CyCP 2
Normal Rinse Agitate Time
CyCP 3
Normal Extra Rinse Agitate
Time
CyCP 4
Normal Final Spin Time
CyCP 5
Perm Press Wash Agitate Time
CyCP 6
Perm Press Rinse Agitate
Time
CyCP 7
Perm Press Extra Rinse Agi-
tate Time
CyCP 8
Perm Press Final Spin Time
CyCP 9
Delicate Wash Agitate Time
Table continues...
Option Display Description
CyCP 10
Delicate Rinse Agitate Time
CyCP 11
Delicate Extra Rinse Agitate
Time
CyCP 12
Delicate Final Spin Time
CyCP 13
Warm Rinse Option Global
CyCP 14
Timed Hot Fill/Spray Rinse
Low Power-Auto Shutdown 1 Days
Enable LPAS 1
This option allows the owner to set Low Power/Auto Shutdown
on certain day(s) of the week. Low Power and/or Auto Shutdown
days/duration are programmed using an external device or net-
work.
1. Control must be in Manual Mode. Refer to How to Enter the
Manual Mode.
2. Press the DELICATES (∧) or the COLD (∨) keypad until
Prog appears in the display. Press the START (enter) keypad,
and AtS 1 will appear in the display.
3. Press the DELICATES (∧) or the COLD (∨) keypad to scroll
through the programmable options until LPAS 1 appears in
the display.
4.
When LPAS 1 appears in the display, press the START (en-
ter) keypad. The current Low Power/Auto Shutdown 1 Days
Enable status will appear in the display.
on = Option Enabled
oFF = Option Disabled (factory default setting)
5. Press the DELICATES (∧) or the COLD (∨) keypad to change
the current status.
6. Press the START (enter) keypad when the correct value ap-
pears in the display. The new value is saved and the next op-
tion will appear in the display.
Low Power-Auto Shutdown 2 Days
Enable LPAS 2
This option allows the owner to set Low Power/Auto Shutdown
on certain day(s) of the week. Low Power and/or Auto Shutdown
days/duration are programmed using an external device or net-
work.
1. Control must be in Manual Mode. Refer to How to Enter the
Manual Mode.
2. Press the DELICATES (∧) or the COLD (∨) keypad until
Prog appears in the display. Press the START (enter) keypad,
and AtS 1 will appear in the display.
Programming Control
©
Copyright, Alliance Laundry Systems LLC -
DO NOT COPY or TRANSMIT
61 Part No. 204370ENR1

3. Press the DELICATES (∧) or the COLD (∨) keypad to scroll
through the programmable options until LPAS 2 appears in
the display.
4.
When LPAS 2 appears in the display, press the START (en-
ter) keypad. The current Low Power/Auto Shutdown 2 Days
Enable status will appear in the display.
on = Option Enabled
oFF = Option Disabled (factory default setting)
5. Press the DELICATES (∧) or the COLD (∨) keypad to change
the current status.
6. Press the START (enter) keypad when the correct value ap-
pears in the display. The new value is saved and the next op-
tion will appear in the display.
Low Power-Auto Shutdown 3 Days
Enable LPAS 3
This option allows the owner to set Low Power/Auto Shutdown
on certain day(s) of the week. Low Power and/or Auto Shutdown
days/duration are programmed using an external device or net-
work.
1. Control must be in Manual Mode. Refer to How to Enter the
Manual Mode.
2. Press the DELICATES (∧) or the COLD (∨) keypad until
Prog appears in the display. Press the START (enter) keypad,
and AtS 1 will appear in the display.
3. Press the DELICATES (∧) or the COLD (∨) keypad to scroll
through the programmable options until LPAS 3 appears in
the display.
4.
When LPAS 3 appears in the display, press the START (en-
ter) keypad. The current Low Power/Auto Shutdown 3 Days
Enable status will appear in the display.
on = Option Enabled
oFF = Option Disabled (factory default setting)
5. Press the DELICATES (∧) or the COLD (∨) keypad to change
the current status.
6. Press the START (enter) keypad when the correct value ap-
pears in the display. The new value is saved and the next op-
tion will appear in the display.
Low Power-Auto Shutdown 4 Days
Enable LPAS 4
This option allows the owner to set Low Power/Auto Shutdown
on certain day(s) of the week. Low Power and/or Auto Shutdown
days/duration are programmed using an external device or net-
work.
1. Control must be in Manual Mode. Refer to How to Enter the
Manual Mode.
2. Press the DELICATES (∧) or the COLD (∨) keypad until
Prog appears in the display. Press the START (enter) keypad,
and AtS 1 will appear in the display.
3. Press the DELICATES (∧) or the COLD (∨) keypad to scroll
through the programmable options until LPAS 4 appears in
the display.
4.
When LPAS 4 appears in the display, press the START (en-
ter) keypad. The current Low Power/Auto Shutdown 4 Days
Enable status will appear in the display.
on = Option Enabled
oFF = Option Disabled (factory default setting)
5. Press the DELICATES (∧) or the COLD (∨) keypad to change
the current status.
6. Press the START (enter) keypad when the correct value ap-
pears in the display. The new value is saved and the next op-
tion will appear in the display.
Power Fail Reset PF rst
This option allows the owner to set the amount of time the con-
trol will store active cycle information in the event of a power
failure. The default setting for Power Fail Reset is OFF. If Power
Fail Reset is turned OFF, the cycle will be saved.
1. Control must be in Manual Mode. Refer to How to Enter the
Manual Mode.
2. Press the DELICATES (∧) or the COLD (∨) keypad until
Prog appears in the display. Press the START (enter) keypad,
and AtS 1 will appear in the display.
3. Press the DELICATES (∧) or the COLD (∨) keypad to scroll
through the programmable options until PF rst appears in
the display.
4.
When PF rst appears in the display, press the START (en-
ter) keypad. oFF or a number will appear in the display. This
number corresponds to the current Power Fail Reset setting.
5. Press the DELICATES (∧) or the COLD (∨) keypad to in-
crease or decrease the current number to the desired number
selected from Table 11 .
6. Press the START (enter) keypad when the correct value ap-
pears in the display. The new value is saved and the next op-
tion will appear in the display.
How to Read Power Fail Reset Table
Use Table 11 to set the amount of time for Power Fail Reset.
oFF turns the option OFF. The current cycle status will be saved.
When power is restored, the cycle will begin where it was inter-
rupted.
Setting this option from 1 - 120 will save the cycle status without
power that number of minutes before the cycle is lost. A value of
0 will cause the cycle and vend to be lost any time a power fail-
ure occurs.
Programming Control
©
Copyright, Alliance Laundry Systems LLC -
DO NOT COPY or TRANSMIT
62 Part No. 204370ENR1

PF rst
DISPLAY TO ENTER IN
STEP 6
POWER FAIL RESET
TIME
oFF *
Turned OFF. Cycle will be
saved.
0 - 120
Number in minutes
0 - 120 minutes without pow-
er before cycle is lost
* Factory default setting.
Table 11
IR Access IrA En
This option allows the owner to enable or disable allowing the
control to be communicated with by an external IR device.
1. Control must be in Manual Mode. Refer to How to Enter the
Manual Mode.
2. Press the DELICATES (∧) or the COLD (∨) keypad until
Prog appears in the display. Press the START (enter) keypad,
and AtS 1 will appear in the display.
3. Press the DELICATES (∧) or the COLD (∨) keypad to scroll
through the programmable options until IrA En appears in
the display.
4.
When IrA En appears in the display, press the START (en-
ter) keypad. The current IR Access status will appear in the
display.
on = Option Enabled (factory default setting)
oFF = Option Disabled
5. Press the DELICATES (∧) or the COLD (∨) keypad to change
the current status.
6. Press the START (enter) keypad when the correct value ap-
pears in the display. The new value is saved and the next op-
tion will appear in the display.
Manual Rapid Advance rAPdEn
This option allows the owner to enable or disable the rapid ad-
vance feature. Refer to Rapid Advance Feature section for more
information.
1. Control must be in Manual Mode. Refer to How to Enter the
Manual Mode.
2. Press the DELICATES (∧) or the COLD (∨) keypad until
Prog appears in the display. Press the START (enter) keypad,
and AtS 1 will appear in the display.
3. Press the DELICATES (∧) or the COLD (∨) keypad to scroll
through the programmable options until rAPdEn appears in
the display.
4.
When rAPdEn appears in the display, press the START (en-
ter) keypad. The current Manual Rapid Advance status will
appear in the display.
0 = oFF (access requires password)
1 = on (access allowed) (factory default setting)
2 = DISABLED (access not allowed)
5. Press the DELICATES (∧) or the COLD (∨) keypad to change
the current status.
6. Press the START (enter) keypad when the correct value ap-
pears in the display. The new value is saved and the next op-
tion will appear in the display.
Manual Diagnostics diAgEn
This option allows the owner to enable or disable the manual di-
agnostics option. Refer to Testing Machine and Electronic Con-
trol Functions section for more information.
1. Control must be in Manual Mode. Refer to How to Enter the
Manual Mode.
2. Press the DELICATES (∧) or the COLD (∨) keypad until
Prog appears in the display. Press the START (enter) keypad,
and AtS 1 will appear in the display.
3. Press the DELICATES (∧) or the COLD (∨) keypad to scroll
through the programmable options until diAgEn appears in
the display.
4.
When diAgEn appears in the display, press the START (en-
ter) keypad. The current Manual Diagnostics status will ap-
pear in the display.
0 = oFF (access requires password)
1 = on (access allowed) (factory default setting)
2 = DISABLED (access not allowed)
5. Press the DELICATES (∧) or the COLD (∨) keypad to change
the current status.
6. Press the START (enter) keypad when the correct value ap-
pears in the display. The new value is saved and the next op-
tion will appear in the display.
Factory Test Ft En
This option allows the owner to enable or disable access to Facto-
ry Test.
1. Control must be in Manual Mode. Refer to How to Enter the
Manual Mode.
2. Press the DELICATES (∧) or the COLD (∨) keypad until
Prog appears in the display. Press the START (enter) keypad,
and AtS 1 will appear in the display.
3. Press the DELICATES (∧) or the COLD (∨) keypad to scroll
through the programmable options until Ft En appears in the
display.
Programming Control
©
Copyright, Alliance Laundry Systems LLC -
DO NOT COPY or TRANSMIT
63 Part No. 204370ENR1

4.
When Ft En appears in the display, press the START (enter)
keypad. The current Factory Test status will appear in the dis-
play.
on = Option Enabled (factory default setting)
oFF = Option Disabled
5. Press the DELICATES (∧) or the COLD (∨) keypad to change
the current status.
6. Press the START (enter) keypad when the correct value ap-
pears in the display. The new value is saved and the next op-
tion will appear in the display.
Lucky Cycle LUC-
This option allows the owner to program the machine to provide
a free or reduced vend cycle to users after a certain number of
machine cycles have occurred.
1. Control must be in Manual Mode. Refer to How to Enter the
Manual Mode.
2. Press the DELICATES (∧) or the COLD (∨) keypad until
Prog appears in the display. Press the START (enter) keypad,
and AtS 1 will appear in the display.
3. Press the DELICATES (∧) or the COLD (∨) keypad to scroll
through the programmable options until LUC- appears in the
display.
4.
When LUC- appears in the display, press the START (enter)
keypad. There are three programmable Lucky Cycle options.
Refer to Table 12 .
Display Lucky Cycle Options
LUC 1
Lucky Cycle Day(s) of
Week / Enable On/Off
Refer to Table 8 for pro-
gramming.
LUC 2
Lucky Cycle Number
(0-255)
LUC 3
Lucky Cycle Display Op-
tion On/Off
ON = Free vend. Lucky
cycle active after 4.25 mi-
nutes in Ready Mode.
OFF = Vend must be en-
tered. Remaining vend is
free. For example, after
entering a coin the price
will count down by Coin
1 value until vend is satis-
fied.
Table 12
NOTE: When the Lucky Cycle conditions have been
met, the display will show FrEE when the Display
Option is set to On.
5. Press the DELICATES (∧) or the COLD (∨) keypad to change
the current status.
6. Press the START (enter) keypad when the correct value ap-
pears in the display. The new value is saved and the next op-
tion will appear in the display.
Water Temperature Indicator tP ind
This option allows the owner to program the water temperature
indicator. If the Wash Temp Display is enabled the actual water
valve fill temperature will be indicated during the fill, supply, ag-
itate, or soak step by lighting the LED corresponding to the actual
temperature. If the option is enabled the control will light up the
LED of the water temperature for the current segment that the
control is in while running after the first fill.
1. Control must be in Manual Mode. Refer to How to Enter the
Manual Mode.
2. Press the DELICATES (∧) or the COLD (∨) keypad until
Prog appears in the display. Press the START (enter) keypad,
and AtS 1 will appear in the display.
3. Press the DELICATES (∧) or the COLD (∨) keypad to scroll
through the programmable options until tP ind appears in
the display.
4.
When tP ind appears in the display, press the START (en-
ter) keypad. The current Water Temperature Indicator status
will appear in the display.
on = Option Enabled
oFF = Option Disabled (factory default setting)
5. Press the DELICATES (∧) or the COLD (∨) keypad to change
the current status.
6. Press the START (enter) keypad when the correct value ap-
pears in the display. The new value is saved and the next op-
tion will appear in the display.
Programmable Close Lid Display PCdL
This option allows the owner to enable or disable allowing the
control to display the corresponding command to close the lid
along with the cycle time.
1. Control must be in Manual Mode. Refer to How to Enter the
Manual Mode.
2. Press the DELICATES (∧) or the COLD (∨) keypad until
Prog appears in the display. Press the START (enter) keypad,
and AtS 1 will appear in the display.
3. Press the DELICATES (∧) or the COLD (∨) keypad to scroll
through the programmable options until PCdL appears in the
display.
4.
When PCdL appears in the display, press the START (enter)
keypad. The current status will appear in the display.
Programming Control
©
Copyright, Alliance Laundry Systems LLC -
DO NOT COPY or TRANSMIT
64 Part No. 204370ENR1

on = Option Enabled (factory default setting)
oFF = Option Disabled
5. Press the DELICATES (∧) or the COLD (∨) keypad to change
the current status.
6. Press the START (enter) keypad when the correct value ap-
pears in the display. The new value is saved and the next op-
tion will appear in the display.
Programmable Push Start Display PPSt
This option allows the owner to enable or disable allowing the
control to display the corresponding command to press the
START (enter) keypad once the vend has been satisfied.
1. Control must be in Manual Mode. Refer to How to Enter the
Manual Mode.
2. Press the DELICATES (∧) or the COLD (∨) keypad until
Prog appears in the display. Press the START (enter) keypad,
and AtS 1 will appear in the display.
3. Press the DELICATES (∧) or the COLD (∨) keypad to scroll
through the programmable options until PPSt appears in the
display.
4.
When PPSt appears in the display, press the START (enter)
keypad. The current Push Start status will appear in the dis-
play.
on = Option Enabled (factory default setting)
oFF = Option Disabled
5. Press the DELICATES (∧) or the COLD (∨) keypad to change
the current status.
6. Press the START (enter) keypad when the correct value ap-
pears in the display. The new value is saved and the next op-
tion will appear in the display.
Programmable Open Lid Display PodL
This option allows the owner to enable or disable allowing the
control to display the corresponding command to open the lid
along with the cycle time when the cycle had completed.
1. Control must be in Manual Mode. Refer to How to Enter the
Manual Mode.
2. Press the DELICATES (∧) or the COLD (∨) keypad until
Prog appears in the display. Press the START (enter) keypad,
and AtS 1 will appear in the display.
3. Press the DELICATES (∧) or the COLD (∨) keypad to scroll
through the programmable options until PodL appears in the
display.
4.
When PodL appears in the display, press the START (enter)
keypad. The current status will appear in the display.
on = Option Enabled (factory default setting)
oFF = Option Disabled
5. Press the DELICATES (∧) or the COLD (∨) keypad to change
the current status.
6. Press the START (enter) keypad when the correct value ap-
pears in the display. The new value is saved and the next op-
tion will appear in the display.
Vend Price Display Override AtS do
This option allows the owner to override the previously set vend
price with a custom display that is set by the payment system.
The default display is CArd if the payment system does not mod-
ify it.
1. Control must be in Manual Mode. Refer to How to Enter the
Manual Mode.
2. Press the DELICATES (∧) or the COLD (∨) keypad until
Prog appears in the display. Press the START (enter) keypad,
and AtS 1 will appear in the display.
3. Press the DELICATES (∧) or the COLD (∨) keypad to scroll
through the programmable options until “ AtS do ” appears in
the display.
4.
When AtS do appears in the display, press the START (en-
ter) keypad. The current Vend Price Display Override status
will appear in the display.
on = Option Enabled
oFF = Option Disabled (factory default setting)
5. Press the DELICATES (∧) or the COLD (∨) keypad to change
the current status.
6. Press the START (enter) keypad when the correct value ap-
pears in the display. The new value is saved and the next op-
tion will appear in the display.
OPL Parameters oPL-
This option allows the owner to enable or disable the OPL Pa-
rameters in which no vend price needs to be satisfied to operate
the machine.
1. Control must be in Manual Mode. Refer to How to Enter the
Manual Mode.
2. Press the DELICATES (∧) or the COLD (∨) keypad until
Prog appears in the display. Press the START (enter) keypad,
and AtS 1 will appear in the display.
3. Press the DELICATES (∧) or the COLD (∨) keypad to scroll
through the programmable options until oPL- appears in the
display.
4.
When oPL- appears in the display, press the START (enter)
keypad to enter the OPL submenu.
5. Press the DELICATES (∧) or the COLD (∨) keypad to scroll
through the OPL submenu options.
6. Press the START (enter) keypad when the desired option ap-
pears in the display
OPL Mode Enable oPL 1
This option allows the owner to place the control in OPL Mode,
in which no vend price needs to be satisfied in order to start the
Programming Control
©
Copyright, Alliance Laundry Systems LLC -
DO NOT COPY or TRANSMIT
65 Part No. 204370ENR1

machine. If the control is in Start Mode, the cycle time will be
displayed. Pressing the START keypad will start the machine cy-
cle. Once a machine cycle has been started, each additional press
of the START keypad will advance the cycle to the next cycle
step only if Rapid Advance Programming Parameter is Enabled.
1. Control must be in Manual Mode. Refer to How to Enter the
Manual Mode.
2. Press the DELICATES (∧) or the COLD (∨) keypad until
Prog appears in the display. Press the START (enter) keypad,
and AtS 1 will appear in the display.
3. Press the DELICATES (∧) or the COLD (∨) keypad to scroll
through the programmable options until oPL- appears in the
display.
4.
When oPL- appears in the display, press the START (enter)
keypad to enter the OPL submenu.
5. Press the DELICATES (∧) or the COLD (∨) keypad to scroll
through the programmable options until oPL 1 appears in the
display.
6.
When oPL 1 appears in the display, press the START (enter)
keypad. The current OPL status will appear in the display.
on = Option Enabled
oFF = Option Disabled (factory default setting)
7. Press the DELICATES (∧) or the COLD (∨) keypad to change
the current status.
8. Press the START (enter) keypad when the correct value ap-
pears in the display. The new value is saved and the next op-
tion will appear in the display.
OPL Delayed Start oPL 2
This option allows the owner to enable delayed start mode which
can delay the cycle up to a maximum of 72 hours.
1. Control must be in Manual Mode. Refer to How to Enter the
Manual Mode.
2. Press the DELICATES (∧) or the COLD (∨) keypad until
Prog appears in the display. Press the START (enter) keypad,
and AtS 1 will appear in the display.
3. Press the DELICATES (∧) or the COLD (∨) keypad to scroll
through the programmable options until oPL- appears in the
display.
4.
When oPL- appears in the display, press the START (enter)
keypad to enter the OPL submenu.
5. Press the DELICATES (∧) or the COLD (∨) keypad to scroll
through the programmable options until oPL 2 appears in the
display.
6.
When oPL 2 appears in the display, press the START (enter)
keypad. The current OPL status will appear in the display.
on = Option Enabled
oFF = Option Disabled (factory default setting)
7. Press the DELICATES (∧) or the COLD (∨) keypad to change
the current status.
8. Press the START (enter) keypad when the correct value ap-
pears in the display. The new value is saved and the next op-
tion will appear in the display.
OPL Display Power Save oPL 3
This option allows the owner to enable the OPL Display Power
Save Feature. If enabled, after 255 seconds of no user input, the
control will turn off all LEDs and the display until user input oc-
curs. The OPL Display Power Save Feature will only turn off the
display if the control is in Start Mode.
1. Control must be in Manual Mode. Refer to How to Enter the
Manual Mode.
2. Press the DELICATES (∧) or the COLD (∨) keypad until
Prog appears in the display. Press the START (enter) keypad,
and AtS 1 will appear in the display.
3. Press the DELICATES (∧) or the COLD (∨) keypad to scroll
through the programmable options until oPL- appears in the
display.
4.
When oPL- appears in the display, press the START (enter)
keypad to enter the OPL submenu.
5. Press the DELICATES (∧) or the COLD (∨) keypad to scroll
through the programmable options until oPL 3 appears in the
display.
6.
When oPL 3 appears in the display, press the START (enter)
keypad. The current OPL status will appear in the display.
on = Option Enabled
oFF = Option Disabled (factory default setting)
7. Press the DELICATES (∧) or the COLD (∨) keypad to change
the current status.
8. Press the START (enter) keypad when the correct value ap-
pears in the display. The new value is saved and the next op-
tion will appear in the display.
Drop Off Mode droP
This option allows the owner to limit machine use to an attendant
without requiring vend. Refer to Drop-Off Mode for more details.
1. Control must be in Manual Mode. Refer to How to Enter the
Manual Mode.
2. Press the DELICATES (∧) or the COLD (∨) keypad until
Prog appears in the display. Press the START (enter) keypad,
and AtS 1 will appear in the display.
3. Press the DELICATES (∧) or the COLD (∨) keypad to scroll
through the programmable options until droP appears in the
display.
4.
When droP appears in the display, press the START (enter)
keypad. The current Drop Off Mode status will appear in the
display.
on = Option Enabled
oFF = Option Disabled (factory default setting)
Programming Control
©
Copyright, Alliance Laundry Systems LLC -
DO NOT COPY or TRANSMIT
66 Part No. 204370ENR1

5. Press the DELICATES (∧) or the COLD (∨) keypad to change
the current status.
6. Press the START (enter) keypad when the correct value ap-
pears in the display. The new value is saved and the next op-
tion will appear in the display.
Out of Order oUt
This option allows the owner to disable machine use by display-
ing an out of order message.
1. Control must be in Manual Mode. Refer to How to Enter the
Manual Mode.
2. Press the DELICATES (∧) or the COLD (∨) keypad until
Prog appears in the display. Press the START (enter) keypad,
and AtS 1 will appear in the display.
3. Press the DELICATES (∧) or the COLD (∨) keypad to scroll
through the programmable options until oUt appears in the
display.
4.
When oUt appears in the display, press the START (enter)
keypad. The current Out of Order status will appear in the dis-
play.
on = Option Enabled
oFF = Option Disabled (factory default setting)
5. Press the DELICATES (∧) or the COLD (∨) keypads to
change the current status.
6. Press the START (enter) keypad when the correct value ap-
pears in the display. The new value is saved and the next op-
tion will appear in the display.
Programming Control
©
Copyright, Alliance Laundry Systems LLC -
DO NOT COPY or TRANSMIT
67 Part No. 204370ENR1

Collecting Audit Information
This feature allows the owner to retrieve audit information stored
in the washer by pressing a sequence of pads on the control.
How to Enter Audit Feature
There are two methods the owner can use to enter the Audit Fea-
ture.
Entering the Audit Feature by Manual
Mode
1. Control must be in Manual Mode. Refer to How to Enter the
Manual Mode.
2. Press the DELICATES (∧) or the COLD (∨) keypad to scroll
through the programmable options until AUdit appears in the
display.
3.
Press the START keypad and CyCLES will appear in the dis-
play.
Entering the Audit Feature with the
Coin Vault Open
1. Open coin vault. Make sure service door is closed.
2. Press the START (enter) keypad.
How to Read Audit Data
1. Press the DELICATES (∧) or the COLD (∨) keypad to scroll
through the programmable options. Refer to Table 13 .
2. When the desired option appears in the display press the
START (enter) keypad. The current value will appear in the
display.
3. Press the WARM keypad. The display will return to the audit
option list.
Programmable Options
CyCLES
Total Number of Machine
Cycles
Coin 1
Total Number of Coins #1
Coin 2
Total Number of Coins #2
PULSE
Total Number of Start Pulses
rAPCyC
Total Number of Rapid Ad-
vance Cycles
rUnHrS
Total Number of Run Hours
rCoin1
Resettable Coin #1 Count
Table 13 continues...
rCoin2
Resettable Coin #2 Count
rCyCLE
Resettable machine Cycle
Count
Table 13
How to Exit Audit Feature
1. Press the WARM (<) keypad until the control returns to
Ready Mode.
2. To exit Audit Feature when using Coin Vault Open method,
owner must close coin vault. The control will then return to
Ready Mode.
Collecting Audit Information
©
Copyright, Alliance Laundry Systems LLC -
DO NOT COPY or TRANSMIT
68 Part No. 204370ENR1

Manual Reset
This feature allows the owner to reset the washer control’s pro-
gramming data to the factory default settings by pressing a se-
quence of pads on the control.
How to Enter Manual Reset
1. Control must be in Manual Mode. Refer to How to Enter the
Manual Mode.
2. Press the DELICATES (∧) or the COLD (∨) keypad until
Prog appears in the display. Press the START (enter) keypad,
and AtS 1 will appear in the display.
3. Press the DELICATES (∧ ) or the COLD (∨ ) keypad to scroll
through the programmable options until rESEt appears in the
display.
4.
Press the START (enter) keypad. no will appear in the dis-
play.
5. Press the DELICATES (∧) or the COLD (∨) keypad to change
the value to yes.
6. Press the START (enter) keypad when the correct value ap-
pears in the display.
Manual Reset
©
Copyright, Alliance Laundry Systems LLC -
DO NOT COPY or TRANSMIT
69 Part No. 204370ENR1

Testing Machine and Electronic Control
Functions
This feature allows the owner to run diagnostic tests on various
washer operations without servicing the washer. The following
tests are available:
• Front-End Control Software Version # Test
• Input/Output Board Software Version # Test
• Service Door Switch Input Test
• Coin Vault Switch Input Test
• Coin Drop #1 Input Test
• Coin Drop #2 Input Test
• Vend Connection Header Present Input Test
• Start Pulse Input Test
• Lid Switch Input Test*
• Show Fill Time Test
• Show Drain Time Test
• External Output Test*
• Water Purge Test*
• Water Leak Detection Test*
• Water Level Test
• Machine Configuration #1 Display Test
• Machine Configuration #2 Display Test
• Machine Configuration #3 Display Test
• Machine Configuration #4 Display Test
• Machine Configuration #5 Display Test
* Tests can only be entered when in Start or Ready Mode.
For an overview of the manual diagnostic test feature, refer to the
flowchart on the following page.
How to Enter Testing Feature
1. Control must be in Manual Mode. Refer to How to Enter the
Manual Mode.
2. Press the DELICATES (∧) or the COLD (∨) keypad to scroll
through the programmable options until dIAg appears in the
display.
3.
Press the START (enter) keypad. Display will change to d 1
indicating the control software version number test.
4. Press the DELICATES (∧) or the COLD (∨) keypad to scroll
through the diagnostic test options.
How to Start Tests
1. To start a diagnostic test, refer to the quick reference chart be-
low.
2. Press the START (enter) keypad when the desired test number
is displayed. For detailed information on each test, read the
appropriate description.
How to Exit Testing Feature
Press the WARM (<) keypad until the display returns to the pre-
vious mode of operation.
Testing Machine and Electronic Control Functions
©
Copyright, Alliance Laundry Systems LLC -
DO NOT COPY or TRANSMIT
70 Part No. 204370ENR1

Diagnostic (Testing) Mode – Quick Reference Chart
Test Number Diagnostic Mode Display
d 1
Control Software Version # Test
S ---
d 2
Input/Output Board Software Version #
Test
ob --
d 8
Service Door Opening Test
S oP or S CL
d 9
Coin Vault Opening Test
v oP or v CL
d 10
Coin Drop #1 Input Test
C1 --
d 11
Coin Drop #2 Input Test
C2 --
d 12
Vend Header Present Status Test
CH oP (Open) or CH CL (Closed)
d 13
Start Pulse Test
St --
d 15
Lid Switch Input Test
Lid oP, Lid CL
d 17
Show Fill Time Test
FL ---
d 18
Show Drain Time Test
dr ---
d 23
External Output Test
ES - or ES -on
d 24
Water Purge Test
CLoSE, Lid, PUrgE or FLUSH
d 25
Water Leak Detection Test
PASS, E Ld, E LF or Ld
CLoSE, Lid
d 26
Water Level Test
L --- or L ---.
d 29
Machine Configuration #1 Display Test
A ---
d 30
Machine Configuration #2 Display Test
b ---
d 31
Machine Configuration #3 Display Test
C ---
d 32
Machine Configuration #4 Display Test
d ---
d 33
Machine Configuration #5 Display Test
E ---
Table 14
Testing Machine and Electronic Control Functions
©
Copyright, Alliance Laundry Systems LLC -
DO NOT COPY or TRANSMIT
71 Part No. 204370ENR1
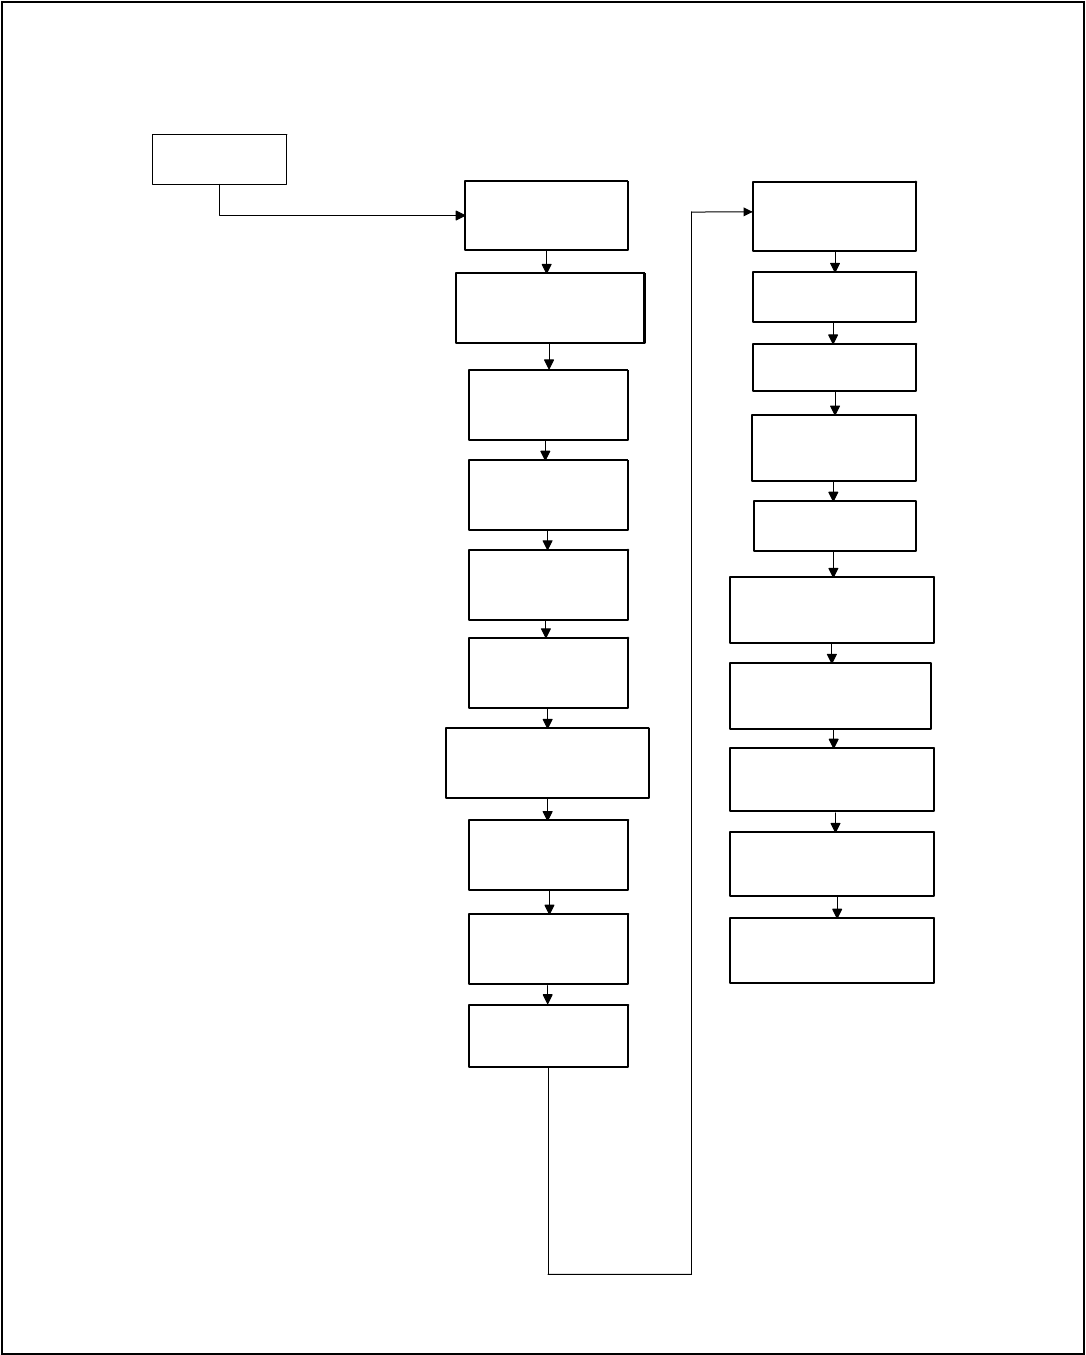
• Press the START (enter) keypad to diplay Diagnostic Test options.
• Press the DELICATES or the COLD keypad to scroll through the Diagnostic Test options.
• To enter a test, press the START (enter) keypad.
• To exit a test, press the WARM keypad.
"d 1"
Control Software
Version Number Test
"d 2"
Input/Output Board
Software Version # Test
"d 8"
Service Door Switch
Input Test
"d 9"
Coin Vault Switch
Input Test
"dIAg"
Diagnostic Tests
"d 10"
Coin Drop #1
Input Test
"d 11"
Coin Drop #2
Input Test
"d 12"
Vend Connection Header
Present Input Test
"d 13"
Start Pulse
Input Test
"d 15"
Lid Switch
Input Test
"d 17"
Show Fill
Time Test
TLW51R_SVG
"d 18"
Show Drain
Time Test
"d 23"
External Output Test
"d 24"
Water Purge Test
"d 26"
Water Level Test
"d 29"
Machine Configuration #1
Display Test
"d 25"
Water Leak
Detection Test
"d 30"
Machine Configuration #2
Display Test
"d 31"
Machine Configuration #3
Display Test
"d 32"
Machine Configuration #4
Display Test
"d 33"
Machine Configuration #5
Display Test
Figure 12
Testing Machine and Electronic Control Functions
©
Copyright, Alliance Laundry Systems LLC -
DO NOT COPY or TRANSMIT
72 Part No. 204370ENR1

Diagnostic Test Descriptions
Control Software Version Number Test d 1
This option displays the control software version number. To start
test, control must be in the Testing Mode. Refer to How to Enter
Testing Feature at the beginning of this section.
To enter, press the START (enter) keypad. The display will show
S XX where XX is the software version number.
To exit the Software Version Number Test, press the WARM (<)
keypad. The control will return to the Testing Mode.
Input/Output Software Version # Test d 2
This option displays the drive board software version number. To
start test, control must be in the Testing Mode. Refer to How to
Enter Testing Feature at the beginning of this section.
To enter, press the START (enter) keypad. The display will show
ob XX where XX is the software version number.
To exit the Drive Board #1 Version Test, press the WARM (<)
keypad. The control will return to the Testing Mode.
Service Door Opening Test d 8
This option tests the service door switch. To start test, control
must be in the Testing Mode. Refer to How to Enter Testing Fea-
ture at the beginning of this section.
To enter, press the START (enter) keypad. The display will show
S oP when the service door switch is open and S CL when the
service door switch is closed.
The service door switch has to be closed for at least one second
and opened for at least one second for the display to change. This
test will add a count to the service door opening counter for the
audit and save the date/time for each opening.
To exit the Service Door Opening Test, press the WARM (<) key-
pad. The control will return to the Testing Mode.
Coin Vault Opening Test d 9
This option tests the coin vault switch. To start test, the control
must be in the Testing Mode. Refer to How to Enter Testing Fea-
ture at the beginning of this section.
To enter, press the START (enter) keypad. The display will show
v oP when the coin vault switch is open and v CL when the
coin vault switch is closed.
The coin vault switch has to be closed for at least one second and
opened for at least one second for the display to change. This test
will add a count to the coin vault opening counter for the audit
and save the time/date for each opening.
To exit the Coin Vault Opening Test, press the WARM (<) key-
pad. The control will return to the Testing Mode.
Coin Drop 1 Input Test d 10
This option tests coin drop #1. To start test, control must be in the
Testing Mode. Refer to How to Enter Testing Feature at the be-
ginning of this section.
To enter, press the START (enter) keypad. The display will show
C1 XX. The XX will show the number of coins entered and will
increment one for each coin entered in coin drop #1.
NOTE: Coins entered in test mode will not increment
the total # of coins counter that is accessed in the audit
feature.
To exit the Coin Drop #1 Input Test, press the WARM (<) key-
pad. The control will return to the Testing Mode.
Coin Drop 2 Input Test d 11
This option tests coin drop #2. To start test, control must be in the
Testing Mode. Refer to How to Enter Testing Feature at the be-
ginning of this section.
To enter, press the START (enter) keypad. The display will show
C2 XX. The XX will show the number of coins entered and will
increment one for each coin entered in coin drop #2.
NOTE: Coins entered in test mode will not increment
the total # of coins counter that is accessed in the audit
feature.
To exit the Coin Drop #2 Input Test, press the WARM (<) key-
pad. The control will return to the Testing Mode.
Vend Connection Header Present Test d 12
This option tests the vend header connection. To start test, control
must be in Testing Mode. Refer to How to Enter Testing Feature
at the beginning of this section.
To enter, press the START (enter) keypad. The display will show
CH oP when the wiring connection is open and CH CL when the
connection is closed.
To exit Vend Connection Header Present Test, press the WARM
(<) keypad. The control will return to the Testing Mode.
Start Pulse Test d 13
This option tests the Start Pulse. To start test, control must be in
the Testing Mode. Refer to How to Enter Testing Feature at the
beginning of this section.
To enter, press the START (enter) keypad. The display will show
St XX. The XX will show the number of pulses entered. This test
will add counts to the total number of Start Pulses counter. Refer
to Collecting Audit Information.
To exit the Start Pulse Test, press the WARM (<) keypad. The
control will return to the Testing Mode.
Lid Switch Input Test d 15
This test will display whether the washer lid is open or closed.
Testing Machine and Electronic Control Functions
©
Copyright, Alliance Laundry Systems LLC -
DO NOT COPY or TRANSMIT
73 Part No. 204370ENR1

To start test, control must be in the Testing Mode. Refer to How
to Enter Testing Feature at the beginning of this section.
To enter, press the START (enter) keypad. If the lid is closed, the
display will show Lid CL. If the lid is open, the display will
show Lid oP.
To exit the test, press the WARM (<) keypad. The control will re-
turn to the Testing Mode.
Show Fill Time Test d 17
This test will display the average fill time. This average will be
calculated by taking the average of the last 10 fill times.
To start test, control must be in the Testing Mode. Refer to How
to Enter Testing Feature at the beginning of this section.
To enter, press the START (enter) keypad. The display will show
FL XXX. The XXX will be the average fill time in seconds.
To exit the Show Fill Time Test, press the WARM (<) keypad.
The control will return to the Testing Mode.
Show Drain Time Test d 18
This test will display the average drain time. This average will be
calculated by taking the average of the last 10 drain times.
To start test, control must be in the Testing Mode. Refer to How
to Enter Testing Feature at the beginning of this section.
To enter, press the START (enter) keypad. The display will show
dr XXX. The XXX will be the average fill time in seconds.
To exit the Show Drain Time Test, press the WARM (<) keypad.
The control will return to the Testing Mode.
External Outputs Test d 23
This test will allow any one of the external outputs to be selected.
To start test, control must be in the Testing Mode. Refer to How
to Enter Testing Feature at the beginning of this section.
To enter, press the START (enter) keypad. The display will show
ES X where X is the output number. Press the DELICATES (∧)
or the COLD (∨) keypad to scroll through the outputs.
Press the START (enter) keypad to energize the selected external
output. ES Xon will be displayed. Press the START (enter) again
or the WARM (<) keypad to turn off the selected external output.
To exit the External Outputs Test, press the WARM (<) keypad.
The control will return to the Testing Mode.
Water Purge Test d 24
This test allows the user to test water removal from the machine.
To start test, control must be in the Testing Mode. Refer to How
to Enter Testing Feature at the beginning of this section.
To enter, press the START (enter) keypad. The display will show
PUrgE and the START (enter) keypad LED will flash. Begin the
test by pressing START (enter). If the lid is open, CLoSE, Lid
will be displayed to prompt the user to close the lid. When the
START (enter) pad is pressed with the lid closed, FLUSH will be
diplayed.
The control will energize all water valves, enable high speed spin
and enable the pump. Press any keypad to end the test. The test
will end automatically after 3 minutes or if the lid is opened.
To exit the Water Purge Test, press the WARM (<) keypad. The
control will return to the Testing Mode.
Water Leak Detection Test d 25
This test allows the user to check for water leaking from the ma-
chine. To start test, control must be in the Testing Mode. Refer to
How to Enter Testing Feature at the beginning of this section.
To enter, press the START (enter) keypad. The display will show
Ld and the START (enter) keypad LED will flash. Begin the test
by pressing START (enter). If the lid is open, CLoSE, Lid will
be displayed to prompt the user to close the lid. When the START
(enter) pad is pressed with the lid closed, the test will begin. The
cold water valve will turn on until the Medium water level is
reached.
After a 10 second pause to allow the water pressure to stabilize,
the control will record the current water level from the electronic
water level sensing input and continue to monitor the water level
for two minutes. The display will show a sequence of horizontal
LED segments to indicate it is monitoring the water level.
After two minutes, the control will compare the ending water lev-
el with the level at the start. If the water level has dropped or
raised, the display will show E Ld to signify a drain leak or E
LF to signify a fill leak. If the water level has not dropped or
raised, the display will show PASS.
Then the control will spin out the tub. When the water has been
drained out of the machine, the control will display the result
message. The error message is an indication to the machine own-
er that there should be service attention devoted to the fill valve
or pump on the machine to diagnose where the water leak is orig-
inating.
To stop the test while it is running, press the WARM (<) keypad.
The test will stop and the control will go back to the beginning of
the test sequence.
To exit the Water Leak Detection Test, press the WARM (<) key-
pad. The control will return to the Testing Mode.
Water Level Test d 26
This test displays the water level as determined by the water level
sensor. To start test, control must be in the Testing Mode. Refer to
How to Enter Testing Feature at the beginning of this section.
To enter, press the START (enter) keypad. The display will show
L XXX where XXX is the water level in 0.1 inch precision where
a value of 05 equals 0.5 inches. If the rightmost decimal point is
lit, the value is negative.
Testing Machine and Electronic Control Functions
©
Copyright, Alliance Laundry Systems LLC -
DO NOT COPY or TRANSMIT
74 Part No. 204370ENR1

To exit the Water Level Test, press the WARM (<) keypad. The
control will return to the Testing Mode.
Configuration 1 Display Test d 29
This option shows the machine configuration values. To start test,
control must be in the Testing Mode. Refer to How to Enter Test-
ing Feature at the beginning of this section.
To enter, press the START (enter) keypad. For configuration val-
ue #1, the display will show A XXX. XX is a number correspond-
ing to whether or not coin drops are connected, a card reader or
network board are connected, or whether the life-test jumper is
present. Refer to Table 15 .
To exit a Configuration Display Test, press the WARM (<) key-
pad. The control will return to the Testing Mode.
Each column of the table below contains a unique combination of
the words “YES” and “NO” that indicates if that column’s con-
nection is present.
Testing Machine and Electronic Control Functions
©
Copyright, Alliance Laundry Systems LLC -
DO NOT COPY or TRANSMIT
75 Part No. 204370ENR1

Configura-
tion Value
Life Test
Jumper
Present
Comm
Board "B"
Header
Present
Comm
Board "A"
Header
Present
Vend Con-
nection
Present
Coin Drop
#2 Present
Coin Drop
#1 Present
0 NO NO NO NO NO NO
1 NO NO NO NO NO YES
2 NO NO NO NO YES NO
3 NO NO NO NO YES YES
4 NO NO NO YES NO NO
5 NO NO NO YES NO YES
6 NO NO NO YES YES NO
7 NO NO NO YES YES YES
8 NO NO YES NO NO NO
9 NO NO YES NO NO YES
10 NO NO YES NO YES NO
11 NO NO YES NO YES YES
12 NO NO YES YES NO NO
13 NO NO YES YES NO YES
14 NO NO YES YES YES NO
15 NO NO YES YES YES YES
16 NO YES NO NO NO NO
17 NO YES NO NO NO YES
18 NO YES NO NO YES NO
19 NO YES NO NO YES YES
20 NO YES NO YES NO NO
21 NO YES NO YES NO YES
22 NO YES NO YES YES NO
23 NO YES NO YES YES YES
24 NO YES YES NO NO NO
25 NO YES YES NO NO YES
26 NO YES YES NO YES NO
27 NO YES YES NO YES YES
28 NO YES YES YES NO NO
29 NO YES YES YES NO YES
30 NO YES YES YES YES NO
Table 15 continues...
Testing Machine and Electronic Control Functions
©
Copyright, Alliance Laundry Systems LLC -
DO NOT COPY or TRANSMIT
76 Part No. 204370ENR1

Configura-
tion Value
Life Test
Jumper
Present
Comm
Board "B"
Header
Present
Comm
Board "A"
Header
Present
Vend Con-
nection
Present
Coin Drop
#2 Present
Coin Drop
#1 Present
31 NO YES YES YES YES YES
32 YES NO NO NO NO NO
33 YES NO NO NO NO YES
34 YES NO NO NO YES NO
35 YES NO NO NO YES YES
36 YES NO NO YES NO NO
37 YES NO NO YES NO YES
38 YES NO NO YES YES NO
39 YES NO NO YES YES YES
40 YES NO YES NO NO NO
41 YES NO YES NO NO YES
42 YES NO YES NO YES NO
43 YES NO YES NO YES YES
44 YES NO YES YES NO NO
45 YES NO YES YES NO YES
46 YES NO YES YES YES NO
47 YES NO YES YES YES YES
48 YES YES NO NO NO NO
49 YES YES NO NO NO YES
50 YES YES NO NO YES NO
51 YES YES NO NO YES YES
52 YES YES NO YES NO NO
53 YES YES NO YES NO YES
54 YES YES NO YES YES NO
55 YES YES NO YES YES YES
56 YES YES YES NO NO NO
57 YES YES YES NO NO YES
58 YES YES YES NO YES NO
59 YES YES YES NO YES YES
60 YES YES YES YES NO NO
61 YES YES YES YES NO YES
Table 15 continues...
Testing Machine and Electronic Control Functions
©
Copyright, Alliance Laundry Systems LLC -
DO NOT COPY or TRANSMIT
77 Part No. 204370ENR1

Configura-
tion Value
Life Test
Jumper
Present
Comm
Board "B"
Header
Present
Comm
Board "A"
Header
Present
Vend Con-
nection
Present
Coin Drop
#2 Present
Coin Drop
#1 Present
62 YES YES YES YES YES NO
63 YES YES YES YES YES YES
Table 15
Configuration 2 Display Test d 30
This option is not used on this model.
Configuration 3 Display Test d 31
This option is not used on this model.
Configuration 4 Display Test d 32
This option shows the user which dipswitches are set on the con-
trol.
To start test, control must be in the Testing Mode. Refer to How
to Enter Testing Feature at the beginning of this section.
To Enter, press the START (enter) keypad. The display will show
d XXX with XXX representing a configuration value as shown
in Table 16 .
If supply voltage is 100-127 Volt per phase, the voltage configu-
ration should be 120 Volt.
If supply voltage is 200-240 Volt per phase, the voltage configu-
ration should be 240 Volt.
To exit Machine Configuration 4 Display Test, press the WARM
(<) keypad. The control will return to the Testing Mode.
Each column in the table below contains a unique combination of
the words “ON” and “OFF” that indicates if that column’s dips-
witch is set on or off when the value is displayed. All other dips-
witches are not used.
Configuration Value
Dipswitch 3
Payment System Not Present
(OFF)
Payment System Present (ON)
Dipswitch 1
120 Volt Supply (OFF)
240 Volt Supply (ON)
0 OFF OFF
1 OFF ON
2 OFF OFF
3 OFF ON
4 ON OFF
5 ON ON
6 ON OFF
7 ON ON
Table 16
Configuration 5 Display Test d 33
This option is not used on this model.
Testing Machine and Electronic Control Functions
©
Copyright, Alliance Laundry Systems LLC -
DO NOT COPY or TRANSMIT
78 Part No. 204370ENR1

Factory Test
To Enter Factory Test
1. Be certain control is in Ready Mode or Start Mode and access
panel or coin vault is open.
2. While pressing and holding the HEAVY modifier keypad with
one hand, press the HOT keypad with the other hand.
3. When the control enters Factory Test, it will display the first
test step, Machine Type.
4. The control will advance through the sequence of test steps
whenever START (enter) is pressed, with the exception of the
Keypad Test and Pressure Sensor Test. Refer to the table be-
low for all tests in the Factory Test.
To Exit Factory Test
To exit a test step, disconnect the machine from electrical power.
Factory Test Cycle Quick Reference Chart
Display Test Mode Comments
tL
Machine Type Topload washer is the machine type.
S---
Software Version Number
--- is the control version number.
ob--
Output Board Version Number
-- is the output board software version
number.
A-
Control Level The control will display the control type
where - is the control level.
00
Dip Switch Value The control will display the status of dip
switches 1 to 8. If a dipswitch is ON, the
value shown will be 1. If the dipswitch is
OFF, the value will be 0.
PA--
Keypad Test
-- is the number of the keypad being
pressed. You need to press all keypads to
advance to the next step.
8.8.8.8
Display Test All LEDs and display segments will
light.
C-C-
Coin Drop Test
- is the number of coins entered. For du-
al coin drops, coin drop 1 is shown on the
left of the display and coin drop 2 is
shown on the right of the display.
Card, LCSU or SU
Card Reader Test
Card is displayed when a card reader is
connected but not driving the display.
LCSU is displayed when a programming/
set-up card is needed. SU is displayed
when a programming/set-up card was
successful.
S oP or S CL
Service Door Switch Test
S oP is displayed when service door
switch is open. S CL is displayed when
service door switch is closed.
Table 17 continues...
Testing Machine and Electronic Control Functions
©
Copyright, Alliance Laundry Systems LLC -
DO NOT COPY or TRANSMIT
79 Part No. 204370ENR1

Factory Test Cycle Quick Reference Chart
Display Test Mode Comments
U oP or U CL
Coin Vault Test
U oP is displayed when coin vault
switch is open. U CL is displayed when
coin vault switch is closed.
0001
High Speed Spin SPIN LED is lit and the control energizes
the high speed spin motor outputs.
0002
Hot Water Fill Hot water fill valve is turned on.
0003
Cold Water Fill Cold water fill valve is turned on.
0004
Pressure Sensor Fill Hot and Cold water valves are turned on
until the tub fill level is reached. Test
cannot be advanced until the step is com-
plete.
0005
High Agitate RINSE LED is lit and the control energi-
zes the high speed agitate motor outputs.
0006
Low Agitate RINSE LED is lit and the control energi-
zes the low speed agitate motor outputs.
0007
Low Speed Spin SPIN LED is lit and the control energizes
the low speed spin motor outputs.
0008
High Speed Spin SPIN LED is lit and the control energizes
the high speed spin motor outputs.
0009
Warm Water Fill Hot and Cold water valves are turned on.
0010
High Speed Spin SPIN LED is lit and the control energizes
the high speed spin motor outputs.
0011
Auxilliary Output 1 The control energizes the Auxiliary Out-
put 1.
0012
Auxilliary Output 2 The control energizes the Auxiliary Out-
put 2.
0013
Auxilliary Output 3 The control energizes the Auxiliary Out-
put 3.
0014
Auxilliary Output 4 The control energizes the Auxiliary Out-
put 4.
Table 17 continues...
Testing Machine and Electronic Control Functions
©
Copyright, Alliance Laundry Systems LLC -
DO NOT COPY or TRANSMIT
80 Part No. 204370ENR1

Factory Test Cycle Quick Reference Chart
Display Test Mode Comments
Pd
Power Down This is the final step of Factory Test. The
control will display Pd to signify that
factory test has been completed and that
the user can safely unplug the machine.
Cycling power to the machine is the only
way to resume normal operation and the
control will stay in this state indefinitely
until that time.
Table 17
Testing Machine and Electronic Control Functions
©
Copyright, Alliance Laundry Systems LLC -
DO NOT COPY or TRANSMIT
81 Part No. 204370ENR1

Error Codes
Following is a list of possible error codes for an electronic con-
trol. Errors beginning with Ei refer to external device Infra-red
communication errors. Errors beginning with EC refer to card
reader errors. All other errors refer to machine errors.
NOTE: Fatal Errors will show oUt oF ordEr along with
the error on the display.
Error Codes
Display Description Cause/Corrective Action
Ei01
Transmission Fail-
ure
Communication failure. Re-aim external device and try again.
Ei02
Time-out Error Communication failure. Re-aim external device and try again.
Ei03
Invalid Command
Code
Communication successful, but the command was not valid for this machine type, or
the control could not perform the command in its current mode of operation. Ensure
data is for current machine type and control is in correct mode.
Ei04
Expecting Upload
Request
Communication failure. Re-aim external device and try again.
Ei05
Invalid or Out-of-
Range Data
The value in at least one of the programming options is invalid or out of range. Re-
check the programming option’s value and try again.
Ei09
CRC-16 Error Communication failure. Re-aim external device and try again.
Ei0A
Framing Error Communication error. Re-aim external device and try again.
Ei0C
Time-out Excee-
ded
Communication error. Re-aim external device and try again.
Ei0E
Encryption Error Communication error. Re-aim external device and try again. If the problem persists,
check that the security code is correct.
Ei0F
Infra-red Disabled Communication failure or infra-red is disabled. Manually enable infra-red on control
or re-aim external device and try again.
ECXX
Payment System
Error
The Front-end control communicates with the Payment System in order to perform
vending transactions. If an error should occur, which, terminates communication dur-
ing a transaction, the LED Display will show ECXX for a control generated error,
where the XX represents an error code.
EC02
Time-out Error Communication failure. Try card again.
EC03
Invalid Command
Code
Communication successful, but the command was not valid for this machine type, or
the control could not perform the command in its current mode of operation. Ensure
data is for current machine type and control is in correct mode.
EC05
Invalid or Out-of-
Range Data
The value in at least one of the programming options is invalid or out of range. Re-
check the programming option’s value and try again.
Table continues...
Error Codes
©
Copyright, Alliance Laundry Systems LLC -
DO NOT COPY or TRANSMIT
82 Part No. 204370ENR1

Error Codes
Display Description Cause/Corrective Action
EC11
No Card Reader
Initialization
Communication is valid, but there is no card reader initialization. Power down, power
up and try again.
EC18
No Communica-
tion
Card reader is initialized, communication lost. Power down, power up and try again. If
error persists, replace control or card reader.
EC19
No Card Reader
Communication
Communication failure. Power down, power up and try again. If error persists, replace
control or card reader.
Right most deci-
mal point Lit
Network Commu-
nication Error
Communication problem. Wait for 1.5 minutes for error to clear. If error doesn’t clear,
power-down and power-up the machine. If error persists, replace control or network
board.
Right most deci-
mal point Lit
Water Leak Detec-
tion Error or Slow
Drain Detection
Error
Water leak test has detected a water leak during a cycle or slow drain is detected in the
drain step of a running cycle. The decimal point will remain lit after the error display
has expired. Clear the decimal point by pressing the START keypad three times within
five seconds or by cycling the power to the machine.
Right most deci-
mal point blinking
Machine ID Error Machine ID is no longer communicating with the control. Check Machine ID connec-
tion.
ALArn
Break-in Alarm
Error
Check the service door and coin vault switches.
oFF
Break-in Alarm
Shutdown Error
Check the service door and coin vault switches.
E FL
Fill Error Fill level is not reached within 30 minutes (or other programmed length of time) in
any fill step.
Coin Error
Coin Error Invalid coin pulse or inoperative coin sensor. Check coin drop area and remove ob-
structions. If error persists, tampering may have occured. Evaluate security proce-
dures.
E id
Board ID Incorrect replacement control. Replace user control or output board with the correct
part.
E dS
Brownout/Voltage
Configuration
Unexpected supply voltage. Check the harness connections between the user control
and the output board. If the user control was replaced, set dip switch #1 to the same
seting as the previous control. If reworking the machine to use a different voltage sup-
ply, the dip switch #1 setting may need to be changed. If the dip switch #1 setting is
changed, power down, power up and try again.
E nr
Drive/Output
Board Not Ready
Hardware failure. Try cycling power to machine before replacing output board.
E bS
Drive/Output
Board Shorted
Hardware failure. Try cycling power to machine before replacing output board.
En
Machine ID Errors
Table continues...
Error Codes
©
Copyright, Alliance Laundry Systems LLC -
DO NOT COPY or TRANSMIT
83 Part No. 204370ENR1

Error Codes
Display Description Cause/Corrective Action
En 31
Product Byte #1
Mis-Match
Product family does not match between the Machine ID Control and Front End Con-
trol. Replace Machine ID Control with one meant for current Front End Control plat-
form.
En 32
Product Byte #2
Mis-Match
Machine type does not match between the Machine ID Control and Front End Control
(frontload washer vs. dryer). Replace Machine ID Control and/or front end control
with one meant for current machine type.
En 33
Product Byte #3
Mis-Match
Control level does not match between the Machine ID Control and Front End Control
(A4 vs. A2). Replace Machine ID Control with a properly configured A level for the
control being attached. Use Factory Test Procedure to determine front end control’s
control level.
En 39
Corrupted Data on
Machine ID Con-
trol
Try cycling power to machine. If error continues, check for damage to Machine ID
Control and harness and/or replace Machine ID Control with a correctly configured
Machine ID Control.
En 3E
Machine control
cannot be config-
ured with the Ma-
chine ID Control
in the machine
Try cycling power to machine. If error continues, check for damage to Machine ID
Control and harness and/or replace Machine ID Control with a correctly configured
Machine ID Control.
En 3F
Cannot communi-
cate with the Ma-
chine ID Control
Try cycling power to machine. If error continues, check for damage to Machine ID
Control and harness and/or replace Machine ID Control with a correctly configured
Machine ID Control.
E Co
Drive/Output
Board Comunica-
tion Error
Communication failure. Power down, power up and try again. If error persists, check
connection between user control and output board, or try replacing the user control or
the output board.
E dr
Drain Error If the control has the drain error enabled the control will enter Machine Error Mode
when the water height is not below the empty level, after attempting to drain for the
programmable time (default 15 minutes). In the event of a drain error, the control will
turn off all outputs and turn on the Machine Error Tone for 15 seconds.
E Sd
Slow Drain Error If a slow drain is detected in the Drain step of a running cycle, the machine control
will light the right-most decimal point. The decimal point will remain illuminated af-
ter the slow drain error display has expired, to draw the attention of the owner or at-
tendant. The decimal point can be cleared by pressing the START keypad 3 times in a
period of 5 seconds, or by cycling the power to the machine.
E Ld
Water Leak Drain
Error
Error will display if there is a leak after the lid is opened at the End of Cycle for 1
minute. Clears after 1 minute or until a key is pressed. If the water level has dropped
more than an acceptable amount in a during a water leak drain check, the control will
save a water leak drain error status and will continue the machine cycle. Immediately
upon detecting the error the right-most decimal point will be lit. This lit decimal point
can be cleared by pressing the START keypad 3 times in a period of 5 seconds or by
cycling the power to the machine.
Table continues...
Error Codes
©
Copyright, Alliance Laundry Systems LLC -
DO NOT COPY or TRANSMIT
84 Part No. 204370ENR1

Error Codes
Display Description Cause/Corrective Action
E nFLo
No Water Flow Er-
ror
If the control does not reach a water level of 0.5 inches within the programmed time it
may mean the hose to the pressure sensor has a leak or no water is flowing into the
machine. The control will enter Machine Error mode. The control will turn off all out-
puts and turn on the Machine Error Tone for 15 seconds. To clear this error one of the
following must occur: the machine must be powered down, the Clear Fatal Error Keys
must be pressed, or a Clear Fatal Error Network command must be sent.
E oF
Overflow Error The machine must be powered down, the Clear Fatal Error Keys must be pressed, or a
Clear Fatal Error Network command must be sent. This error is triggered when an un-
safe high water level is detected in the machine and water is unable to drain.
E PS
Pressure Sensor
Error
If the control does not detect a valid water level sensor input for thirty (30) seconds, or
if the Max (Overflow) Fill Level in the control is set to 0 while in Run Mode, Factory
Test Mode, or Overflow Mode, the control will enter Machine Error Mode. To clear
this error one of the following must occur: the machine must be powered down, the
Clear Fatal Error Keys must be pressed, or a Clear Fatal Error Network command
must be sent.
E LF
Water Leak Fill
Error
If the water level has raised more than an acceptable amount in a during a water leak
check, the control will save a water leak error status and will continue the machine
cycle. Immediately upon detecting the error the right-most decimal point will be lit.
This lit decimal point can be cleared by pressing the START keypad 3 times in a peri-
od of 5 seconds or by cycling the power to the machine.
Display is dim Look for loose pins and damaged wires on harness from user control to drive board.
E tP
Thermal Protect
Error
This error occurs when the motor thermal protect opens. If a cycle is running, the au-
dio will sound for five seconds and the cycle will stop for two minutes. If the motor
thermal protect is closed and the lid was not opened during the duration of the error,
the cycle will resume automatically. If the lid was opened, the display will show
PUSH, StArt, E tP indicating that the START keypad must be pressed to resume
the cycle.
E d xx
Drive/Output
Board Error
A machine error tone will sound for 15 seconds. Fatal error condition detected by
drive board where xx represents an error code. Power down machine to clear. Call a
service technician if error persists.
Error Codes
©
Copyright, Alliance Laundry Systems LLC -
DO NOT COPY or TRANSMIT
85 Part No. 204370ENR1

Rapid Advance Feature
This feature allows the user to quickly advance through an active
cycle or advance into a cycle from the Ready Mode. This feature
is useful when tests must be performed immediately on a ma-
chine currently in an active cycle. In this case, the user can quick-
ly advance through the cycle to the Ready Mode. At this point,
the user can perform the required tests and then return the ma-
chine to the active cycle.
How to Enter Rapid Advance
1. Control must be in Manual Mode. Refer to How to Enter the
Manual Mode.
2. Press the DELICATES (∧) or the COLD (∨) keypad to scroll
through the programmable options until rAPid appears in the
display.
3.
Press the START (enter) keypad. The display will show PUSH
then StArt followed by the cycle time and the START (en-
ter) keypad LED will flash.
4. Press the START (enter) keypad to start cycle or, if already in
an active cycle, pressing START (enter) keypad will advance
to the next cycle step.
NOTE: Lid must be closed to start cycle.
5. Continue pressing the START (enter) keypad until the cycle is
completed.
NOTE: The Rapid Advance option must be turned
on for Rapid Advance to work.
How to Exit Rapid Advance Feature
Advance through the cycle until reaching the Ready Mode.
Rapid Advance Feature
©
Copyright, Alliance Laundry Systems LLC -
DO NOT COPY or TRANSMIT
86 Part No. 204370ENR1

Clear Vend Feature
The Clear Vend feature allows the owner to clear a control which
is in the middle of satisfying the initial vend price, and set it back
to the ready mode.
NOTE: The Clear Vend Feature does not work with Ad-
ditional Vend Mode or Additional Cycle Top-Off.
How to Clear Vend
1. Open the service door. Refer to Opening the Service Door
section.
2. While pressing and holding the MEDIUM modifier keypad
with one hand, press the NORMAL cycle keypad with the
other hand. The control will reset to the Ready Mode and
clear out the current vend that has been entered.
Clear Vend Feature
©
Copyright, Alliance Laundry Systems LLC -
DO NOT COPY or TRANSMIT
87 Part No. 204370ENR1
Power Fail Recovery
The Power Fail Recovery feature allows the cycle status to be
saved in memory in the event of a power failure.
If the power failure lasted less than 5 seconds, the cycle will re-
sume without requiring the user to press the START (enter) key-
pad to restart.
If the power failure lasted longer than 5 seconds, the Power Fail
Reset option is turned on, and the duration of the power failure is
less than or equal to the time programmed in the Power Fail Re-
set option, the START (enter) keypad will flash until it is pressed
and the cycle will restart from the point it left off.
If the power failure lasted longer than 5 seconds and the Power
Fail Reset option is turned oFF, the START (enter) keypad will
flash one second on and one second off until it is pressed. The cy-
cle will restart from the point it left off when START (enter) is
pressed.
If the power failure lasted longer than 5 seconds, lasted longer
than the time programmed in the Power Fail Reset option, and the
Power Fail Reset option is turned on, the control will reset the
cycle and lose all vending entered for the cycle.
Power Fail Recovery
©
Copyright, Alliance Laundry Systems LLC -
DO NOT COPY or TRANSMIT
88 Part No. 204370ENR1

Communications Mode
Infra-red Communications
The Infra-red Communications feature allows the washer control
to communicate with an external device. The washer control can
be programmed and have its data read without using the keypad.
It may also be used to start and stop various diagnostic tests.
How to Begin Communications with an External
Device
The control will go blank and the display will show -C- until the
communication is complete. If an error occurs that terminates
communication, the display will show EIXX (XX represents the
error code).
NOTE: The Infra-red Communications option must be
turned on.
Card Reader Communications - Card
Models Only
The Card Reader Communications feature allows the washer con-
trol to communicate with the card reader. The washer control can
be programmed for a limited number of options and have its data
read without using the keypad.
Network Communications
The Network Communications feature allows the washer control
to communicate with a network. The washer control can be pro-
grammed and have its data read without using the keypad.
Communications Mode
©
Copyright, Alliance Laundry Systems LLC -
DO NOT COPY or TRANSMIT
89 Part No. 204370ENR1

Default Cycle Time
Cycles can be made longer or shorter by reprogramming the fill/
agitate times. Refer to Programmable Options to change these
times. All other times are not programmable. The default cycle
programmed in at the factory is:
LIGHT, NORMAL, COLD
Description Step Number Step Type
Step Time (Minutes:Sec-
onds)
Wash 0 Fill 4:00
Agitate 10:00
1 Pause 0:10
2 Spin #1 1:00
3 Spin/Spray 0:50
4 Spin #2 2:45
Rinse 5 Pause 0:10
6 Spin 0:05
7 Spin/Spray 0:30
8 Spin 1:00
9 Spin/Spray 0:30
10 Spin 1:00
11 Pause 0:10
Final Spin 12 Final Spin NORMAL = 7:00
PERM PRESS = 6:00
DELICATE = 5:00
Total Time NORMAL = 29:10
PERM PRESS = 28:10
DELICATE = 27:10
Default Cycle Time
©
Copyright, Alliance Laundry Systems LLC -
DO NOT COPY or TRANSMIT
90 Part No. 204370ENR1
